2017 Release Notes
The following items have been enhanced, modified, expanded upon, or are now available in the lasted version of MembersFirst Tee Times.
What’s New:
- Member’s “Look and Feel” for Finding and Booking a Tee Time/Event
- Remember Groups
- Point of Sale Integration with Jonas Club Management and Club Systems Group
- Event Waitlists
- Pace of Play Tracking and Reporting
- Caddie/Cart Enhancements
- Force Specific Cart Types
- Shop Carts
- Caddie Assigning
- Additional Reporting
- Administration “Quick Keys” to Streamline the Check in Process.
- Flag in Blocks to Hide Names of People Playing in Event
- Minimum Guests Per Group
- Non-Member Facing Course
- Count Down Timer
- Starter Times, “Select all Feature”
Below please find the details and screenshots of all the changes noted above.
Members' "Look and Feel" for Finding and Booking a Tee Time/Event
Finding a Tee Time
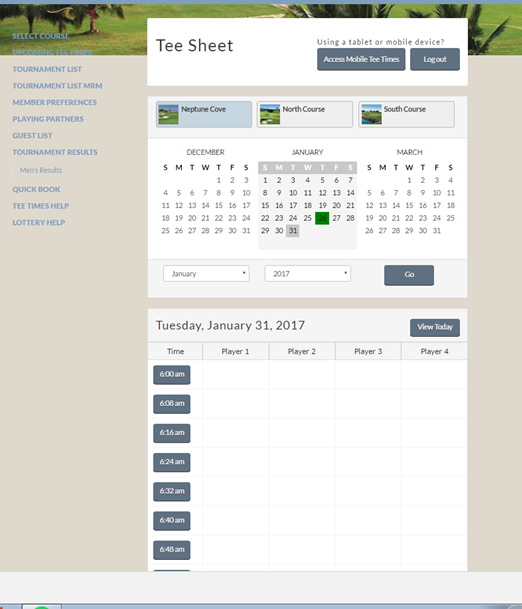
No new functionality has been added to the tee times list screen, however once your member’s log into the latest version, they will quickly appreciate the modern “look and feel” of the tee sheet. If you wish to send this link out prior to the update or start of your season, please direct your member to http://www.membersfirst.com/teetimesinstructions. Upon selection, your members will be directed to our website which will have our standard instructions for making tee time and event reservations with the new look and feel.
Booking a Tee Time
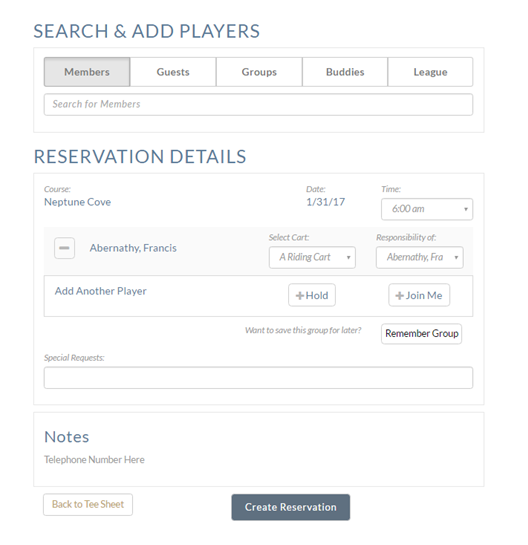
The member’s booking screen has gone through a major change in this release. This screen has been redesigned to bring the process to more of a vertical navigation. The “SEARCH & ADD PLAYERS” is where your members will be able to find their additional playing partners. The “RESERVATION DETAILS” will display the players you have selected to be part of your group. Notice we have created two quick keys, “HOLD” and “JOIN ME” to assist the members to quickly build their groups. If you are not taking advantage of these two functionalities and want to learn how they can assist you and your members’s, please contact your MembersFirst Representative.
Search & Add Players
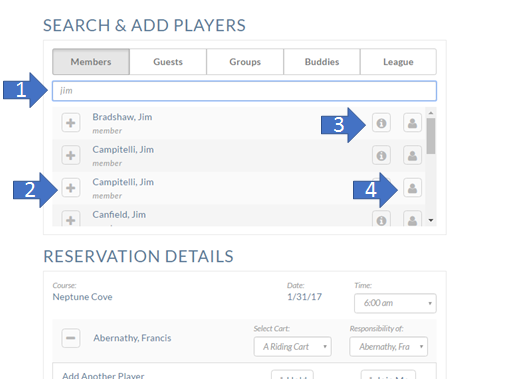
To add a player to your group, members have five different tabs to assist in making their reservation.
Above find the tab labeled “Members”. Most of the same functionality on the “Members” tab will apply to the other tabs, except the “Groups” tab which will be outlined below.
- Start typing your member/guest name (first or last will not matter).
- A list of people will appear based upon what you typed. Hit the “+” button to add them to your group.
- The “i” will bring a popup of any information your member’s have chosen to be displayed.
- If on the Member’s tab, the bust icon will add this member to your Buddies List. If on Guest it will add this guest to your Guest List.
Remember Groups
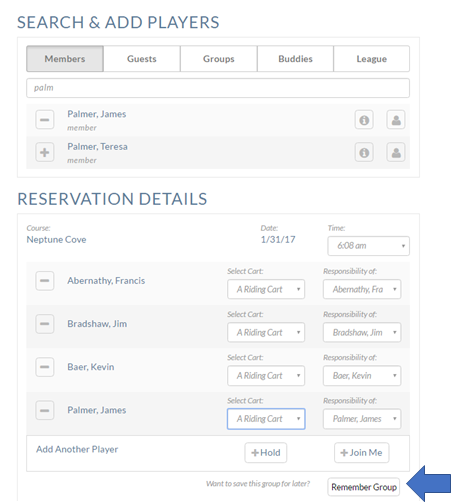
This new feature was developed to assist your members with their recurring groups. This function will allow your members to quickly setup, save and edit their regular groups. Think of it as a “Save As” functionality brought to the booking screen.
For example: Francis Abernathy plays every Saturday morning with the same three players. He now can go into the booking screen create the group once, hit “Remember Group” then give his group a name and hit save. Next time he goes into the booking screen he doesn’t need to build his reservation, he can simply go to “Group”, find the group he created and hit “+”. This will be a big time saver for your members.
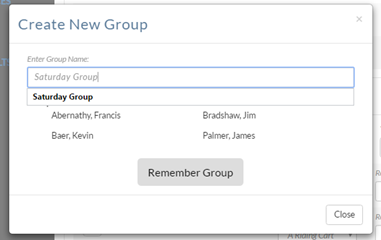
Image Displaying:
A member naming their group.
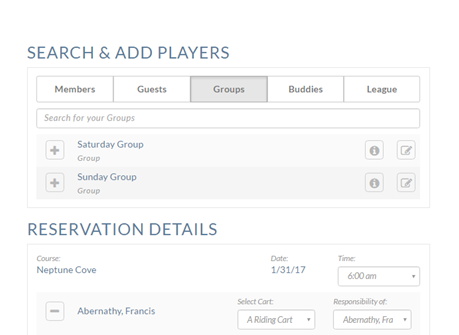
Image Displaying:
A list of Groups a member has created.
Steps for creating and adding a group:
- Create your normal reservations
- Don’t forget to assign the cart types,and, if guests are included to say who is responsible for the guest.
- Instead of selecting “Create Reservation” at the bottom of the screen select “Remember Group” at the bottom of the “RESERVATION DETAILS” section.
- You will then be brought to a popup screen, where you can name your recurring group, i.e. Saturday Group.
- Select “Remember Group” to create your group.
- You can then make this reservation.
- Next time you want to book this group, go to “Groups”
- Search or locate the group name you created
- To add to the “RESERVATION DETAILS” section simply hit the “+” next to the group’s name.
- The “i” will give you a pop up of the names in your group.
- The paper and pencil icon will allow you to edit your predefined group.
- Here you can edit/adjust the default names, change cart types, change who is responsible for the guest, add Hold, JoinMe, or delete your group.
Point of Sale Integration with Jonas Club Management and Club Systems Group
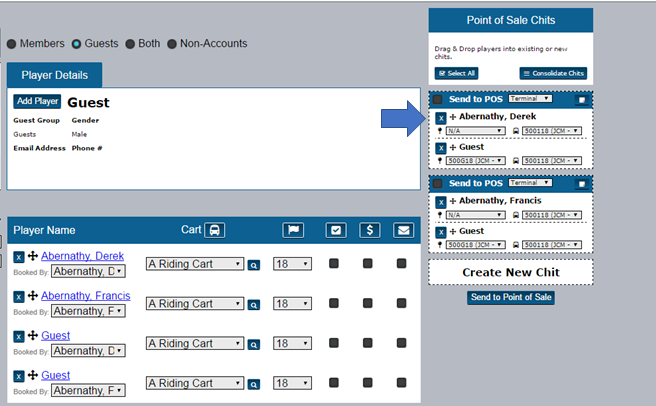
If your club utilizes either the Jonas or the CSG Point of Sale System, our Tee Times system now has the ability to push transactions directly to your point of sale for tendering. Some of the key elements of this new feature include:
- The ability to easily edit check in details, improving billing accuracy.
- Send any member transactions to the POS, using an online device, from any location on the golf course – even the first tee.
- Utilize package revenue breakdowns so you can categorize the type of revenue you receive – your club accountant will thank you later.
- Structure your billing based on member details such as guest type, days of the week, and specific times.
*This feature does not come standard with Tee Times. Please contact your MembersFirst Representative to learn more about this feature.
Event Waitlists
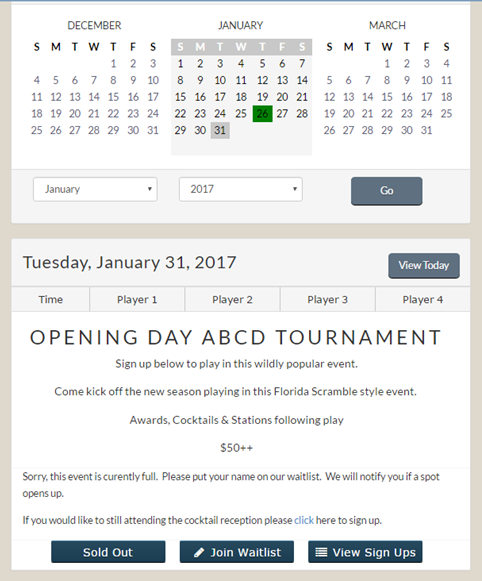
Now standard with your Tee Times system is the ability to create a waitlist if a golf event sells out. This new feature offers several different configuration options such as automatic filling cancellations, creating custom on screen messaging, plus other options mentioned below.

Setting up an Event to Accept Waitlists
- Create Block or Edit Block if already created
- Navigate to the “Event/Lottery tab.
- Fill in the “Max Players” box with the amount of people that can be in the field.
- Under “Waitlist Options”, flag if you even will accept a waitlist.
- Waitlist Open will put the event immediately in waitlist mode.
- Display the Waitlist to Members, if flagged, will let your members see who is on the waitlist and see their place in line. (BE CAREFUL)
- Waitlist Opens at, putting a date and time in this field will automatically put the event in waitlist mode at that time.
- Waitlist Closes at, putting a date and time in this field will automatically close the waitlist for this event.
- Waitlist Processing:
- Manually Move Groups from Waitlist - You the administrator will be notified that a waitlist spot has opened up via email. Your then can go to the “View Entries” screen and select the person/group that will move into the tournament.
- Automatically Move Groups from Waitlist when slots open - The system will auto fill the waitlist slot when a cancellation occurs. If there is a discrepancy with the first slot that opens, the email address listed in the next section will be notified, and the entry will need to be populated manually.
- Send notification regarding waitlist entries and status to this email address - Here you will want to put in the responsible staff’s email address so they can be notified when the event has reached capacity, for manual events it will email you when a spot opens and for automated events it will email you in a problem exists.
- Waitlist Description - allow you to put in messaging that will appear once the event has gone into waitlist mode.
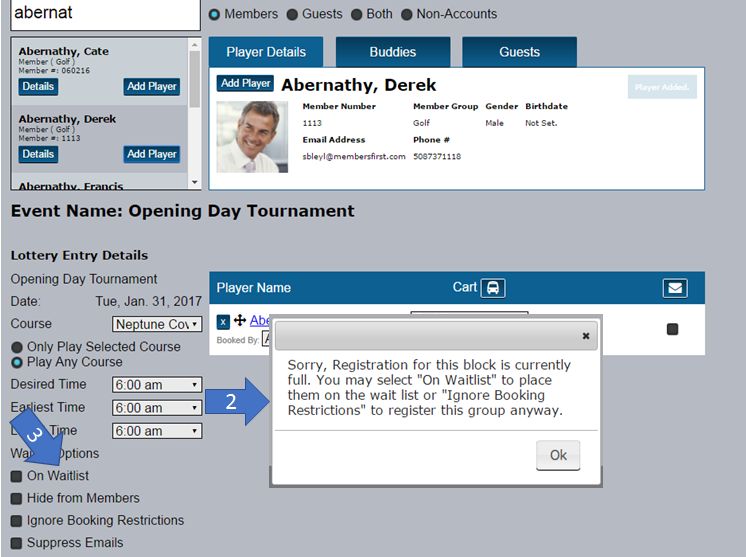
As an Admin, Putting Someone on the Waitlist
- Create entry, just like an other event.
- If the event has reached capacity the error above will show.
- You simply then flag the box labeled “On Waitlist”
- Hit Submit Reservation
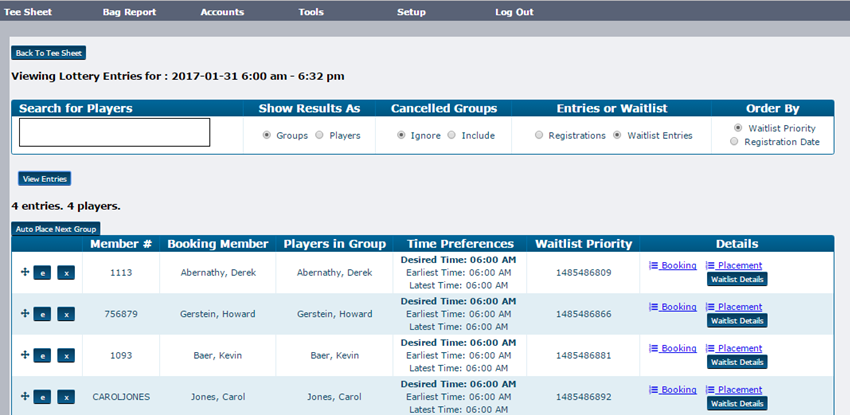
Viewing, Prioritizing & Moving off the Waitlist
To view your waitlist entries.
- Select “View Entries” on the block section of the event.
- Select “Waitlist Entries” from the header section.
- Hit “View Entries”
To prioritize the waitlist
- View the entries on your screen.
- The “cross” icon appears before each entry. This icon represents drag and drop.
- Left click on this icon and put the names/group in the order you wish for them to be populated into the event. NOTE: If you allow members to view waitlist entries, you will be changing the order they might have already seen.
Moving someone off the waitlist
- View the entries on your screen.
- Select the “e” next to the names/group
- Remove the On Waitlist flag as you should have been notified there is now room.
- If you continue to get the warning you might still not have room, if you have verified there is room simply flag the “Ignore Booking Restrictions” area.
- Hit “Submit Reservation”
Waitlist Communication
With this new functionality comes new email communication types. With the “Communication” section under tools in the ribbon you have the ability to create default waitlist communications. Just like the rest of your email confirmations, these can also be overridden by block.
The new email communications are:
- New Waitlist Entry
- Waitlist Entry Cancelled
- Waitlist Group Placed in Event.
Along with these three communications, if the admin puts their email address in the waitlist spot within the event creation, they will be notified when:
- The event goes into waitlist
- A spot opens for someone to come off the waitlist (manual mode)
- The first spot available has a conflict (automatic mode)
Pace of Play Tracking and Reporting

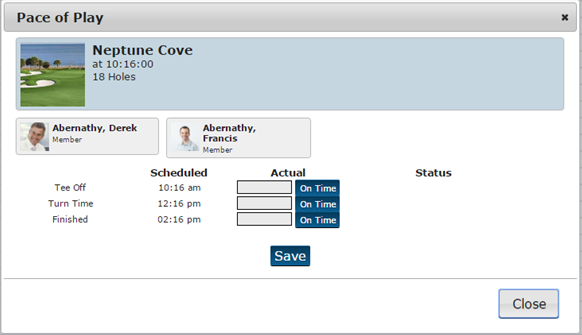
With this release your club now has the ability to track and report pace of play. On the tee time listing screen you will notice a new icon that looks similar to a clock. Here you will be able to track when the group actually tees off, when they make the turn,and when they finished. The “On Time” button are quick keys to fill in if they are on time. You can put in the exact time and the system will let you know if the group is behind or on pace.
Pace of Play Reporting
Under Tools/Stats you will find a new report called Pace of Play. Here you will be able to get some information based upon a date range, time interval, and even a specific day of the week during that span. Furthermore, you can report upon a member type, and the specific members that were holding up the course.
Caddie/Cart Enhancements
We have made a couple minor, and major changes to cart types in the system. They include:
- Forcing a specific cart type during a specific time
- Creating shop carts(carts only administrators can assign)
- Assigning caddies to a specific group
- Enhanced reporting
Forcing a Specific Cart Type During a Specific Time
You now have the ability within the members category restrictions (Admin>Accounts>Member Categories>Restrictions) to force a certain cart/transportation for specific days and times. As shown in the example below, social members are required to take a cart on Saturday mornings from 7AM to 12PM.

Creating Shop Carts(Carts only Administrators can Assign)
If you have a handful of carts that you don’t want to advertise to members, but still want to display the option on the administrative side of the tee times, you can now create a shop cart. Shop carts are cart options that are internal only and aren’t shown to members. To set up a Shop Cart go to Admin Side>Setup>Cart Setup>Create a new type and flag “Proshop Only”

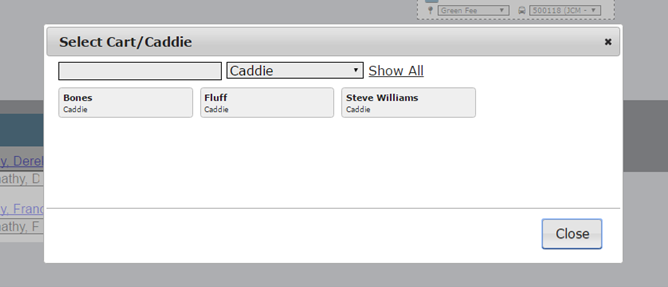
Assign Caddies to a Specific Group
With this latest version, you have the ability to create a caddie inventory and then assign them to groups.
- Go to Admin Side>Setup>Cart Setup>Next to Caddie find Inventory (if Caddie is not available you will want to create) and where the system calls for Cart #, type in the Caddies Name.
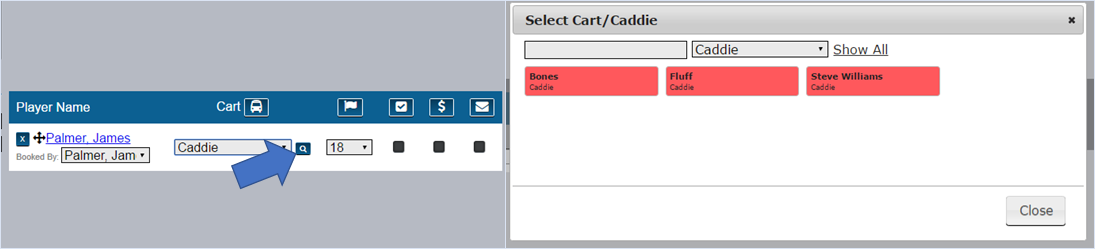
- When a member requests a caddie, you can go into the admin booking screen, and next to drop down where the transportation/cart type has been filled out for Caddie, you will find a magnifying glass.
- A listing of your caddies will appear. Notice there is a search box where you can start typing in the caddies name. On this screen you will want to select the caddie that is going out with this member.
- Caddies can be added to as many members/guests in their group. If select to loop for a group they will then appear in red for the next four hours as the system will assume they are on the course. You as the administrator, however, can add them to additional groups by simply overriding the onscreen error message.
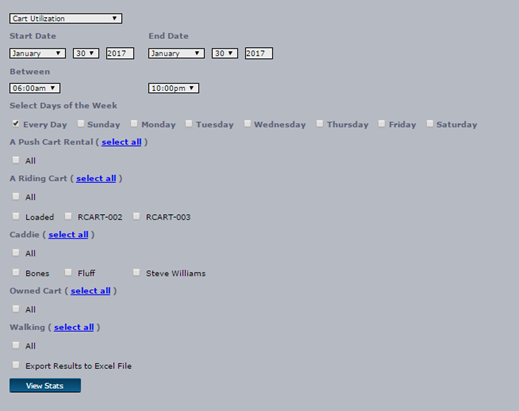
Enhanced Reporting
With the addition of more cart options comes the ability to further report upon them. Admin Side>Tools>Stats>Drop Down Monthly Overview to Cart Utilization. This will allow you to get reports on date range, time, day of the week and who/what carts were used.
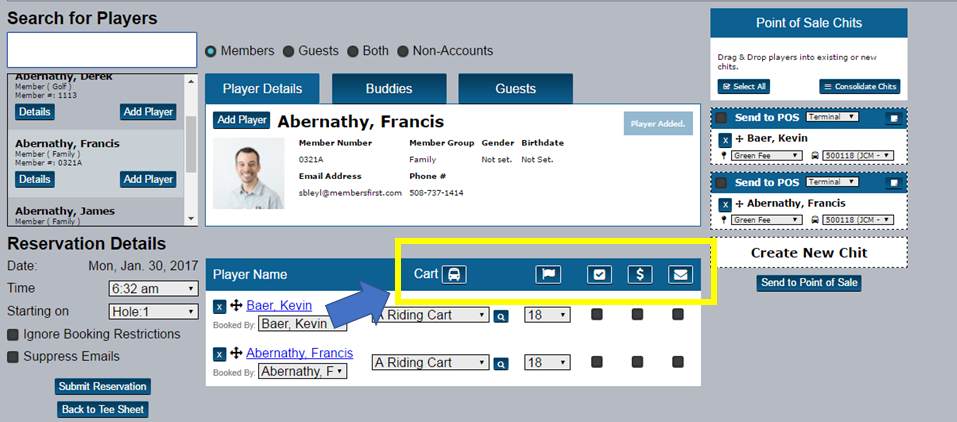
Administration “Quick Keys” to Streamline the Check in Process
In an attempt to make the checkin and adjustment process faster, we turned the icons along the top of the reservation details into hot keys. Based upon the specific icon the system will give you the options to change the type underneath in bulk. Specifically, the cart icon will bring up a listing of all cart types, where with one click, it will assign everyone in the group with that cart type. The envelope is your email confirmation. If selected, everyone in the group will be flagged to receive an email confirmation. Also note: the ability to assign 9 or 18 per members has been enhanced and brought to the individual level.
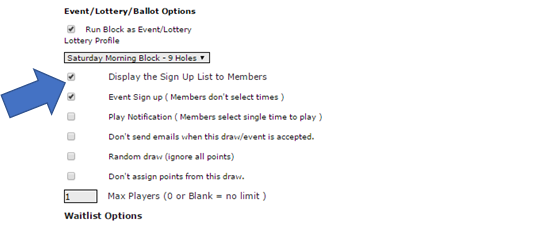
Flag in Blocks to Hide Names of People Playing in Event
From time to time, clubs may not wish to show the list of members that are playing in an event. This can now be configured with a simple flag that resides in the block creation. Go into the Create/Edit Block>Event Lottery>Event/Lottery/Ballot Options>Note the “Display the Sign Up List to Members”. This option by default it selected but by selecting this the members will not be able to see the list of people also signed up for the event.
Minimum Guests Per Group
If your club has specific tee times in which it’s mandatory to have a guest in your group, we now have a setting to accommodate this rule. The setting can be found in Accounts>Member Categories>Restrictions. Select or create the season in which this rule applies. In the season restrictions area, select the day, times and the Span Type should be “Min Guests in Member Booking”, once that is selected Span Value will become a numerical value. Then hit save to create your new rule.

Non-Member Facing Course
For those clubs that have executive courses or a course that does require tee times or displaying of events/times but still want to track member play, we have a new configuration setting for you. This setting more than likely needs to be created by your MembersFirst Representative as the configuration options is under Setup>Course Setup. Please contact us for assistance with this new setting.
Count Down Timer
If your members are confused as to how far in advance a day opens up for booking, we have a new configuration for you. PLEASE NOTE THIS IS FOR DAYS ONLY NOT EVENTS. To turn this feature on please contact your MembersFirst Representative. Once the countdown time has reached 0:00:00 the system will refresh and the booking will be open.
This is not a standard option. If you club wishes to use this feature, please contact your MembersFirst Representative.
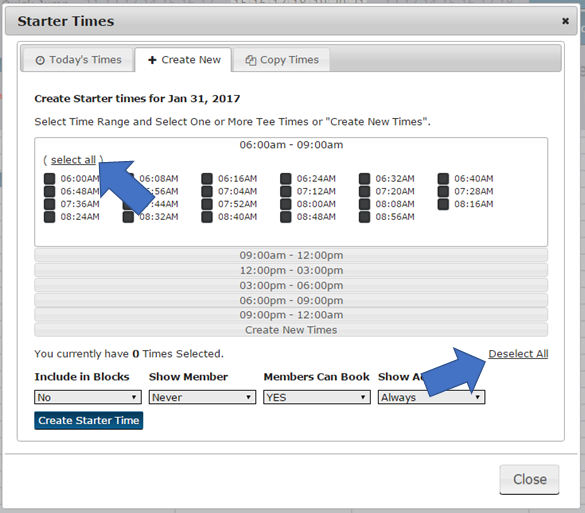
Starter Times - “Select All” Feature
Whether you are copy and pasting starter times or creating starter times, we have created two quick options to Select All or Deselect All to make the setup and administration of your starter times faster and easier. Simply click on the name of the process and the appropriate action will take place.