New Member Tee Sheet Tutorials
|
Step-by-step instruction with illustrations:
|
Mobile Video Instruction: |
Configure Your Profile
Configuring your tee sheet preferences, from setting your default cart type and privacy sharing rules to your buddy list enhances your tee sheet experience.
Updating Your Profile
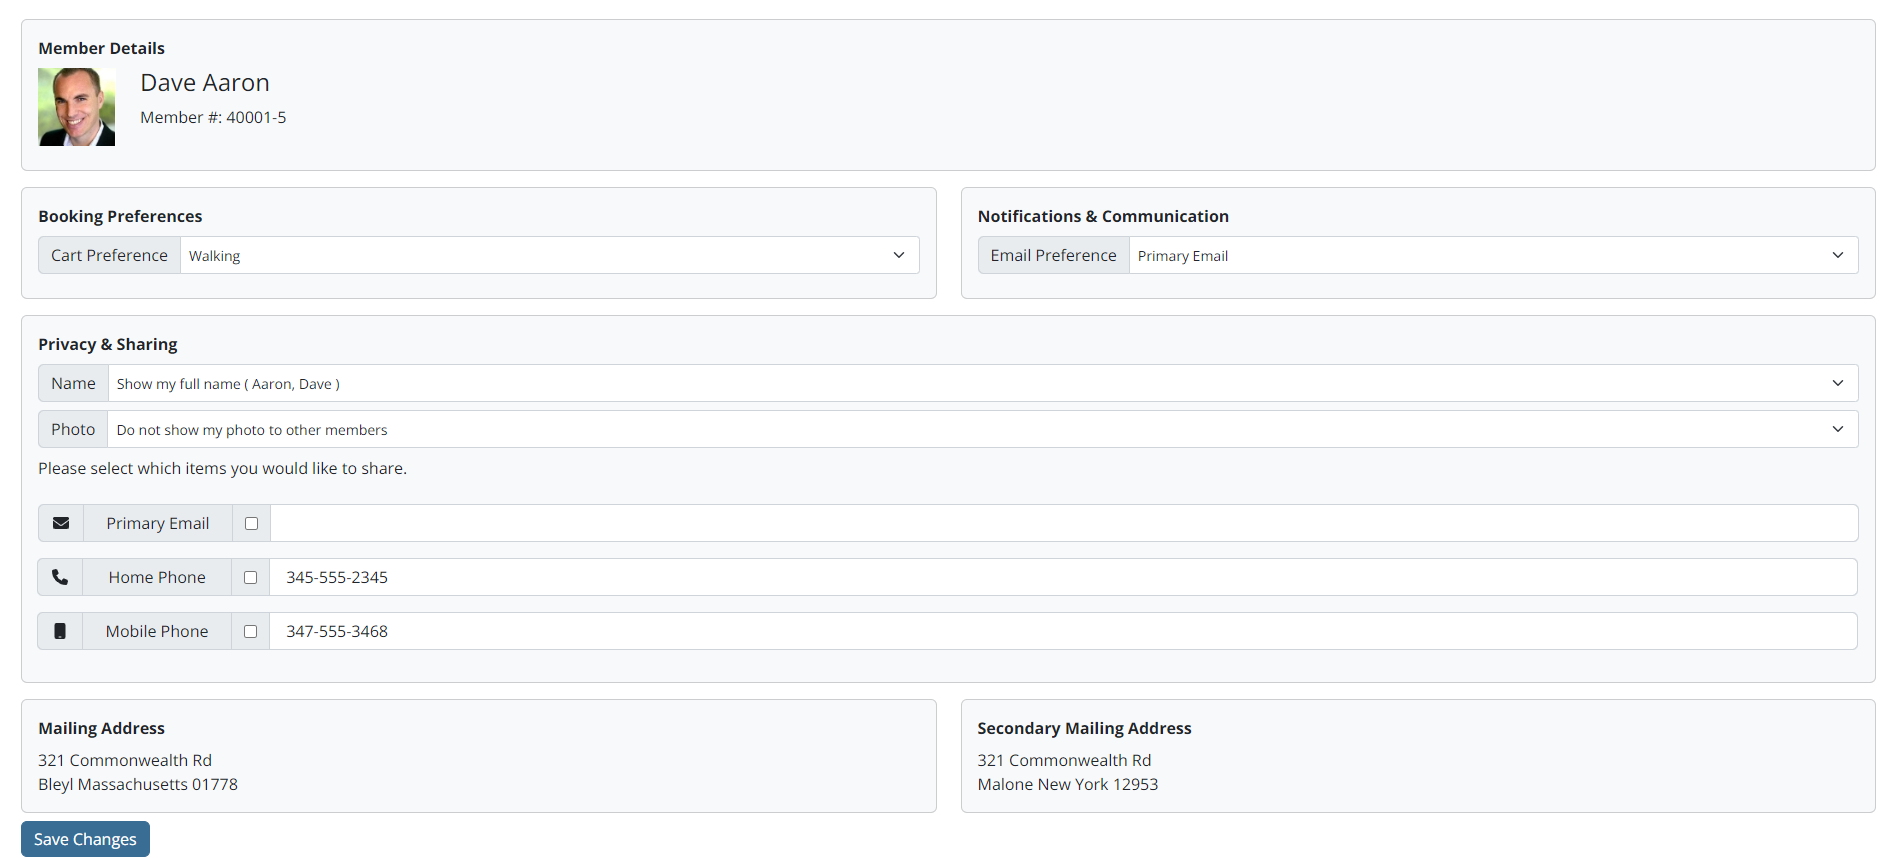
In most cases, the tee sheet uses the same profile information that is present in the club's website. We default your information to be suppressed to other members, however, you can control what (if any) information can be viewed by your fellow members.
-
To access your member details, select Member Preferences in the primary navigation.
If using a desktop, the primary navigation is listed along the top of the page.
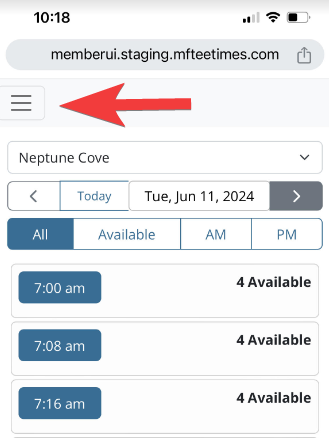
If using your mobile device, select the hamburger navigation in upper left corner to expand all navigation items.
-
Notice nothing is checked next to your information such as email, phone #, etc. If you wish to show this information to your fellow members, simply check the box next to the field you want to share with your members.
-
A great time saver is to preset your Cart Preference. Here, you can select what you would like to use as your default cart type and it will auto-populate the cart type selection field when reserving a tee time. However, it can be overridden per tee time.
-
Set your Email Preference to the email addresses on record you want your tee time confirmations sent to.
-
Once you have updated your profile preferences don't forget to hit Save Changes in the lower left corner of the page.
Buddy List/Guest List
Located in the primary navigation of the tee sheet, these two options allow you to create/manage your buddies and common guests. Establishing your buddy & guest lists are another great time saver when reserving your tee time or signing up for an event/lottery because it allows you to quickly add these players into your reservation without needing to search for them in the database.
BUDDY LIST
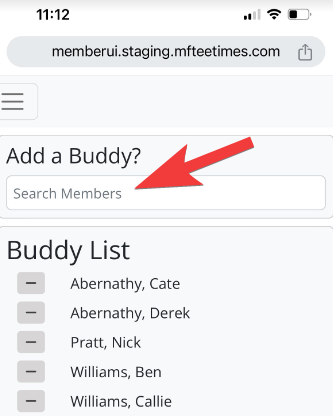
You can search the membership database and deem members to be added to your Buddy List. To add a new buddy, type the member's last name into the 'Add a Buddy' field.
In the search results, select the silhouette icon next to the member's name you wish to add to your list.
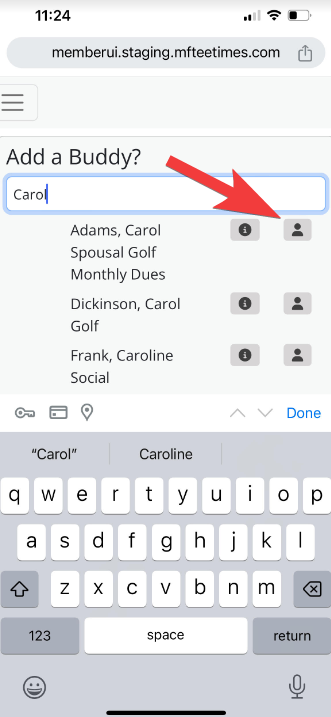
Once flagged, member names now appear in the Buddy List and will automatically display on the Members tab of the reservation booking screen for a quick and easy addition to your group.
GUEST LIST
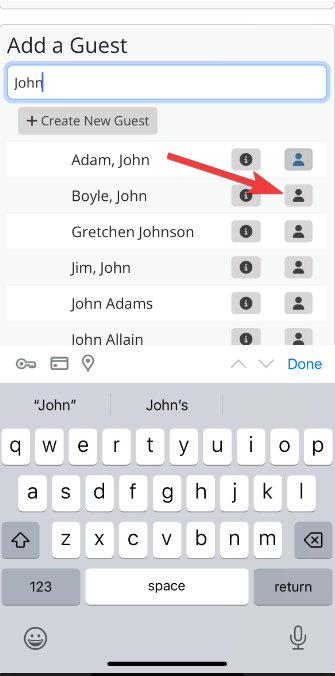
You can search the guest database and flag existing guests as quick links to your Guests tab within the booking screen. To add an existing guest profile to your Guest List, type the guest's last name into the 'Add a Guest' field. If the guest profile doesn't exist in the guest database yet, use 'Create A Guest' option to create your own guests (this option is also offered on the reservation booking screen). Depending on your club's rules, guest profiles may require certain information like email address and phone number. It is recommended to include an email address, even if it's not required by your club, so your guest also receive any tee time related confirmation emails tied to the reservation they were invited to play in.

In the search results, select the silhouette icon next to the guest's name you wish to add to your list.
Once flagged, guest names now appear in the Guest List and automatically display on the Guests tab of the reservation booking screen for a quick and easy addition to your group.
Create a Reservation (Tee Time)
The tee sheet is designed to provide a seamless booking experience across all devices (desktop/tablet/mobile). Your club may restrict the amount of days you can book in advance, however, you can still access future days and months outside your booking window to view events, blocks, and start times.
Step 1: Select a Date and Course to play
Desktop:
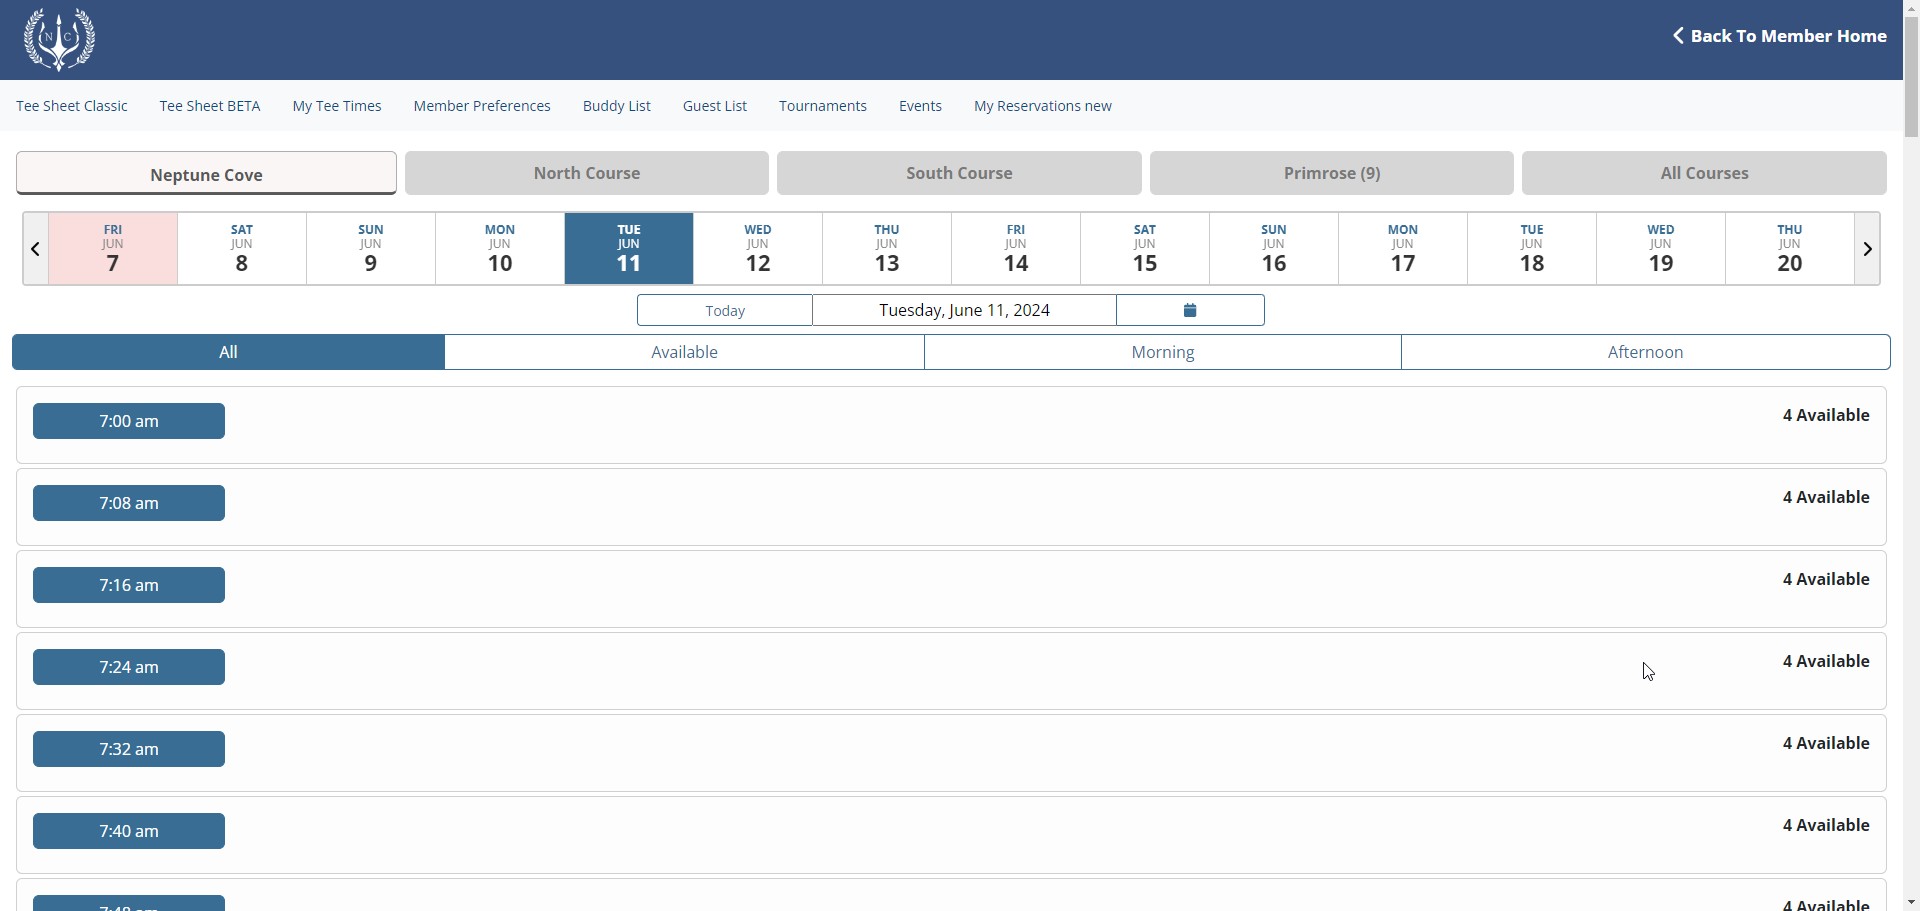
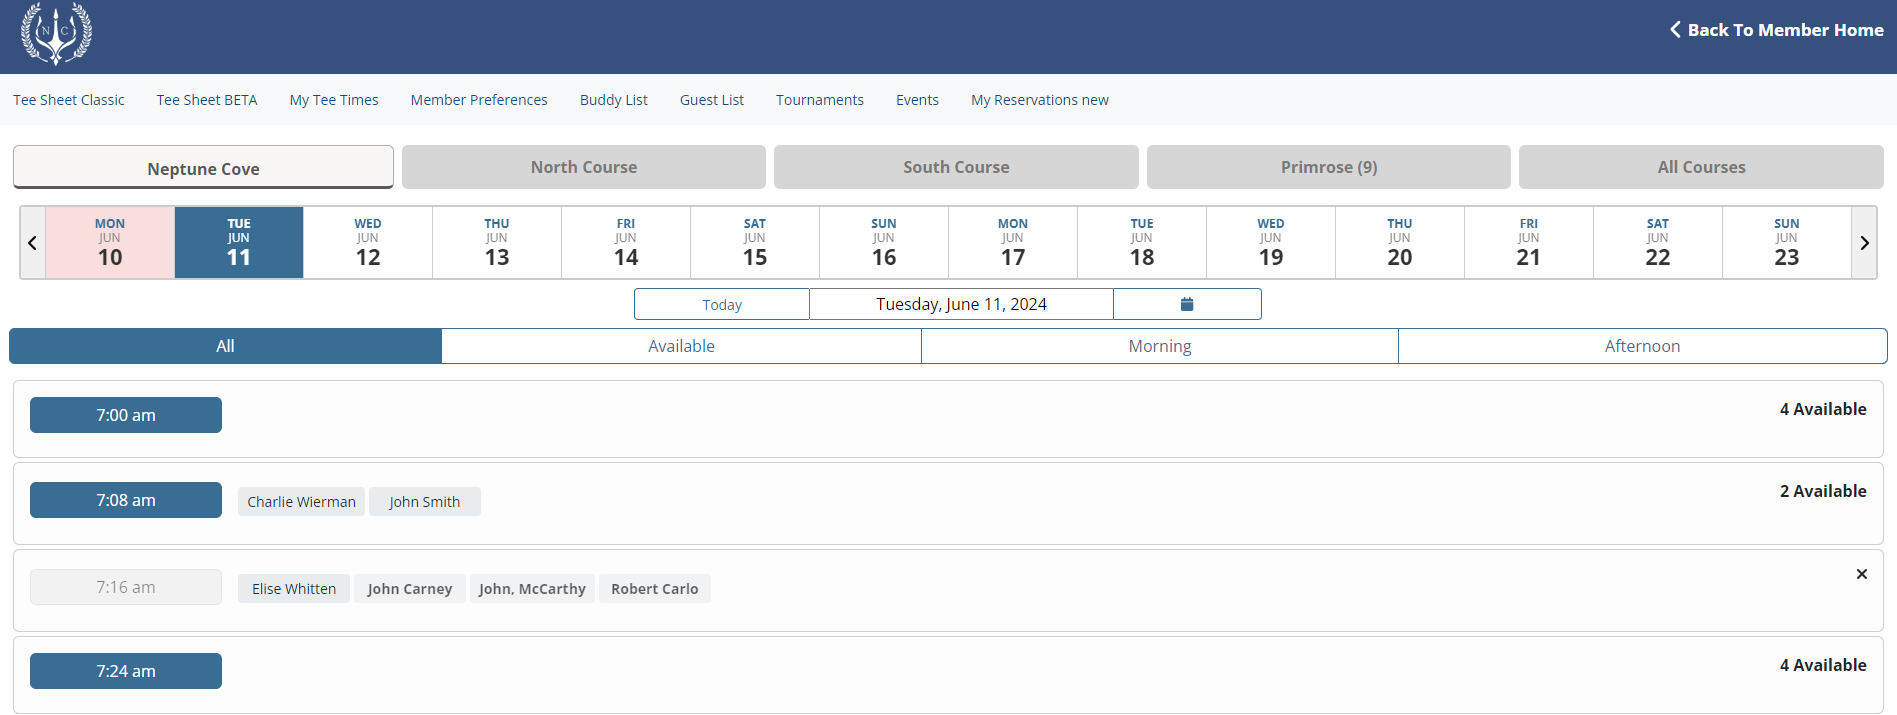
The desktop tee sheet provides a 14-day scrolling calendar and a two-month calendar picker, which can be accessed below the 14-day scrolling calendar by selecting calendar icon or the spelled out date. Both calendar options default to the current day. To navigate to a new day select the date desired on the calendar. As you select various dates, the date you are currently viewing is highlighted in blue while today's date is highlighted in pink.
If your club has multiple courses, each course will be listed above the 14-day scrolling calendar with the loaded course highlighted in a lighter shade and drop shadow. In this screenshot, Neptune Cove is the active course. To view available tee times and events on another course, select the course button you want to view. In addition to viewing tee times on individual courses, the tee sheet also provides the option to view all courses on a single tee sheet. This can be accessed by selecting the All Courses option on far right.
Mobile:
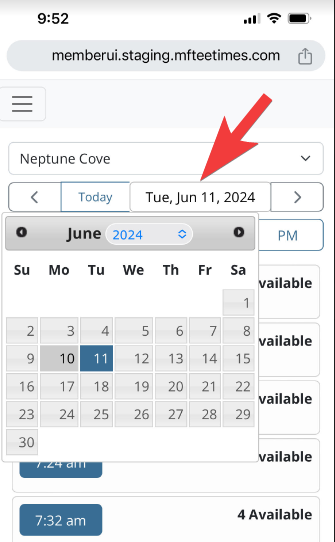
On a mobile device, the tee sheet loads the current day by default. There are two options available to navigate to different days. Tap the date to pop the monthly calendar picker -
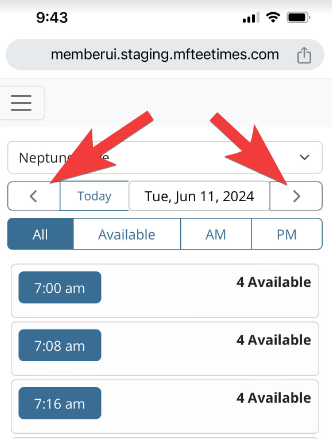
Or, use the left and right arrows on each side of the date to move backward and forward, respectively, by a single day.
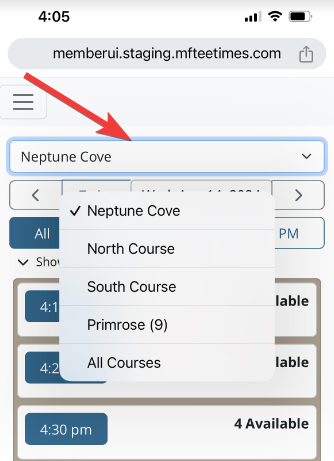
If your club has multiple courses, each course is listed above the date display in a drop down menu.
Step 2: Search and select a time to play
The time interval buttons down the left-hand side of the tee sheet indicate the times which are available for booking. On the right-hand side of the tee sheet, the Availability marker provides how many player slots are still available in that tee time. When a tee time is fully booked, the time interval displays as read-only and the availability marker displays as 'X'.
Full names of existing players in each reservation display by default, but depending on your club's privacy rules, some members may elect to hide their names. In this instance, a general term determined by your club like 'Reserved' will display in lieu of the member/guest name.
By default the tee sheet displays all tee times based on that day's course hours. You can use the filter options located underneath the 14-day calendar to narrow down your search:
All - displays every tee time from start of day to end if day for that selected day.
Available - displays any tee time for that selected day that has available player slots that can be booked.
Morning - displays all tee times from beginning of day to 11:59am. On a mobile device, Morning is referenced as AM.
Afternoon - displays all tee times from 12pm until the end of the day. On a mobile device, Afternoon is referenced as PM.

Once you find the time you would like to play that has availability in it, click on the tee time interval button to access the Reservation Detail Page.
Step 3: Build your tee time
Desktop
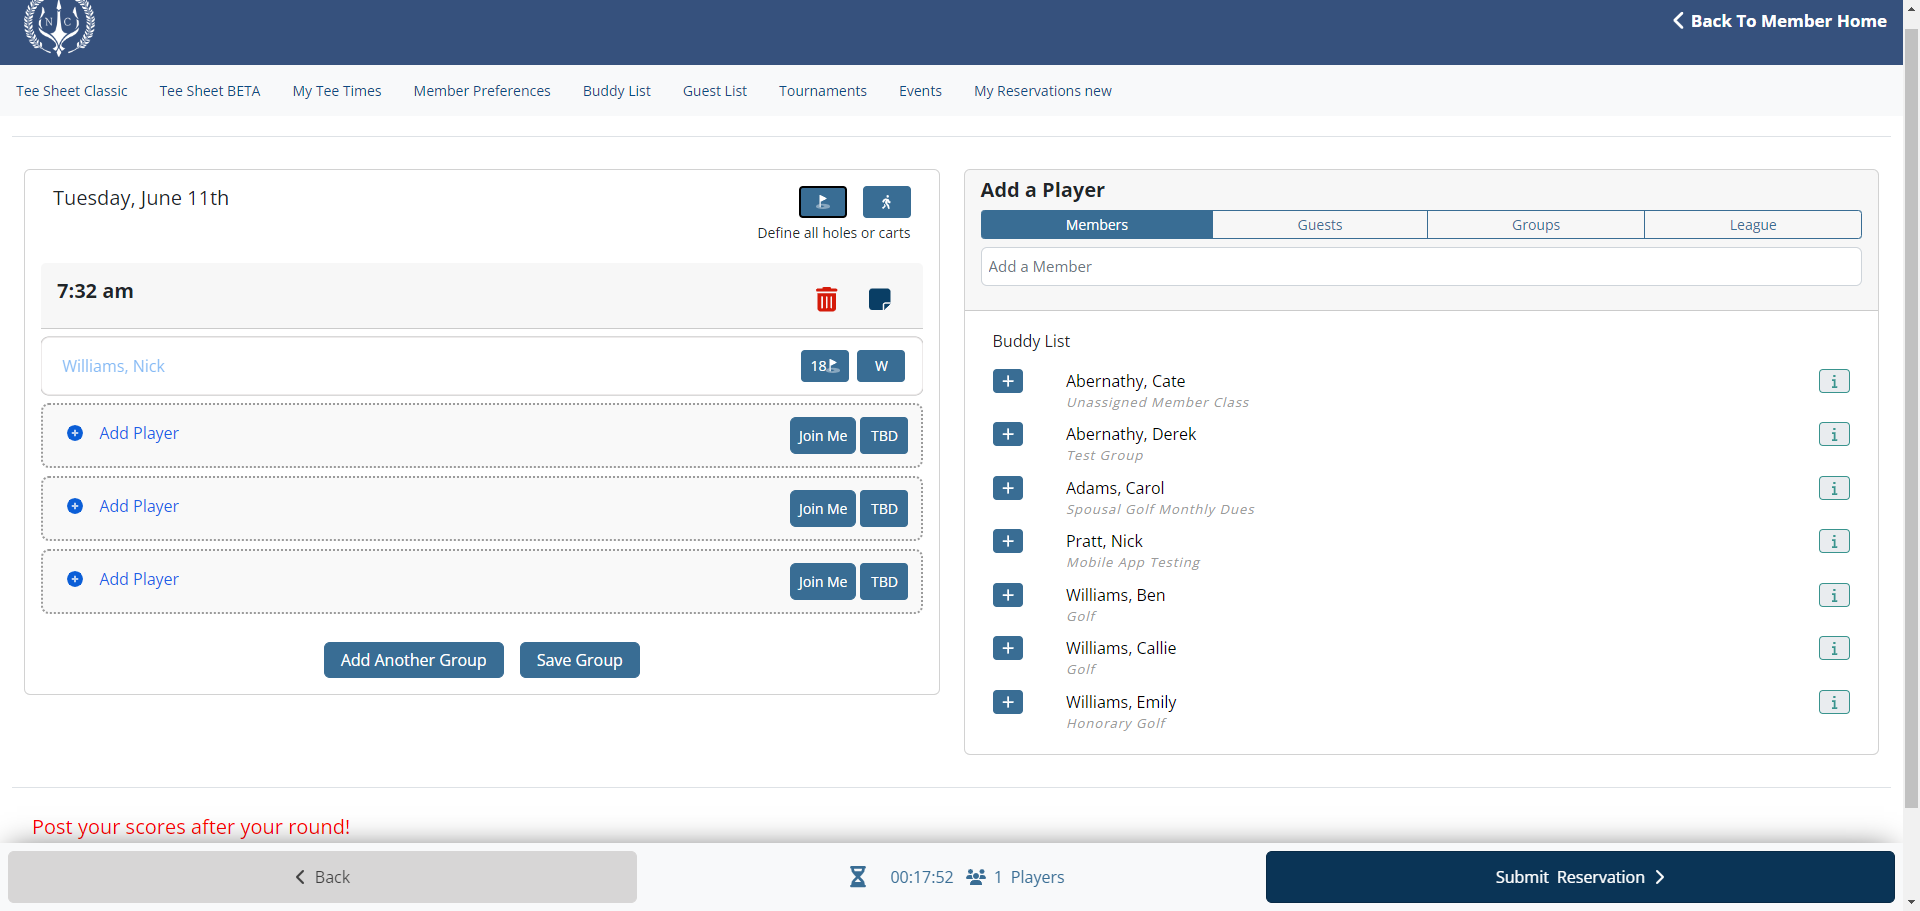
When you enter into the booking screen, your name will automatically be pulled into the first player slot in the reservation details on left-hand side of the page. If you already saved your "Cart Preference" in the Member Preference section, that information has also pulled over automatically listed to the right of you name.
a) Add Fellow Members
To add another member into your reservation, select "ADD PLAYER" in one of the empty player slots listed below your name. This will activate the 'ADD A MEMBER' field on the right-hand side of page in the Add A Player section.
-
Ensure Members tab is highlighted
-
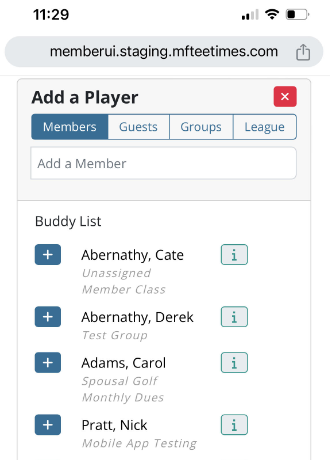
Any member you previously added to your Buddy List automatically displays without needing to search their name. To add a buddy, select the plus sign (+) next to the player name you want to add.
To search for a member not on your Buddy List, type in the member's first or last name into the Add a Member search field. The more letters you include the more accurate the search results. -
A list of members will appear as you begin typing the name. There are two buttons tied to each member in the search results.
- The plus sign (+) will add the member to the empty player slot in your reservation.
- The "i" will show you any information your fellow member has shared from their profile.
- To add additional members, continue this process.
Mobile
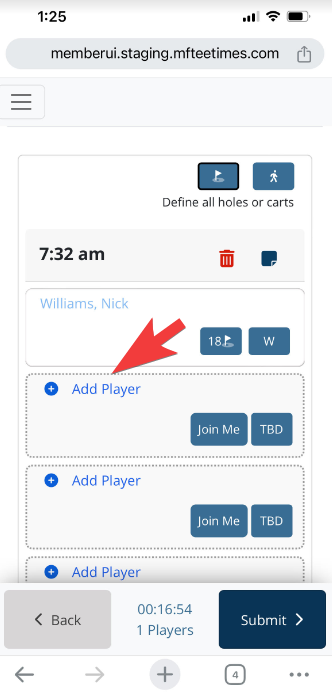
When you enter into the booking screen on a mobile device, your name will automatically be pulled into the first player slot. To add additional players to your reservation select the Add Player link in the player slots below your name to access the Add A Player interface.

-
Ensure Members tab is highlighted
-
Any member you previously added to your Buddy List automatically displays without needing to search their name. To add a buddy, select the plus sign (+) next to the player name you want to add.
To search for a member not on your Buddy List, type in the member's first or last name into the Add a Member search field. The more letters you include the more accurate the search results. -
A list of members will appear as you begin typing the name. There are two buttons tied to each member in the search results.
- The plus sign (+) will add the member to the empty player slot in your reservation.
- The "i" will show you any information your fellow member has shared from their profile.
- Select the plus sign (+) next to the member name you wish to add to your reservation. The Add A Player interface automatically closes and the reservation detail is now updated with the additional member.
- To add additional members, continue this process.
b) Add Guests
On desktop and mobile, adding guests to your reservation follows the same steps as adding a member outlined above. Select "ADD PLAYER" in one of the empty player slots listed below your name. This will activate the Add A Player interface.
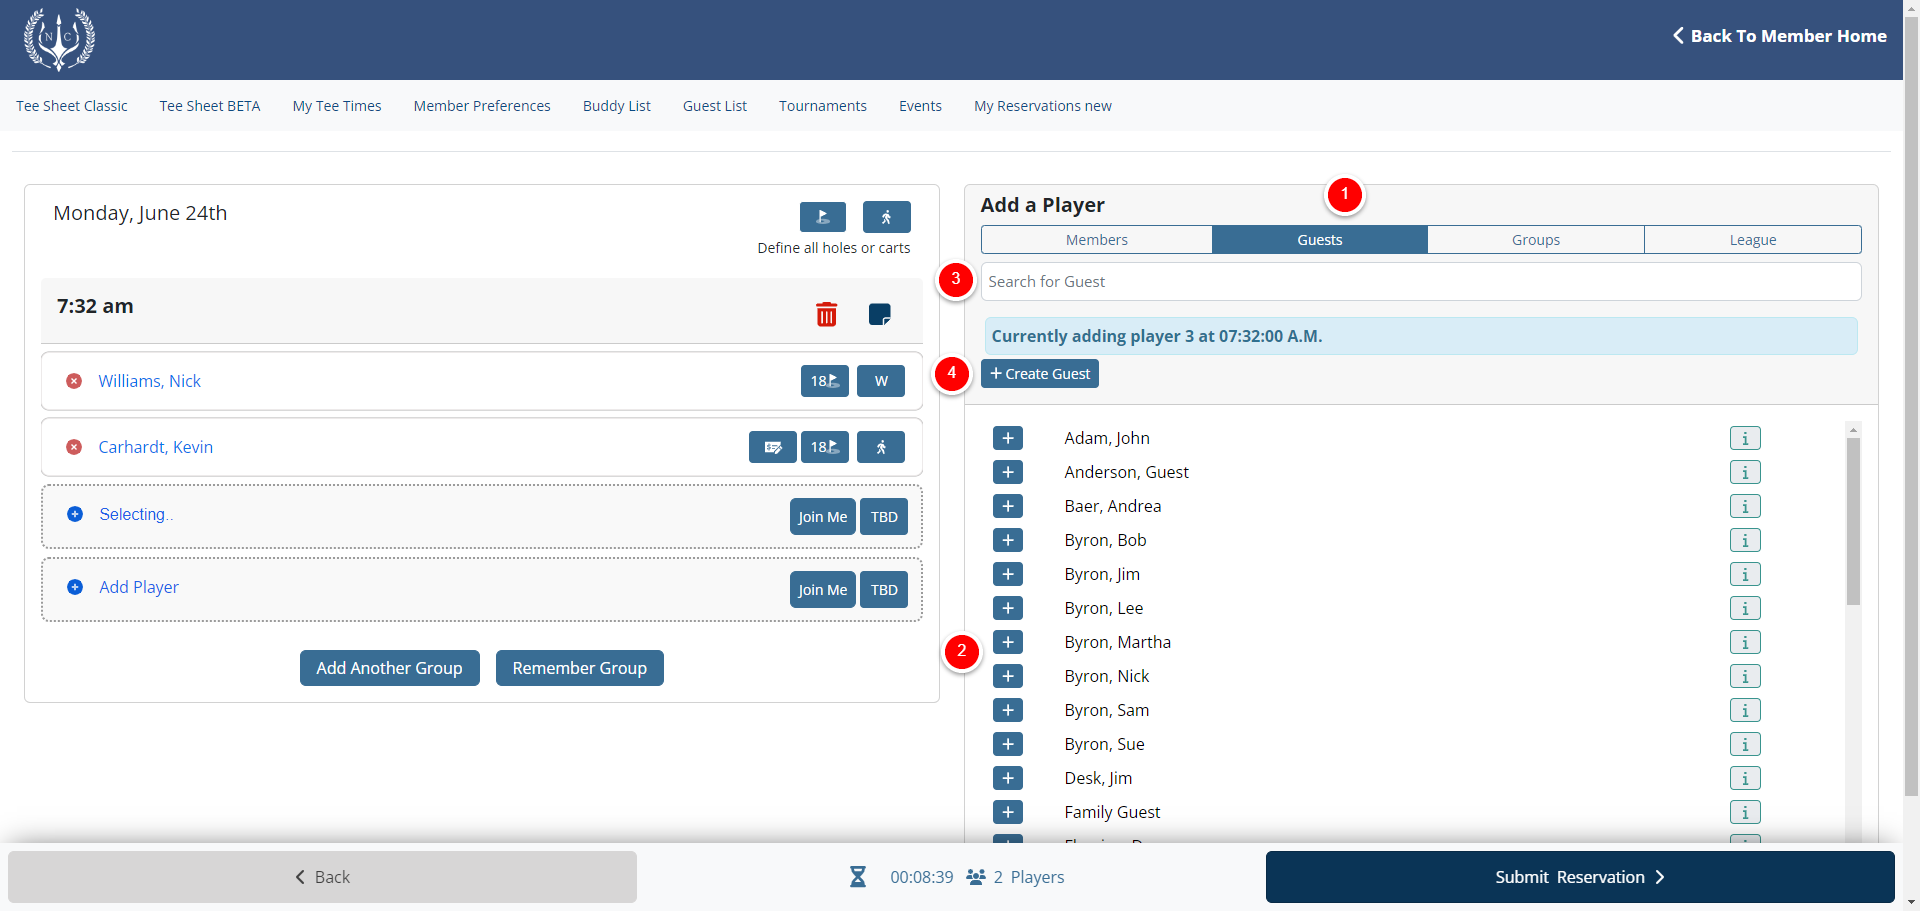
-
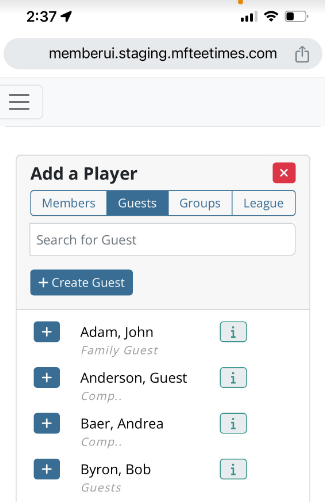
Ensure Guests tab is highlighted
-
Any previously created guest profiles will automatically display in the guest list without needing to search the guest database. Select the plus icon (+) next to the guest name to add into the reservation.
-
Our system has a universal guest database. If you have yet to create the guest profile of the guest you wish to add to your reservation, you can search to see if your guest is already in the system by typing their first or last name in the Search for Guest field.
-
If your guest is not present you can select the Create a Guest button underneath the Search for Guest field and at the top of list of existing guests.
-
Fill in the appropriate information. Some clubs may make it mandatory to fill in either the email account or the phone number. Indicating the type of guest you will be bringing is an important step in this process, as some clubs use this for billing accuracy. When the information is filled in, click Create Guest. Your guest has now been added to your Playing Group.
-
If you don't know the guest's name for one reason or another, your club may choose to create a universal TBD Guest Name for convenience. However, to properly serve you and your guests at arrival, it's always recommended to provide the guest names prior to your tee time.
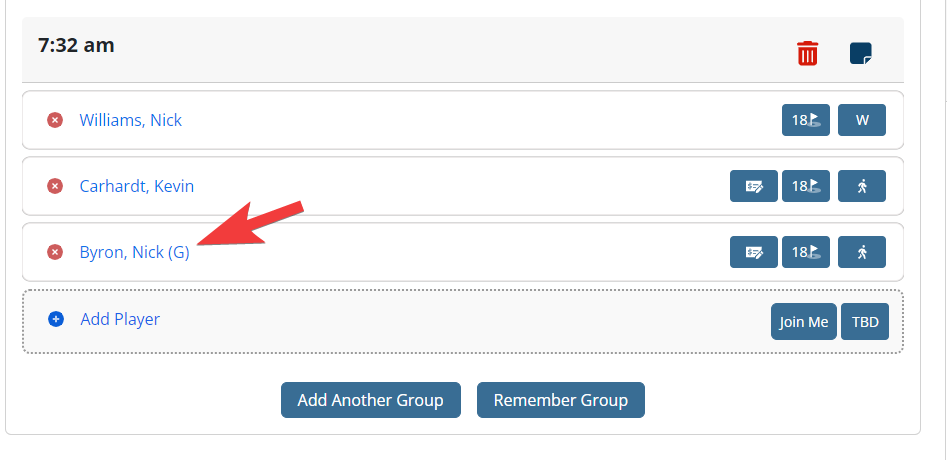
Once your guest has been added to your reservation, the guest name will be denoted with a G, which indicates that player is a guest.
c) Hold/Join Me Options
The system comes with two configurable options that clubs may or may not utilize.
Holds - Also known as TBD or X at some clubs, this option allows you to secure the spots in the group as you find other players to fill out your reservations. Clubs have the ability to release any Holds/TBDs in a reservation if a member or guest name is not filled in by a predetermined time allotment. You will want to check with the golf shop as to how long holds can stay within your reservation.
Join Me - This allows you to let the rest of the membership know they are welcome to join your group. This is a convenient way to fill your group if you are looking for players. It's also convenient if you are a single and are looking for a game. This signifies the group is actively looking for players to join in.
To add a Hold/TBD or a Join Me to your reservation select either option in the player slot you wish to place it.

d) Create Recurring Groups
If you play with the same individuals on a regular basis you have the ability to remember the group, which allows for a one-click quick-add during the booking process. Creating groups is highly recommend especially on mobile devices.
-
First create your reservation. Use the above instructions for assistance in making your group.
-
Prior to finalizing your reservation, click on the Remember Group button.
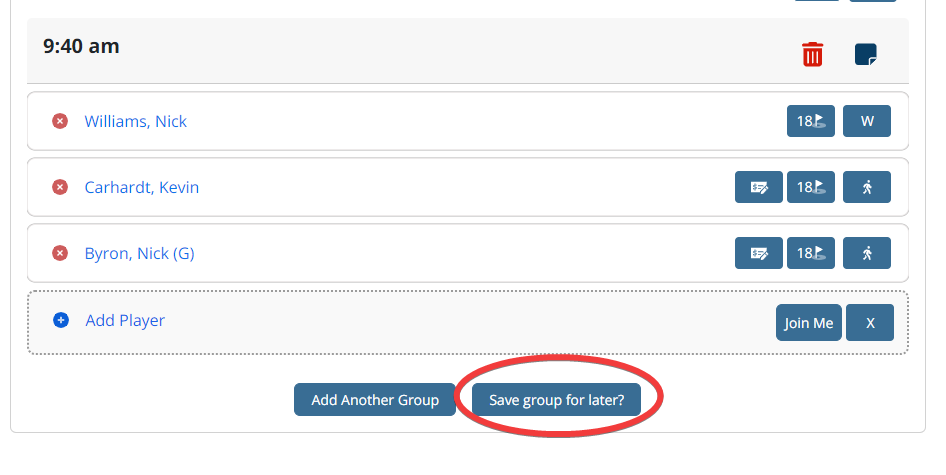
-
The system will then ask for you to name your group, which is what it will be remembered as in the system for future selection. After naming group click on Remember Group to return to the reservation details.
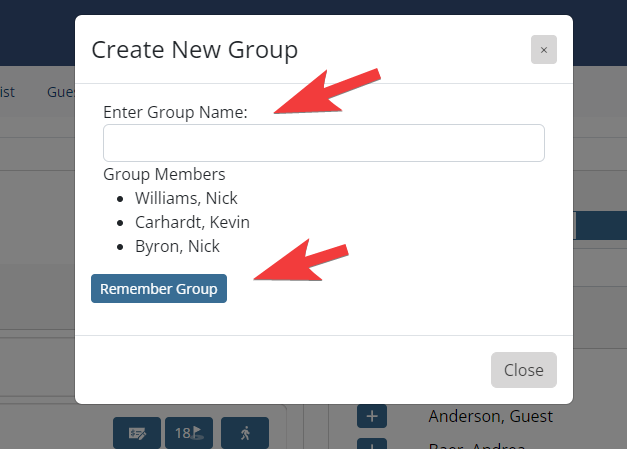
-
You can now finalize your tee time by selecting Submit Reservation
-
The next time you want to create a tee time with your newly saved group go through the normal process of finding and selecting the time you wish to play.
-
Once you get to the booking screen instead of searching for your playing partners within Members and Guests in Add A Player interface, navigate to the Groups tab.
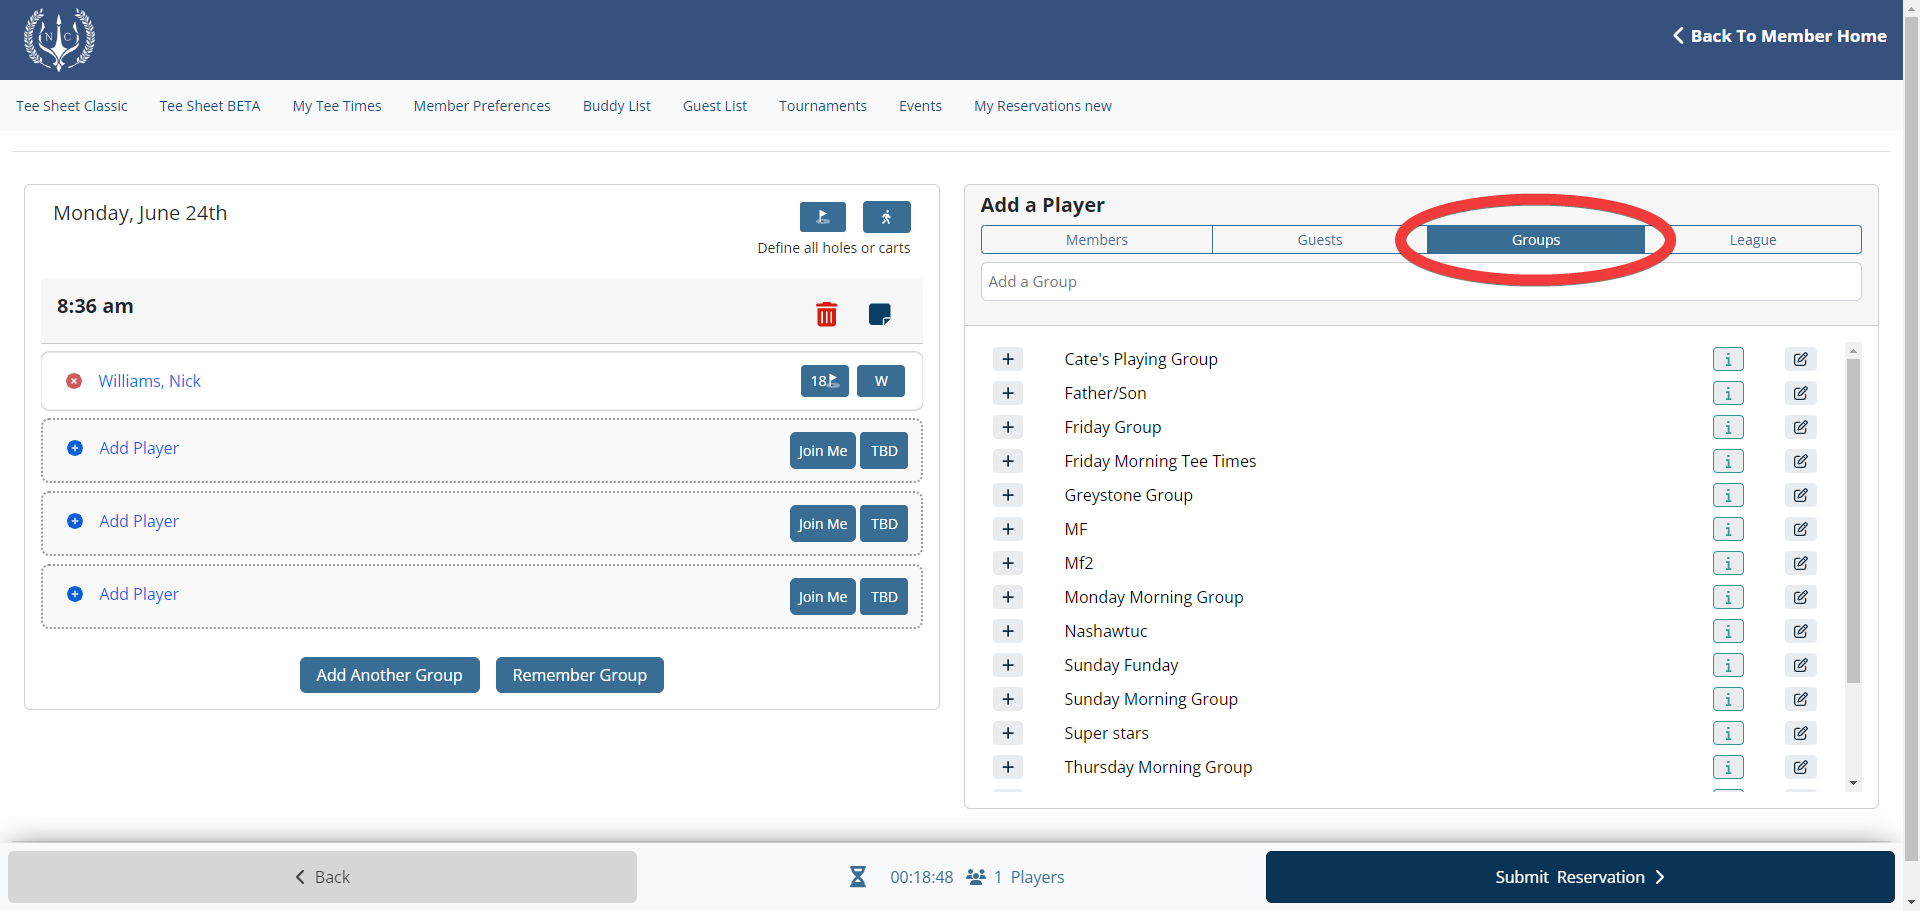
-
Here you will see a list of all the groups that you have saved. To add a group, select the plus icon (+) to the left of the group name.
-
To the right of the group name, the "i" icon will show you who is associated with that group and even allow you to place the details into your reservation.
-
The edit icon located on the far right will allow you to make any permanent changes to your group, such as removing or replacing names, setting cart types, as well as designating who is responsible for the guests.
-
Once the group has been added to the reservation, edits can be made prior to finalizing your reservation.
Finalizing Your Reservation
Prior to submitting your reservation, take a moment to set the mode of transportation, the # of holes your group will play, the billing responsibility for each individual, as well as any reservation notes you'd like included with the tee time for the golf staff to be aware of. Setting these options will help the golf shop with service and billing.
Set Cart Preference (Mode of Transportation) - Players in your reservation may or may not have a cart preference set. Cart types are denoted with the cart type abbreviation (set by your club's golf staff) to the right of the player's name. If a player's cart type displays as a person, as highlighted in this screenshot, then that player's cart type is unassigned. To set the cart type for an individual, select the the button highlighted in the screenshot to open the Mode of Transportation modal.
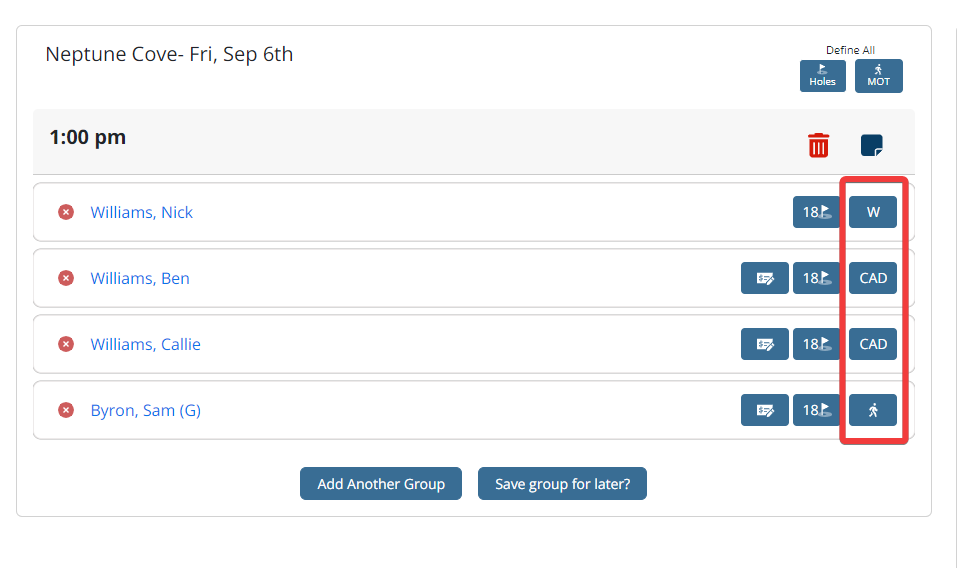
If everyone in the reservation will be taking the same cart type, use the Define All - MOT (Mode of Transportation) option at the top of the reservation details to everyone's cart type.

The Mode of Transportation modal provides all available cart types. To apply a cart type, select the appropriate one. This will close the modal and update the players accordingly.

Number of Holes Playing- All tee time reservations are set to 18 holes, by default, for an 18 hole course. If your group is only planning on playing 9 holes, select the flag icon next to the cart type button to change it to 9 holes. Like cart types, you can also use the Define All Holes at the top of the reservation details to set number of holes for everyone in the group at once.
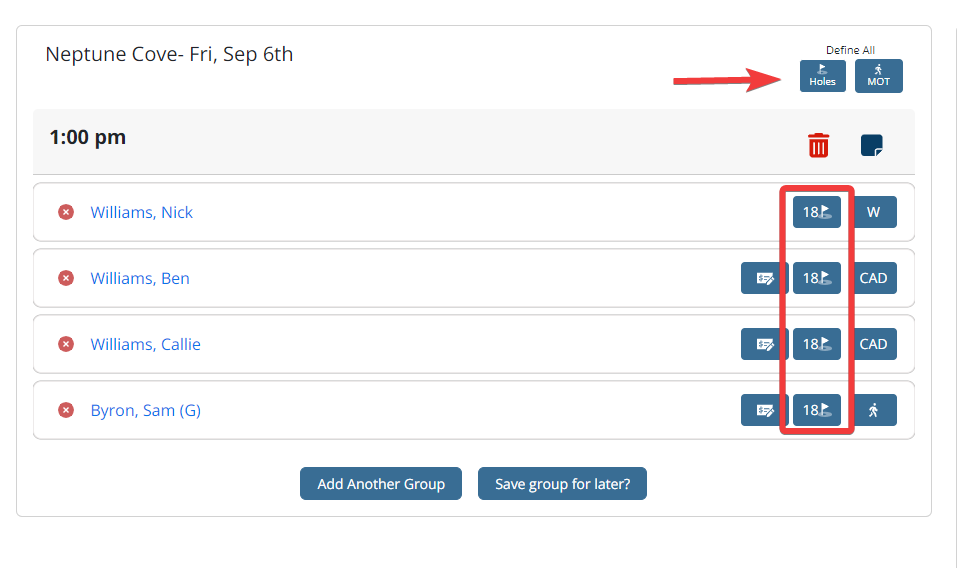
Billing Responsibility - By default, any member included in the reservation will be responsible for themselves and the booking member will be responsible for any guests. To change the responsibility of to a different player in the group, select the Responsibility Of icon represented by check and pencil.
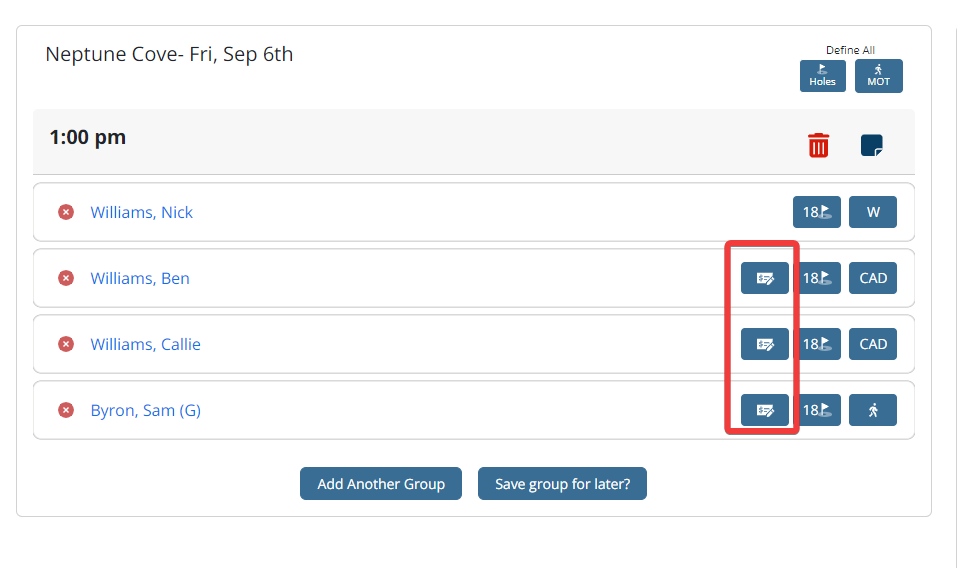
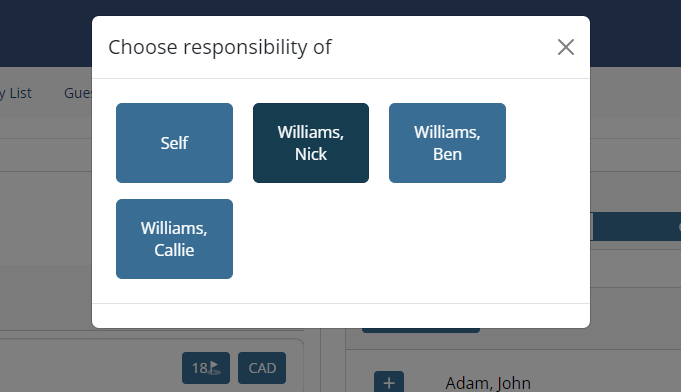
Depending on the player selected for (member or guest), you have the option to change responsibility of to another member. If a guest is planning on paying for themselves, select the Self option, as highlighted in this screenshot.
Reservation Note - Every reservation has the option to submit a tee time note. To include a note, select the Note icon that sits atop the reservation details. When a note is included in the reservation, a notification is sent to the golf staff.

Large Group Booking (4+ players) - If your club allows reservations of more than 4 players, use the Add Another Group option to load additional tee times onto the reservation detail page.
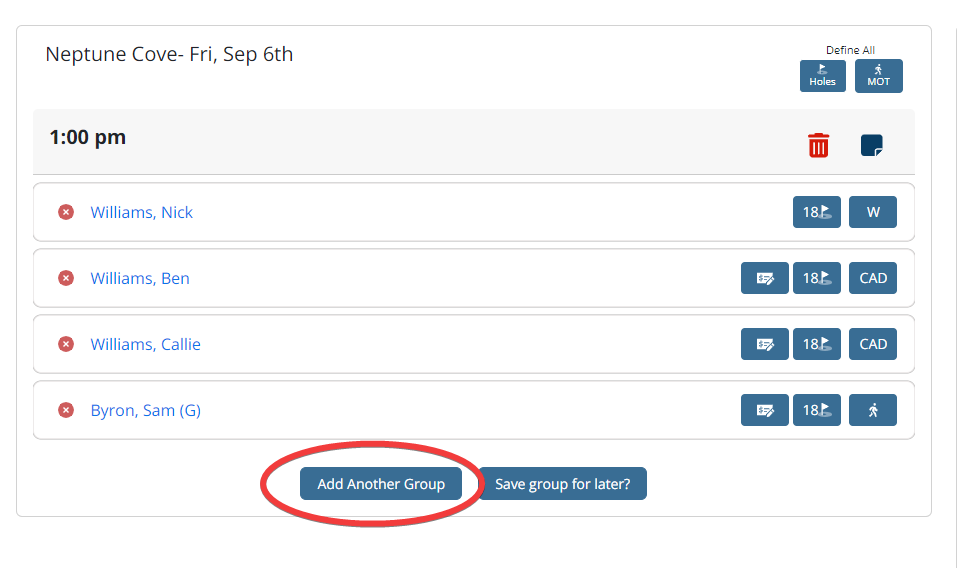
As additional groups are added, a green success message displays confirming the next tee time as locked and ready for you to add players to. Follow the same process outlined above to add members and guests. The max booking size set by your club will determine how many additional tee times can be locked.

To submit your reservation, select the Submit Reservation button in the lower right corner. Upon submission, the user will be brought back to their tee time on the tee sheet for a visual confirmation and, if an email address is in your profile, an email confirmation will be delivered immediately.
Manage Existing Reservation
The member tee sheet is designed to give you flexibility on how to manage the group. To manage an existing reservation, navigate to your tee time or entry either by using the calendar at top of tee sheet or by using the My Reservations page found in the primary navigation.
When viewing your reservation, the player names are highlighted in orange and are designed to allow for quick changes without needing to enter the reservation detail page.
Booking Member of Reservation - If you are the booking member of the group your name will be listed first. Next to the booking member's name there is a trash can icon and red "x", along with a single red "x" next to others in the group. Only the booking member is allowed to manage or cancel the reservation for the entire group. Selecting the "x" icon deletes that individual from the reservation.
Non-Booking Member - The other players (non-booking member) in the reservation can only manage themselves and any guest that they are the responsibility of. Non-booking members will only see the red "x" next to their name, allowing them to only delete themselves and associated guests.
To the right of each name displays the number of holes playing and the mode of transportation. Select either option to update the individual on the fly. Please note that your club may elect to hide these options on the member tee sheet.
To access the reservation detail page, which allows full management of reservation (number of holes, mode of transportation, responsibility of, and updating players), select the blue tee time interval button. The rules around booking member v. non-booking member still apply on the reservation detail page. The booking member can manage the entire group, while the non-booking members can only manage themselves.

Events and Lotteries
Find Your Event/Lottery
All events and lotteries live directly on the tee sheet and can be viewed or signed up for by navigating directly to the day of the event. If you are not sure of the date of the event/lottery, navigate to Events in the primary navigation of the member tee sheet. The Events page lists all general events, lotteries and tournament signups built into the tee sheet. From here, you can search and select the event you are looking for by using the filter options at the top of the page.
By default, all event and lotteries in the current month will display. If you wish to view events of a certain category, like Couples Events, for example, use the filter option called Group Type. Group Type is a list of different tournament categories that allow you filter the event list to only show the category selected. Please keep in mind this is a configurable option that clubs may or may not utilize.
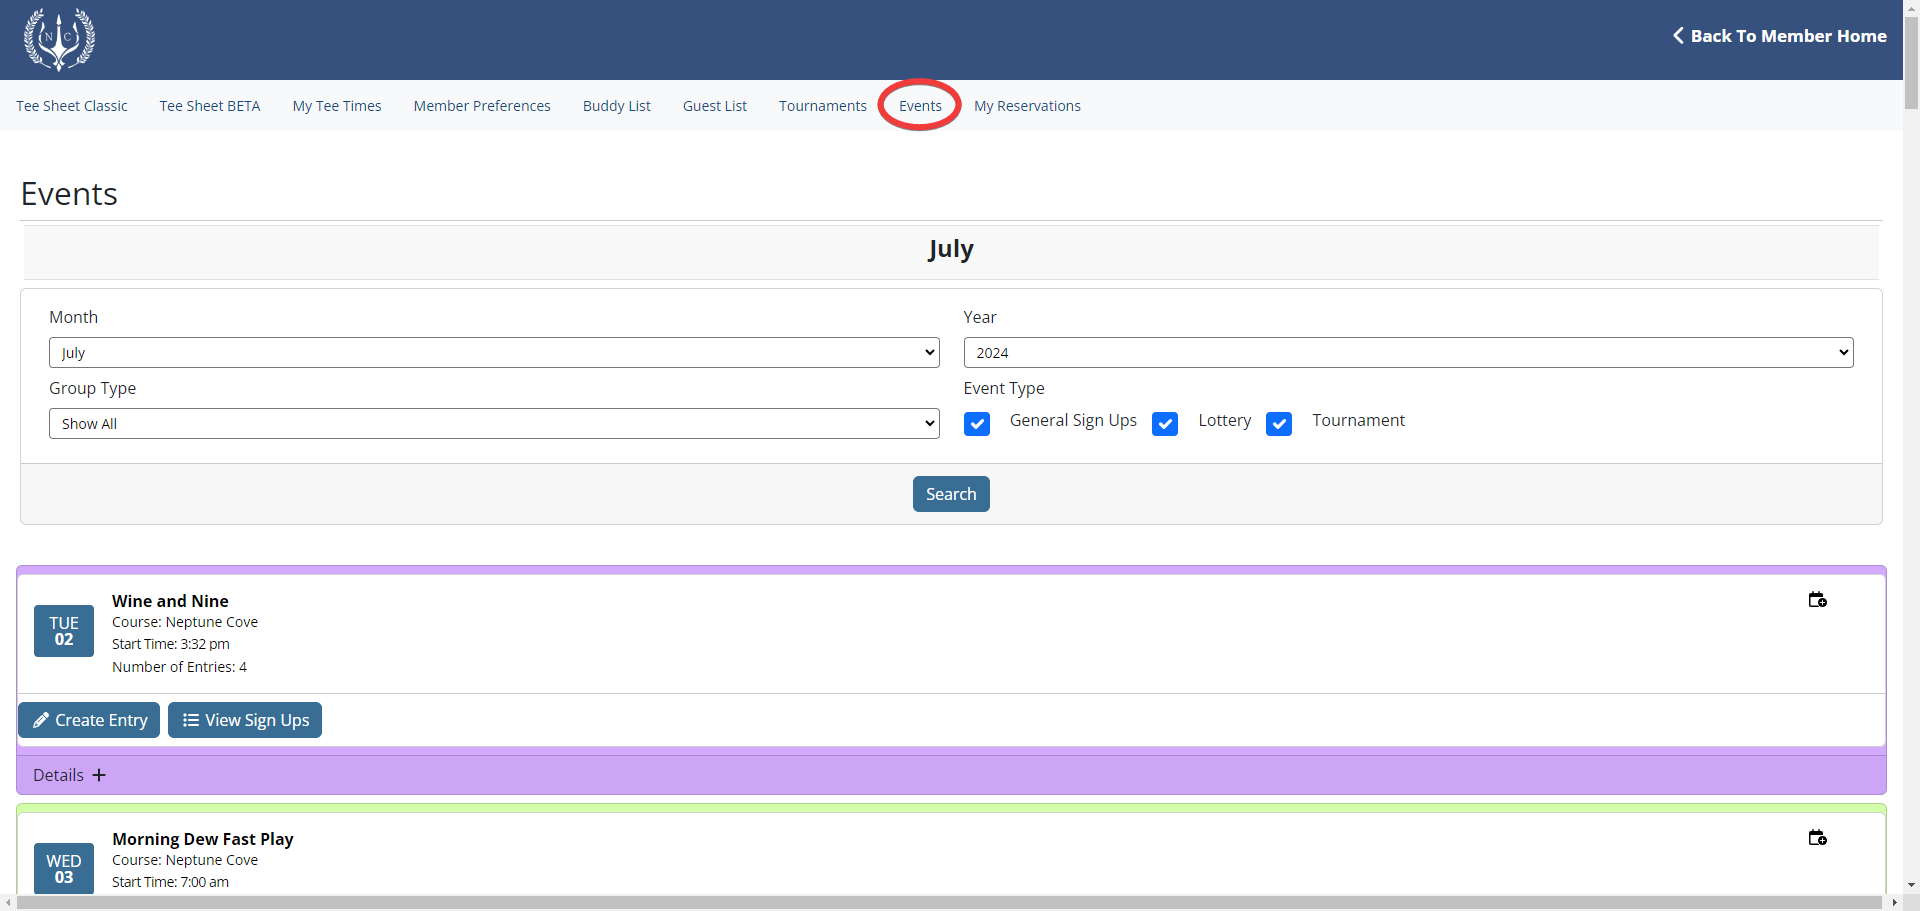
Create Entry and View Sign Ups
On each event card, the following details will always be available.
- Event Title
- Course
- Displays course name event takes place on. If multi-course event, displays all course names.
- Start Time
- If event is not open for registrations yet, the Start Time will display the date/time event opens.
- Date
- Select the date icon to navigate directly to that event on the tee sheet.
- Details
- Select the Details + to expand the event description and learn more about the event. This is a configurable option that clubs may or may not utilize.
If an event is open and accepting sign ups, you will see the Create Entry button listed below the event details. Select this to build and submit your entry. In addition, the View Sign Ups button displays the entry details of members who have already submitted an entry into the event or lottery. This is a configurable option that clubs may or may not utilize.
Max Players and Waitlist
In some events there may be a max playing field set, as well as a waitlist. In this case, the number of entries displays on the event card and there are various statuses to be aware of.
- Number of Entries
- if max player field set, keeps a running tally of existing entries v. the max. In this screenshot, the Men's League has a max of 12 players and no one has signed up yet.
- Almost Full
- if the max player filed is close to being full the number of entries will display "Almost Full" and highlight it on red. This is a configurable option that clubs may or may not utilize.
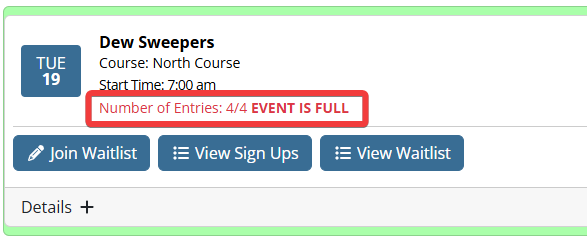
- Event Full
- if the max player field has been met, the number of entries will display "Event Is Full" and highlight it in red.
- Waitlist
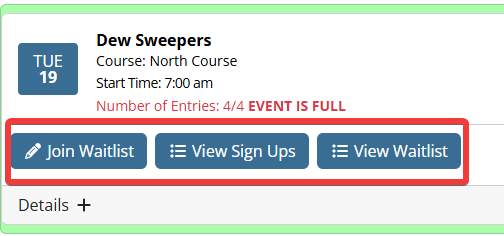
- If an event is set up with a Waitlist, it will automatically activate once the max player field has been met. In addition, the golf staff also has the ability to manually activate the waitlist even if the max players field has not been met.
- When the Waitlist is activate, the event card displays Join Waitlist button, which allows the user to add their name to the Waitlist. In addition, you may also see View Waitlist button, which display other members who have submitted waitlist entries. This is a configurable option that clubs may or may not utilize.
Managing Your Entry
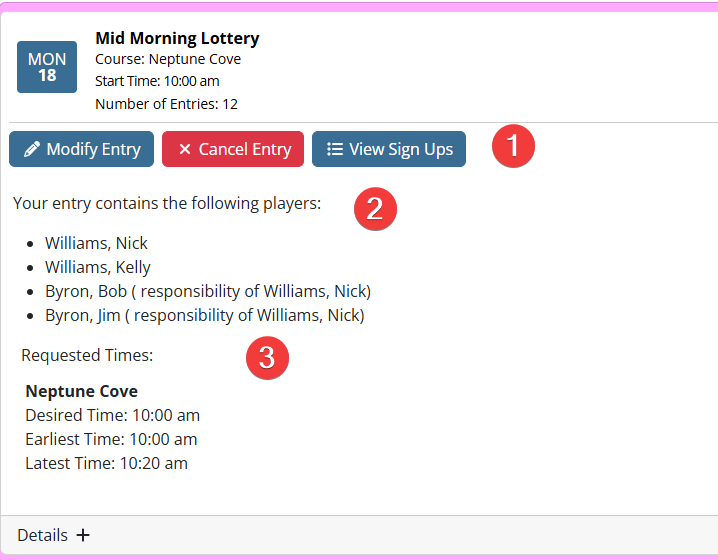
Once you have submitted your entry into an event, you can manage the entry from the event card on the Events page.
- Modify Entry and Cancel Entry
- Use Modify Entry to update your existing entry. This can include changing players, cart types, the number of holes, or adding/updating special requests.
- Use Cancel Entry to delete your entry from the event.
- Entry Details
- All players/guests names and responsibility of display for easy reference.
- Requested Times
- If the event is set up as a lottery, the requested times and courses associated with the entry display for easy reference.
Video Instruction
How To Navigate the Tee Sheet
How to Create a Tee Time Reservation
Events