MembersFirst Digital Sign
Jump to Sign:
- Digital Sign - 2019 - Sign 1
- Digital Sign - 2019 - Sign 2
- Digital Sign - 2019 - Sign 3
- Digital Sign - 2019 - Sign 4
- Digital Sign - 2019 - Sign 5
- Digital Sign - 2019 - Sign 6
- Digital Sign - 2019 - Sign 7
- Digital Sign - 2019 - Sign 8
- Digital Sign - 2019 - Sign 9
- Digital Sign - 2019 - Sign 11
- Digital Sign - 2019 - Sign 12
- Digital Sign - 2024 - Events, Weather, Flyer (Vertical)
- Digital Sign - 2024 - Conference Room (Horizontal)
- Digital Sign - 2024 - Conference Room (Vertical)
- Digital Sign - 2024 - Events & 7-Day Outlook (Horizontal)
- Digital Sign - 2024 - Events & 7-Day Outlook (Vertical)
- Digital Sign - 2024 - Scorecard (Horizontal)
- Digital Sign - 2024 - Scorecard (Vertical)
Introduction
The MembersFirst Digital Sign is a display utility allowing our clubs to showcase club events and happenings on a computer or TV monitor positioned/mounted at the club. The MembersFirst Digital Sign requires a Member Account to be logged in on the computer/monitor being used to display the Digital Sign. The application is built with an automatic page refresh to prevent the logged-in session from expiring.
Table Of Contents
In this guide we will cover the Digital Sign requirements and content usage:
- Computer/TV Monitor Requirements
- Digital Sign Layout Options
- Digital Sign Display/Configuration Options
- General Site Configuration
- Digital Sign Logo
- Digital Sign Title
- Content Usage
- Announcements
- Navigate to Club Announcements
- Create a New Announcement
- Announcements
- Calendar Events
- Navigate to Club Calendar of Events
- Adding an Existing Event to the Digital Sign Event List
- Featured Highlight (Full Page Text Flyers)
- Navigate to Inserts Maintenance
- Adding an Existing Highlight to the Digital Sign
- Highlights
- Navigate to Inserts Maintenance
- Adding an Existing Highlight to the Digital Sign
- Highlights (Menus)
- Navigate to Inserts Maintenance
- Adding an Existing Highlight to the Digital Sign
- Instagram Feed
- Pull Instagram Photos from an Account
- Photo Gallery
- Navigate to Image Albums
- Managing Images in the Digital Sign Photo Gallery
- Adding New Images
- Deleting Images
- Reordering the Existing Images
Hardware Recommendations
- TV/Monitor:
- 1080i/1080p TV (1920 x 1080 pixels) resolution Required
- 4K TV (3840 x 2160 pixels) resolution Required
- Internet Access: Hardwired or Wireless
- Cable Connection: HDMI
- Computer/Chromebox/etc. Connected to Monitor: Asus Chromebit Stick or ASUS Chromebox 3 (recommended if you have the space behind TV)
- Browser Access: Google Chrome - The Digital Sign is built and tested to display on the most up-to-date version of Google Chrome and therefore requires that the computer running the Digital Sign have Google Chrome installed and have uninterrupted access to the Internet to run properly.
Digital Sign Layout Options
Identify the design of the digital sign below that your club has chosen. Scroll below to learn how to manage the content shown within your chosen layout.
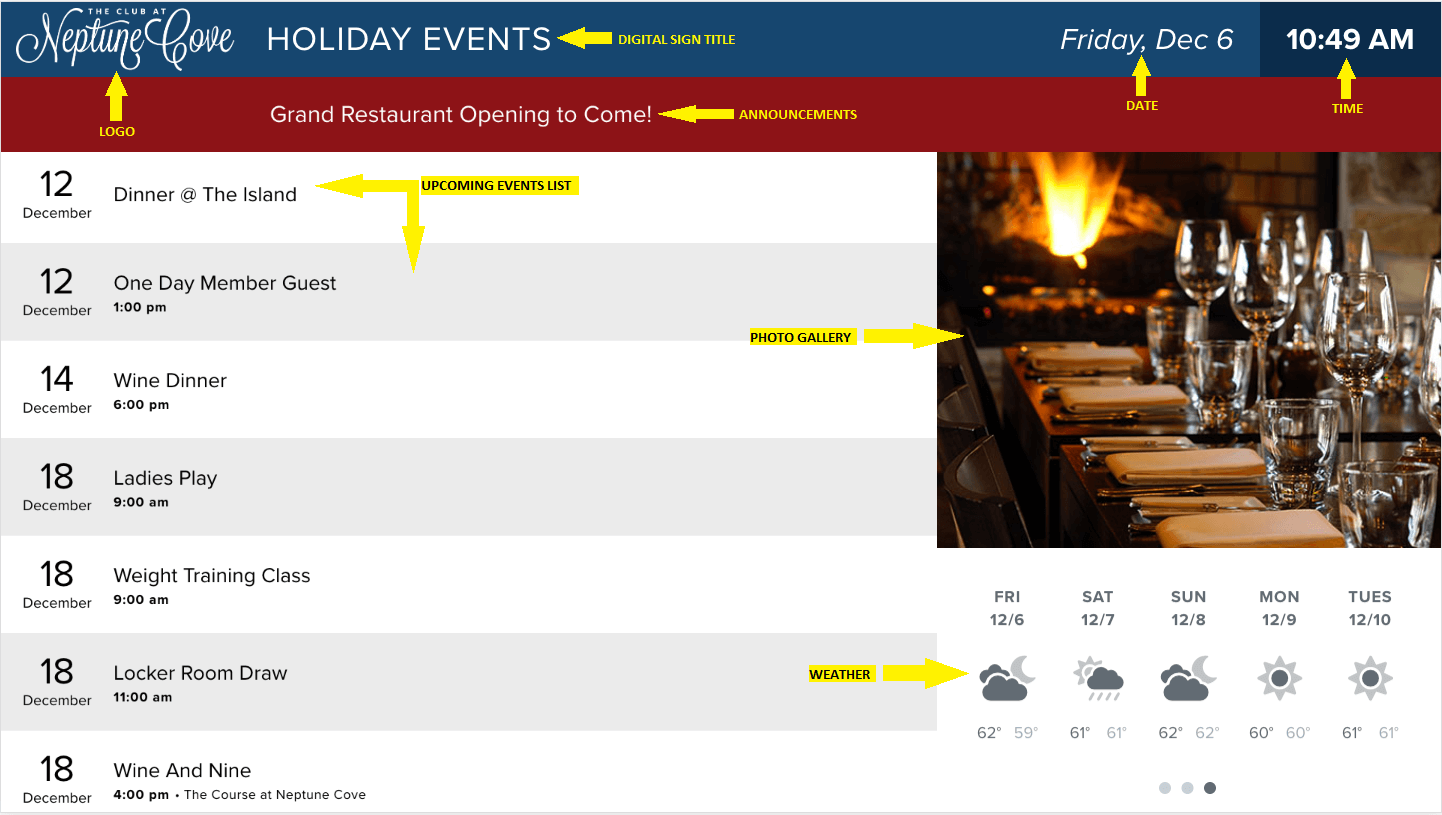
Digital Sign - 2019 - Sign 1
View Mockup in Sketch Cloud
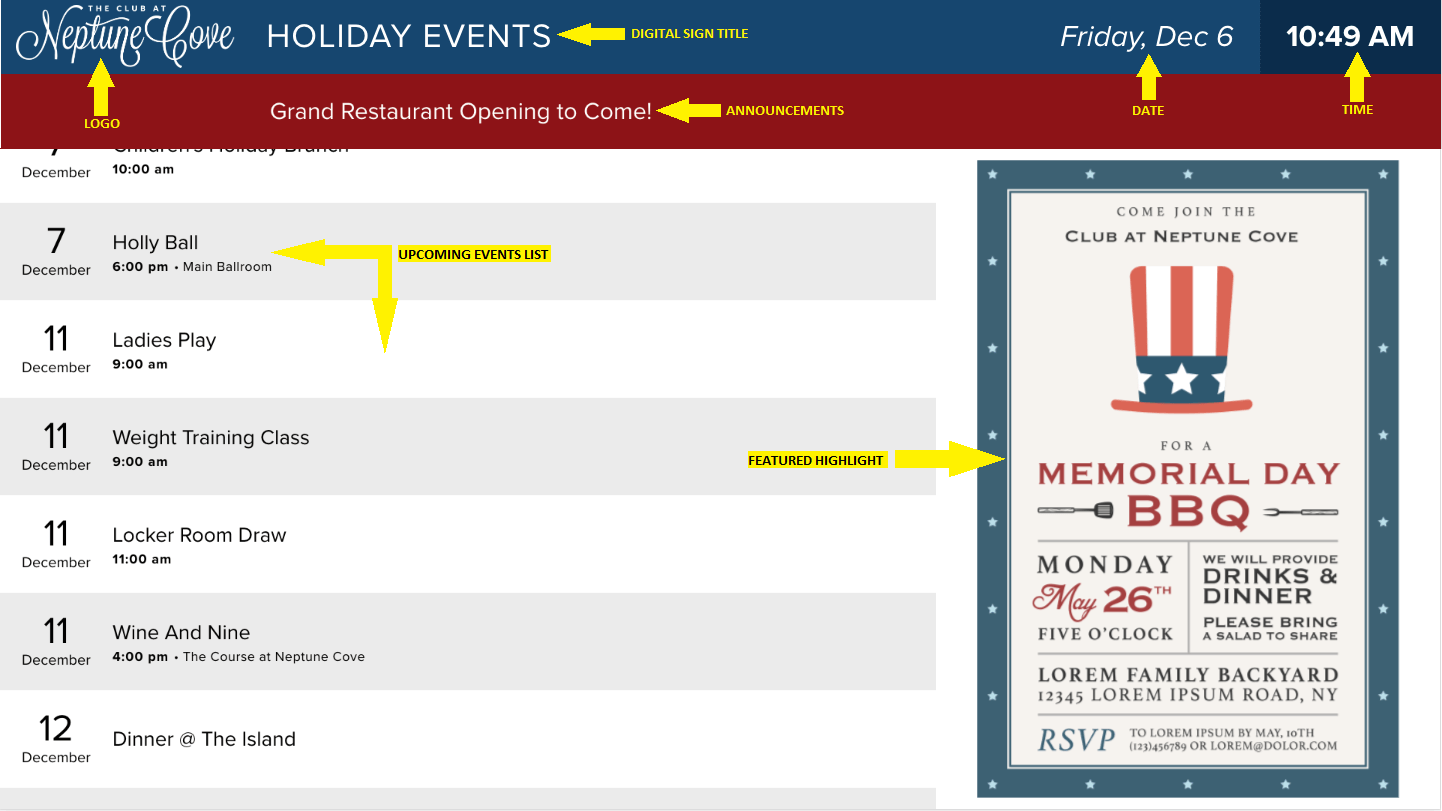
Logo, Title, Date/Time, Announcements, Upcoming Events, Photo Album, Weather
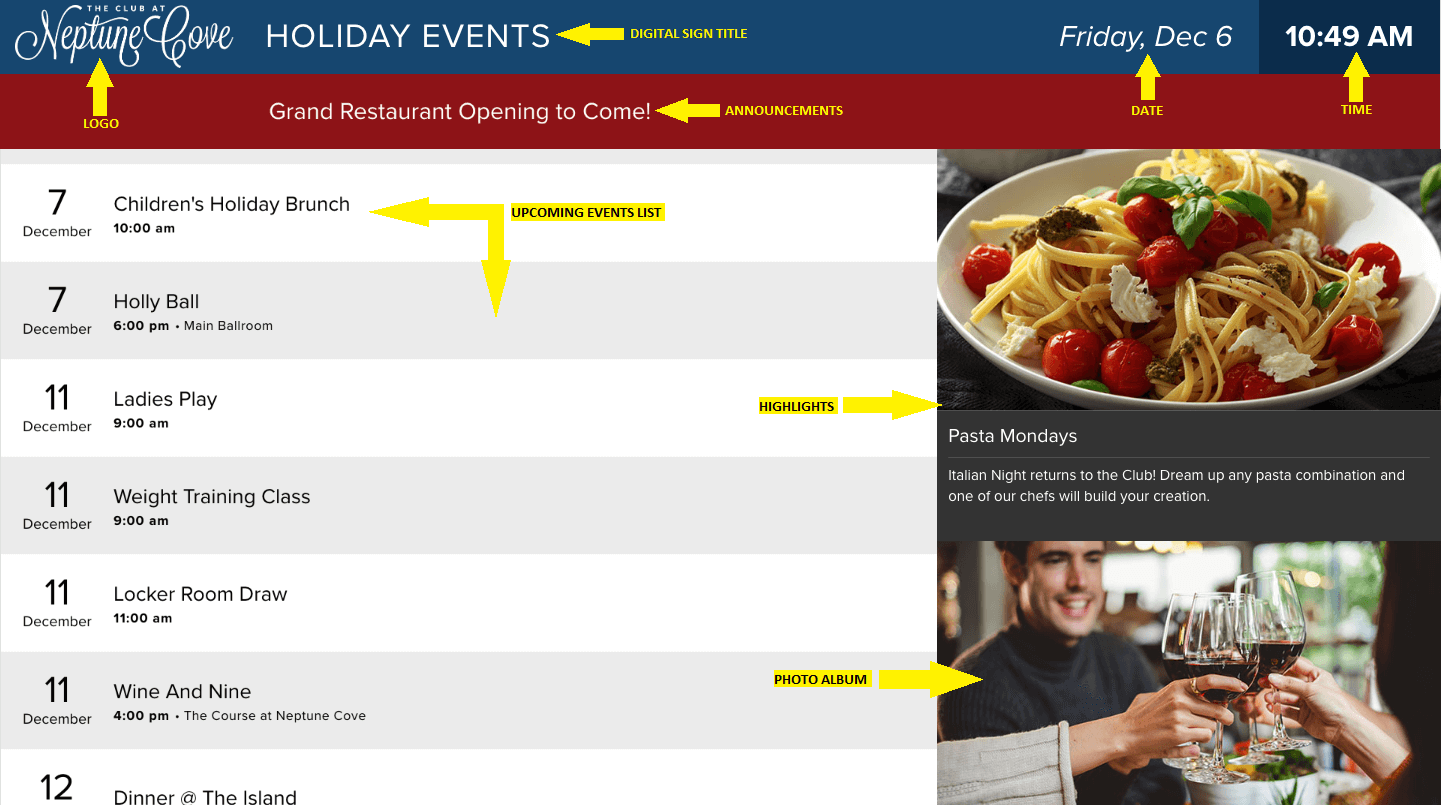
Digital Sign - 2019 - Sign 2
View Mockup in Sketch Cloud
Logo, Title, Date/Time, Announcements, Upcoming Events, Highlights (Rotating), Photo Album
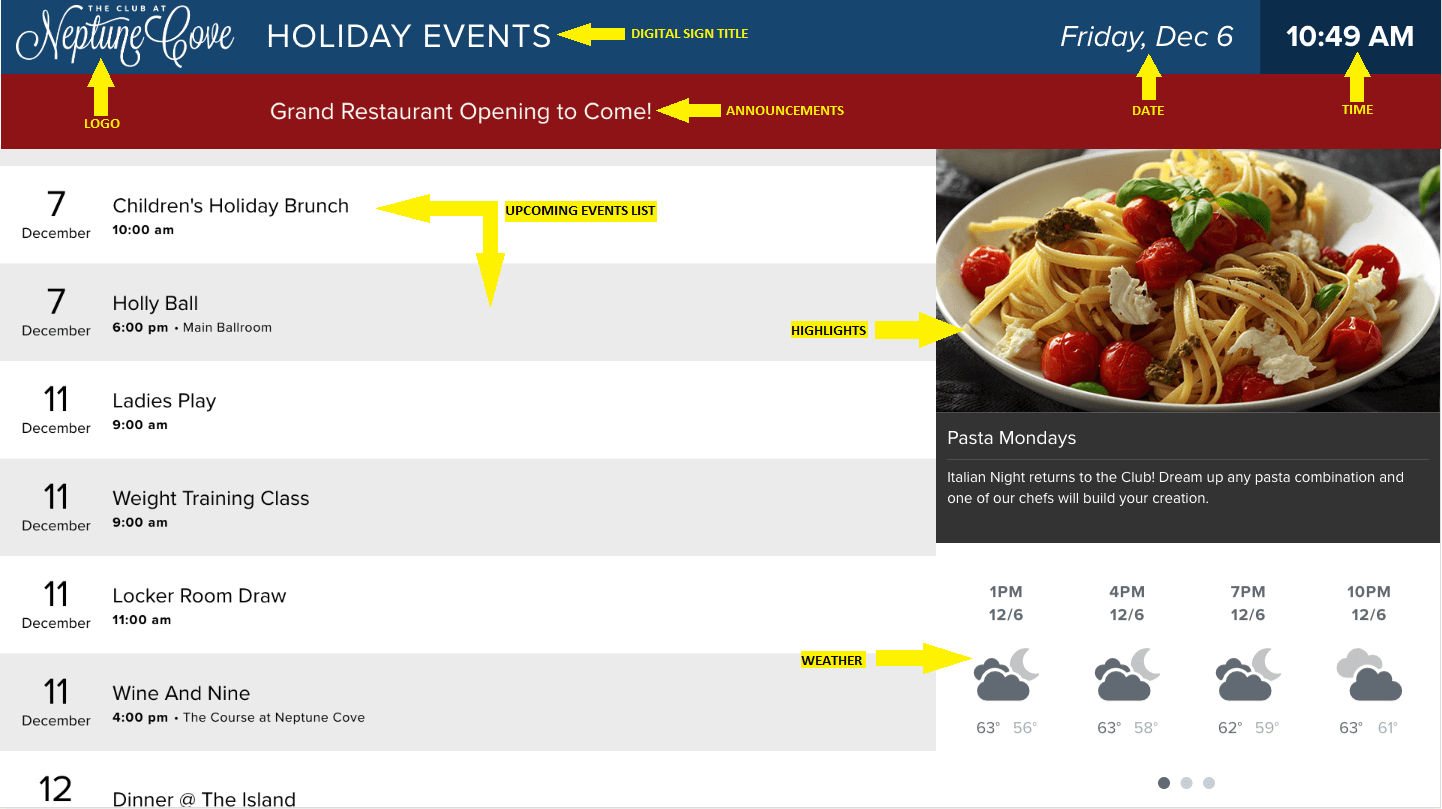
Digital Sign - 2019 - Sign 3
View Mockup in Sketch Cloud
Logo, Title, Date/Time, Announcements, Upcoming Events, Highlights (Rotating), Weather
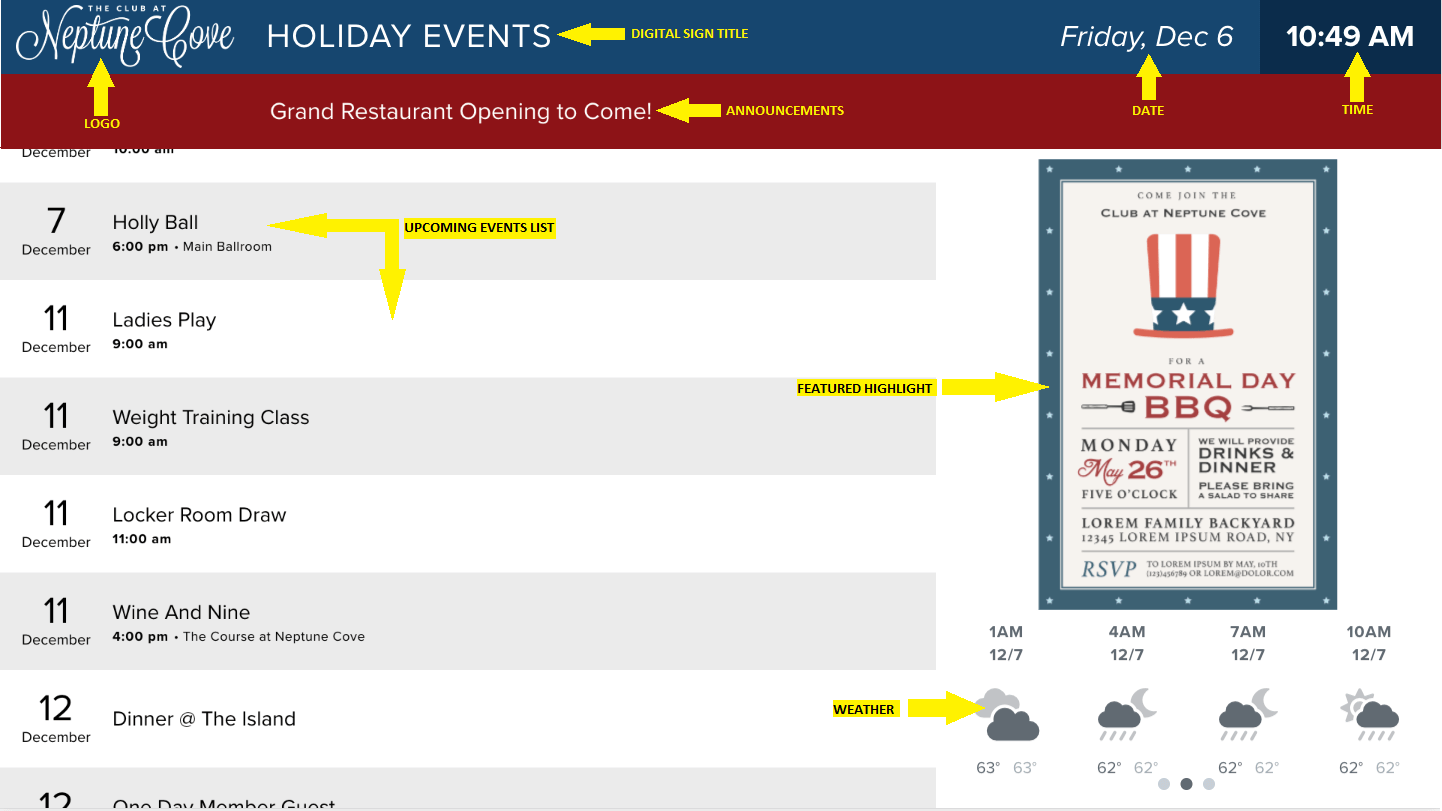
Digital Sign - 2019 - Sign 4
View Mockup in Sketch Cloud
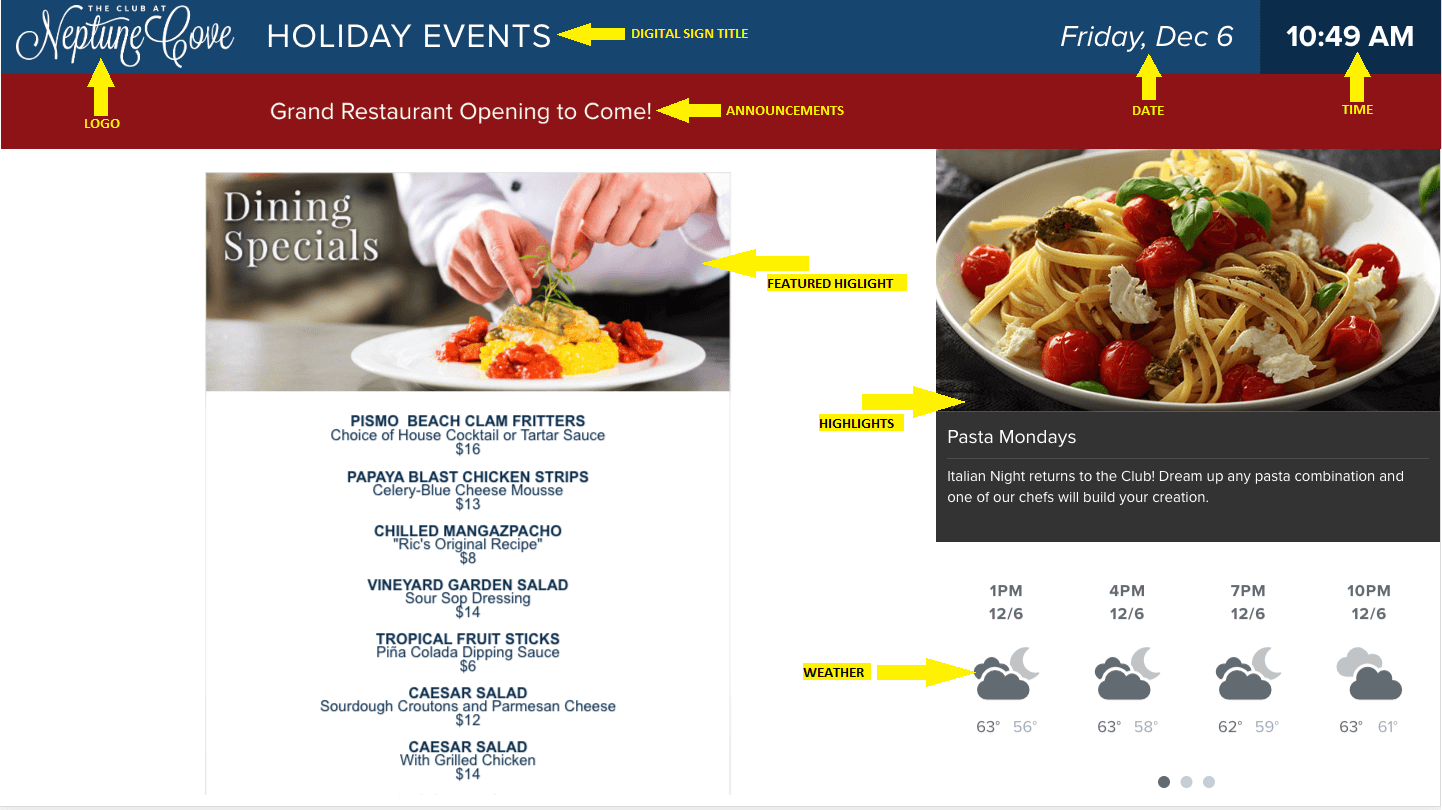
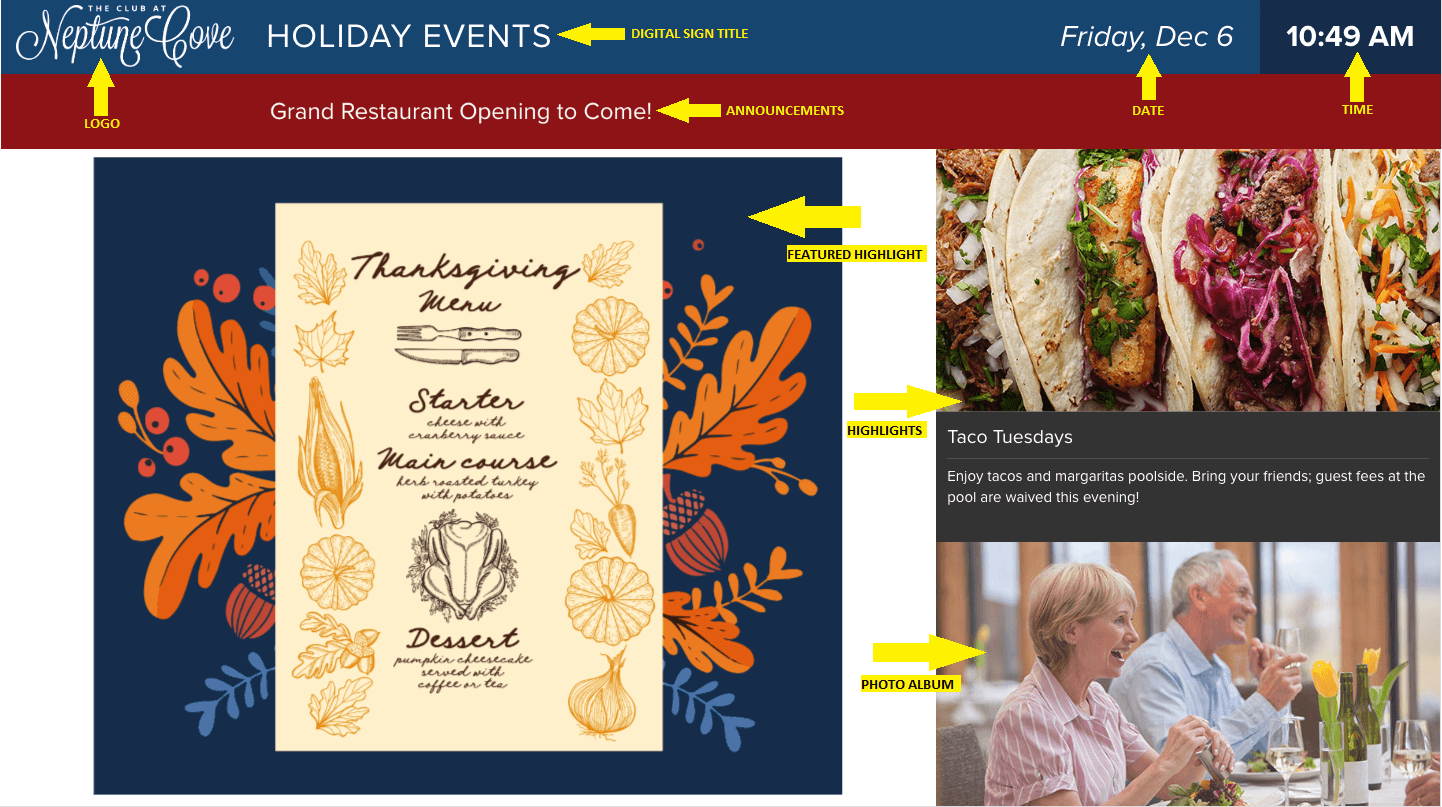
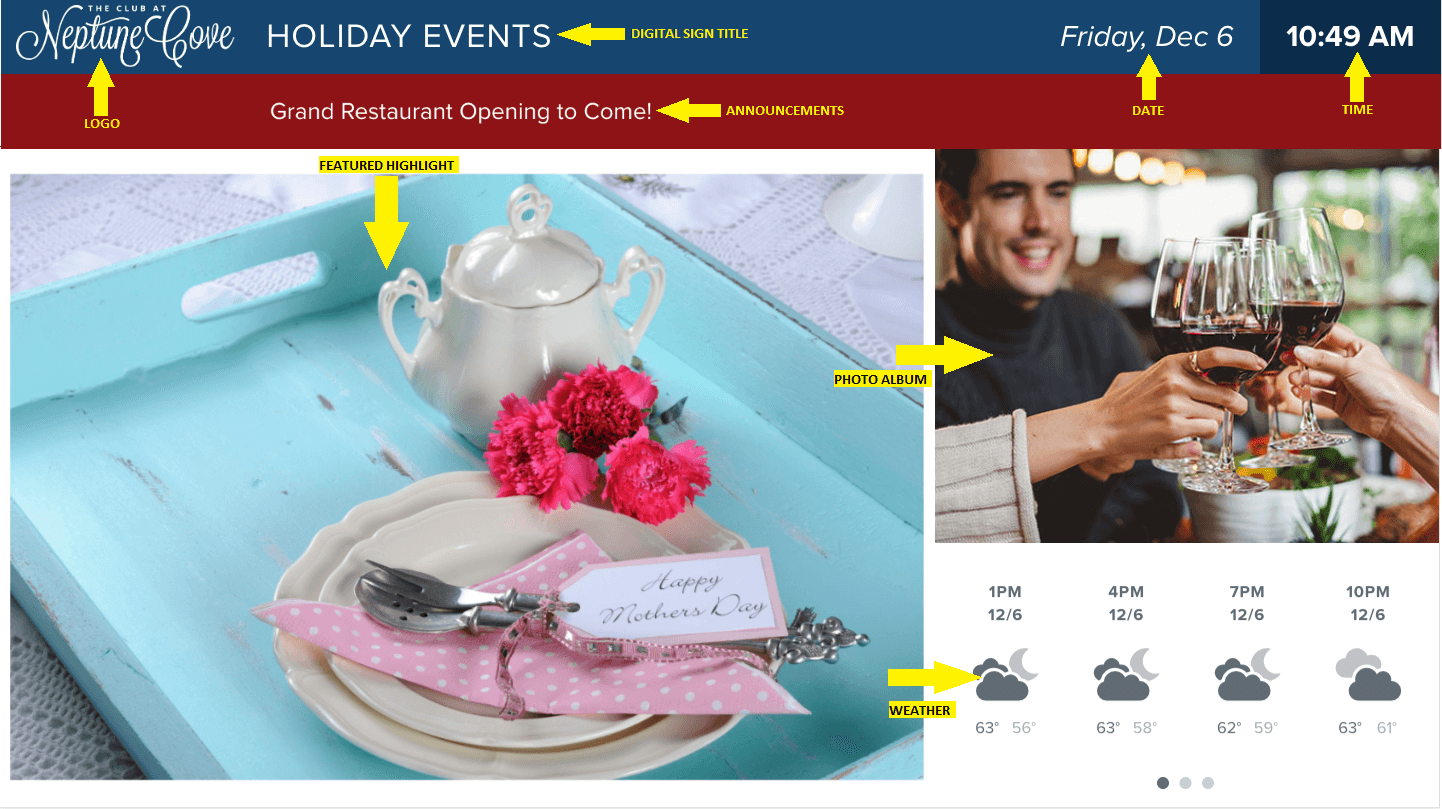
Logo, Title, Date/Time, Announcements, Upcoming Events, Rotating Featured Highlights (Full Page Text), Weather
Digital Sign - 2019 - Sign 5
View Mockup in Sketch Cloud
Logo, Title, Date/Time, Announcements, Upcoming Events, Rotating Featured Highlights (Full Page Text)
Digital Sign - 2019 - Sign 6
View Mockup in Sketch Cloud
Logo, Title, Date/Time, Announcements, Rotating Featured Highlights (Full Page Text), Highlights (Rotating), Weather
Digital Sign - 2019 - Sign 7
View Mockup in Sketch Cloud
Logo, Title, Date/Time, Announcements, Rotating Featured Highlights (Full Page Text), Highlights (Rotating), Photo Album
Digital Sign - 2019 - Sign 8
View Mockup in Sketch Cloud
Logo, Title, Date/Time, Announcements, Rotating Featured Highlights (Full Page Text), Photo Album, Weather
Digital Sign - 2019 - Sign 9
View Mockup in Sketch Cloud
Logo, Title, Inserts (Section Page Text)
Digital Sign - 2019 - Sign 11
View Mockup in Sketch Cloud
Logo, Title, Date/Time, Announcements, Rotating Featured Highlights (Full Page Text), MRM Image Album of 9 Photos

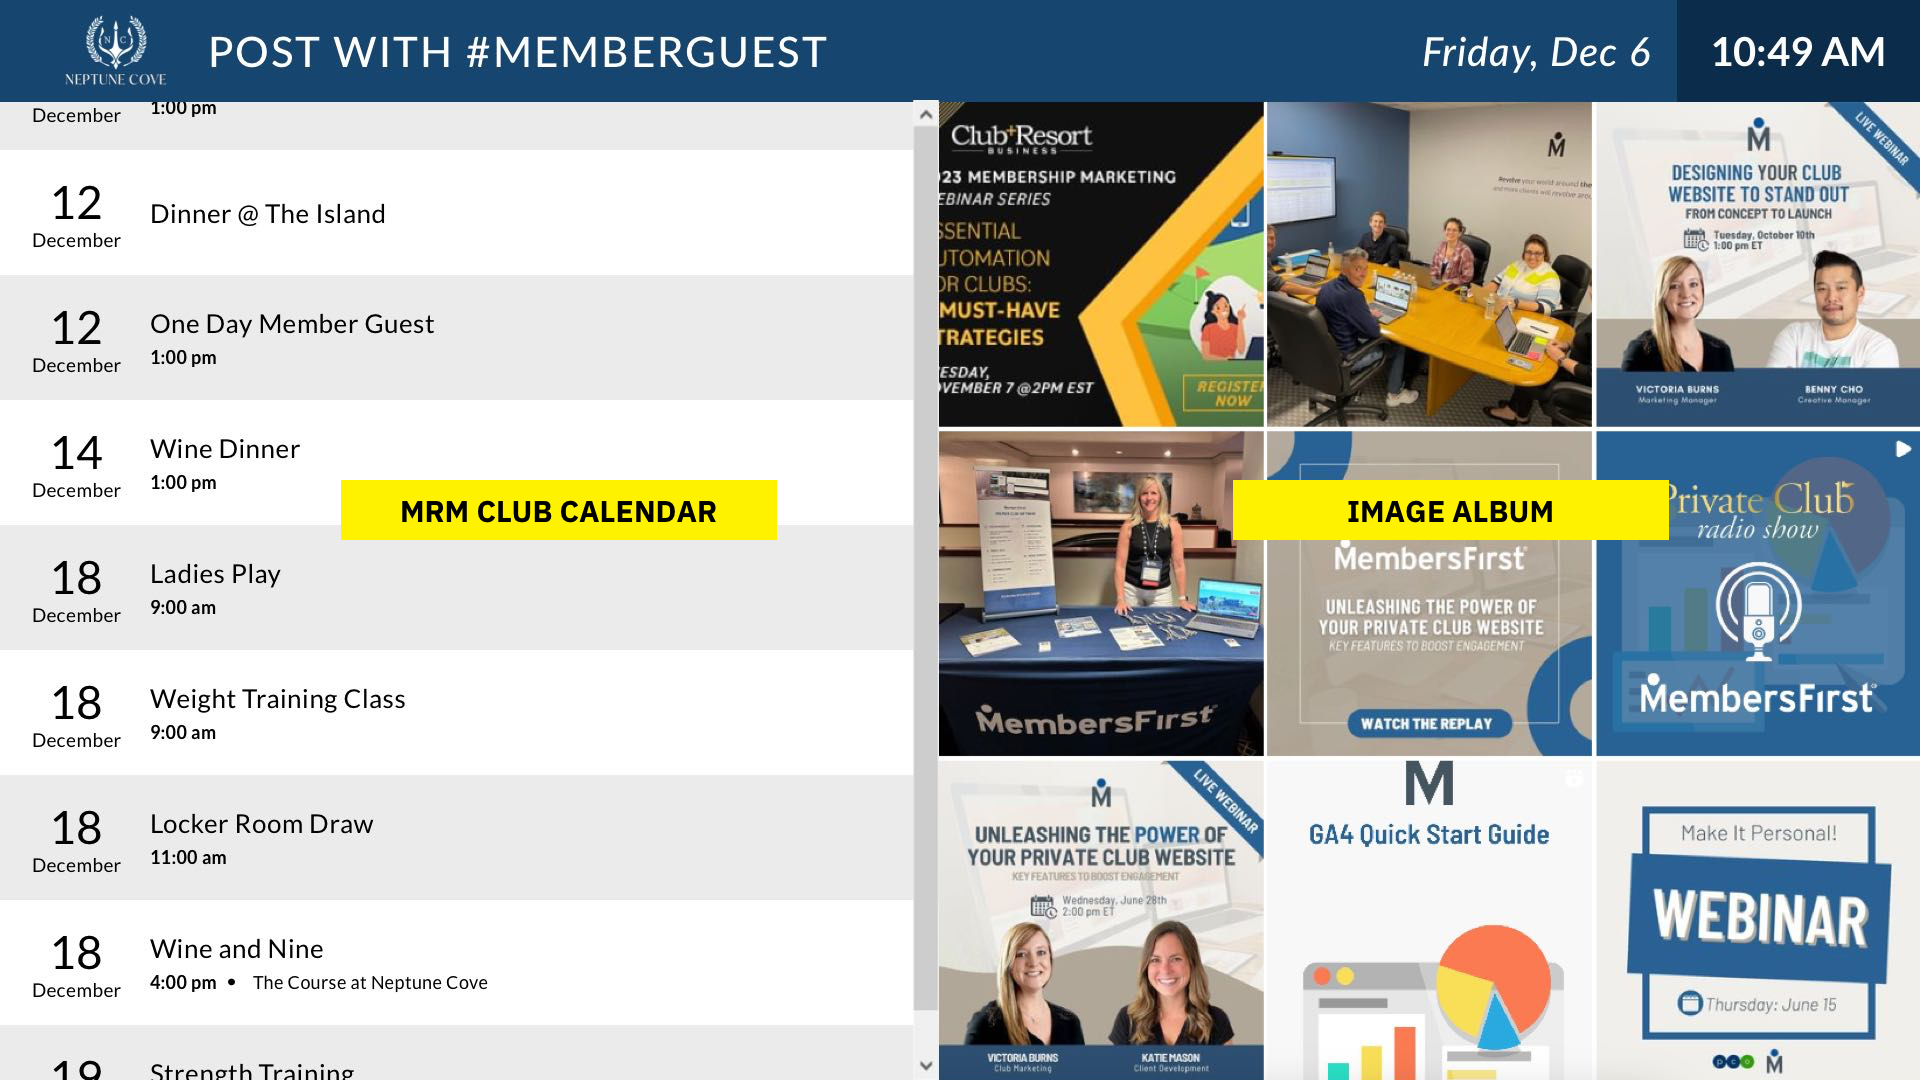
Digital Sign - 2019 - Sign 12
View Mockup in Sketch Cloud
Logo, Title, Date/Time, Announcements, Upcoming Events, MRM Image Album of 9 Photos
- Image Album must be named "DS12"
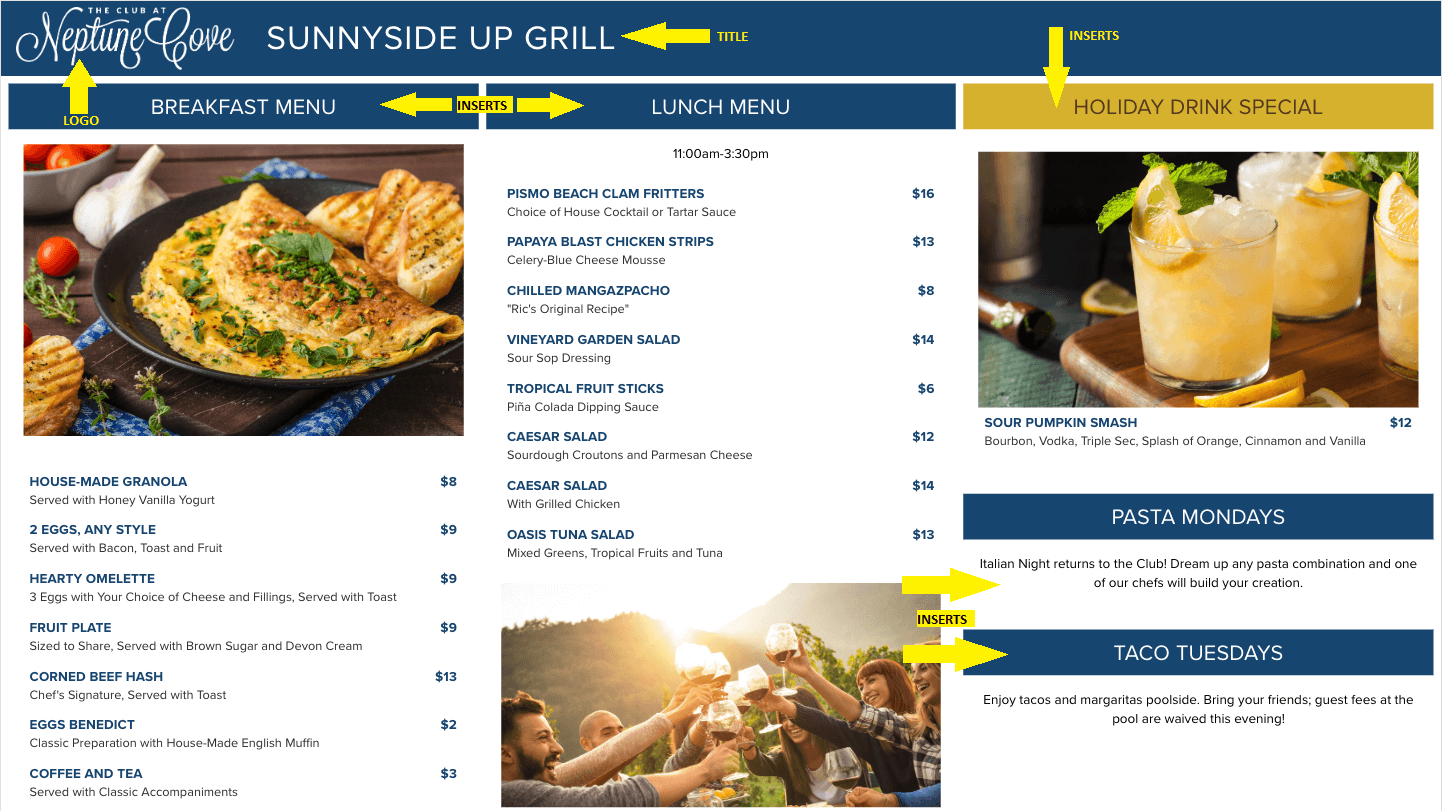
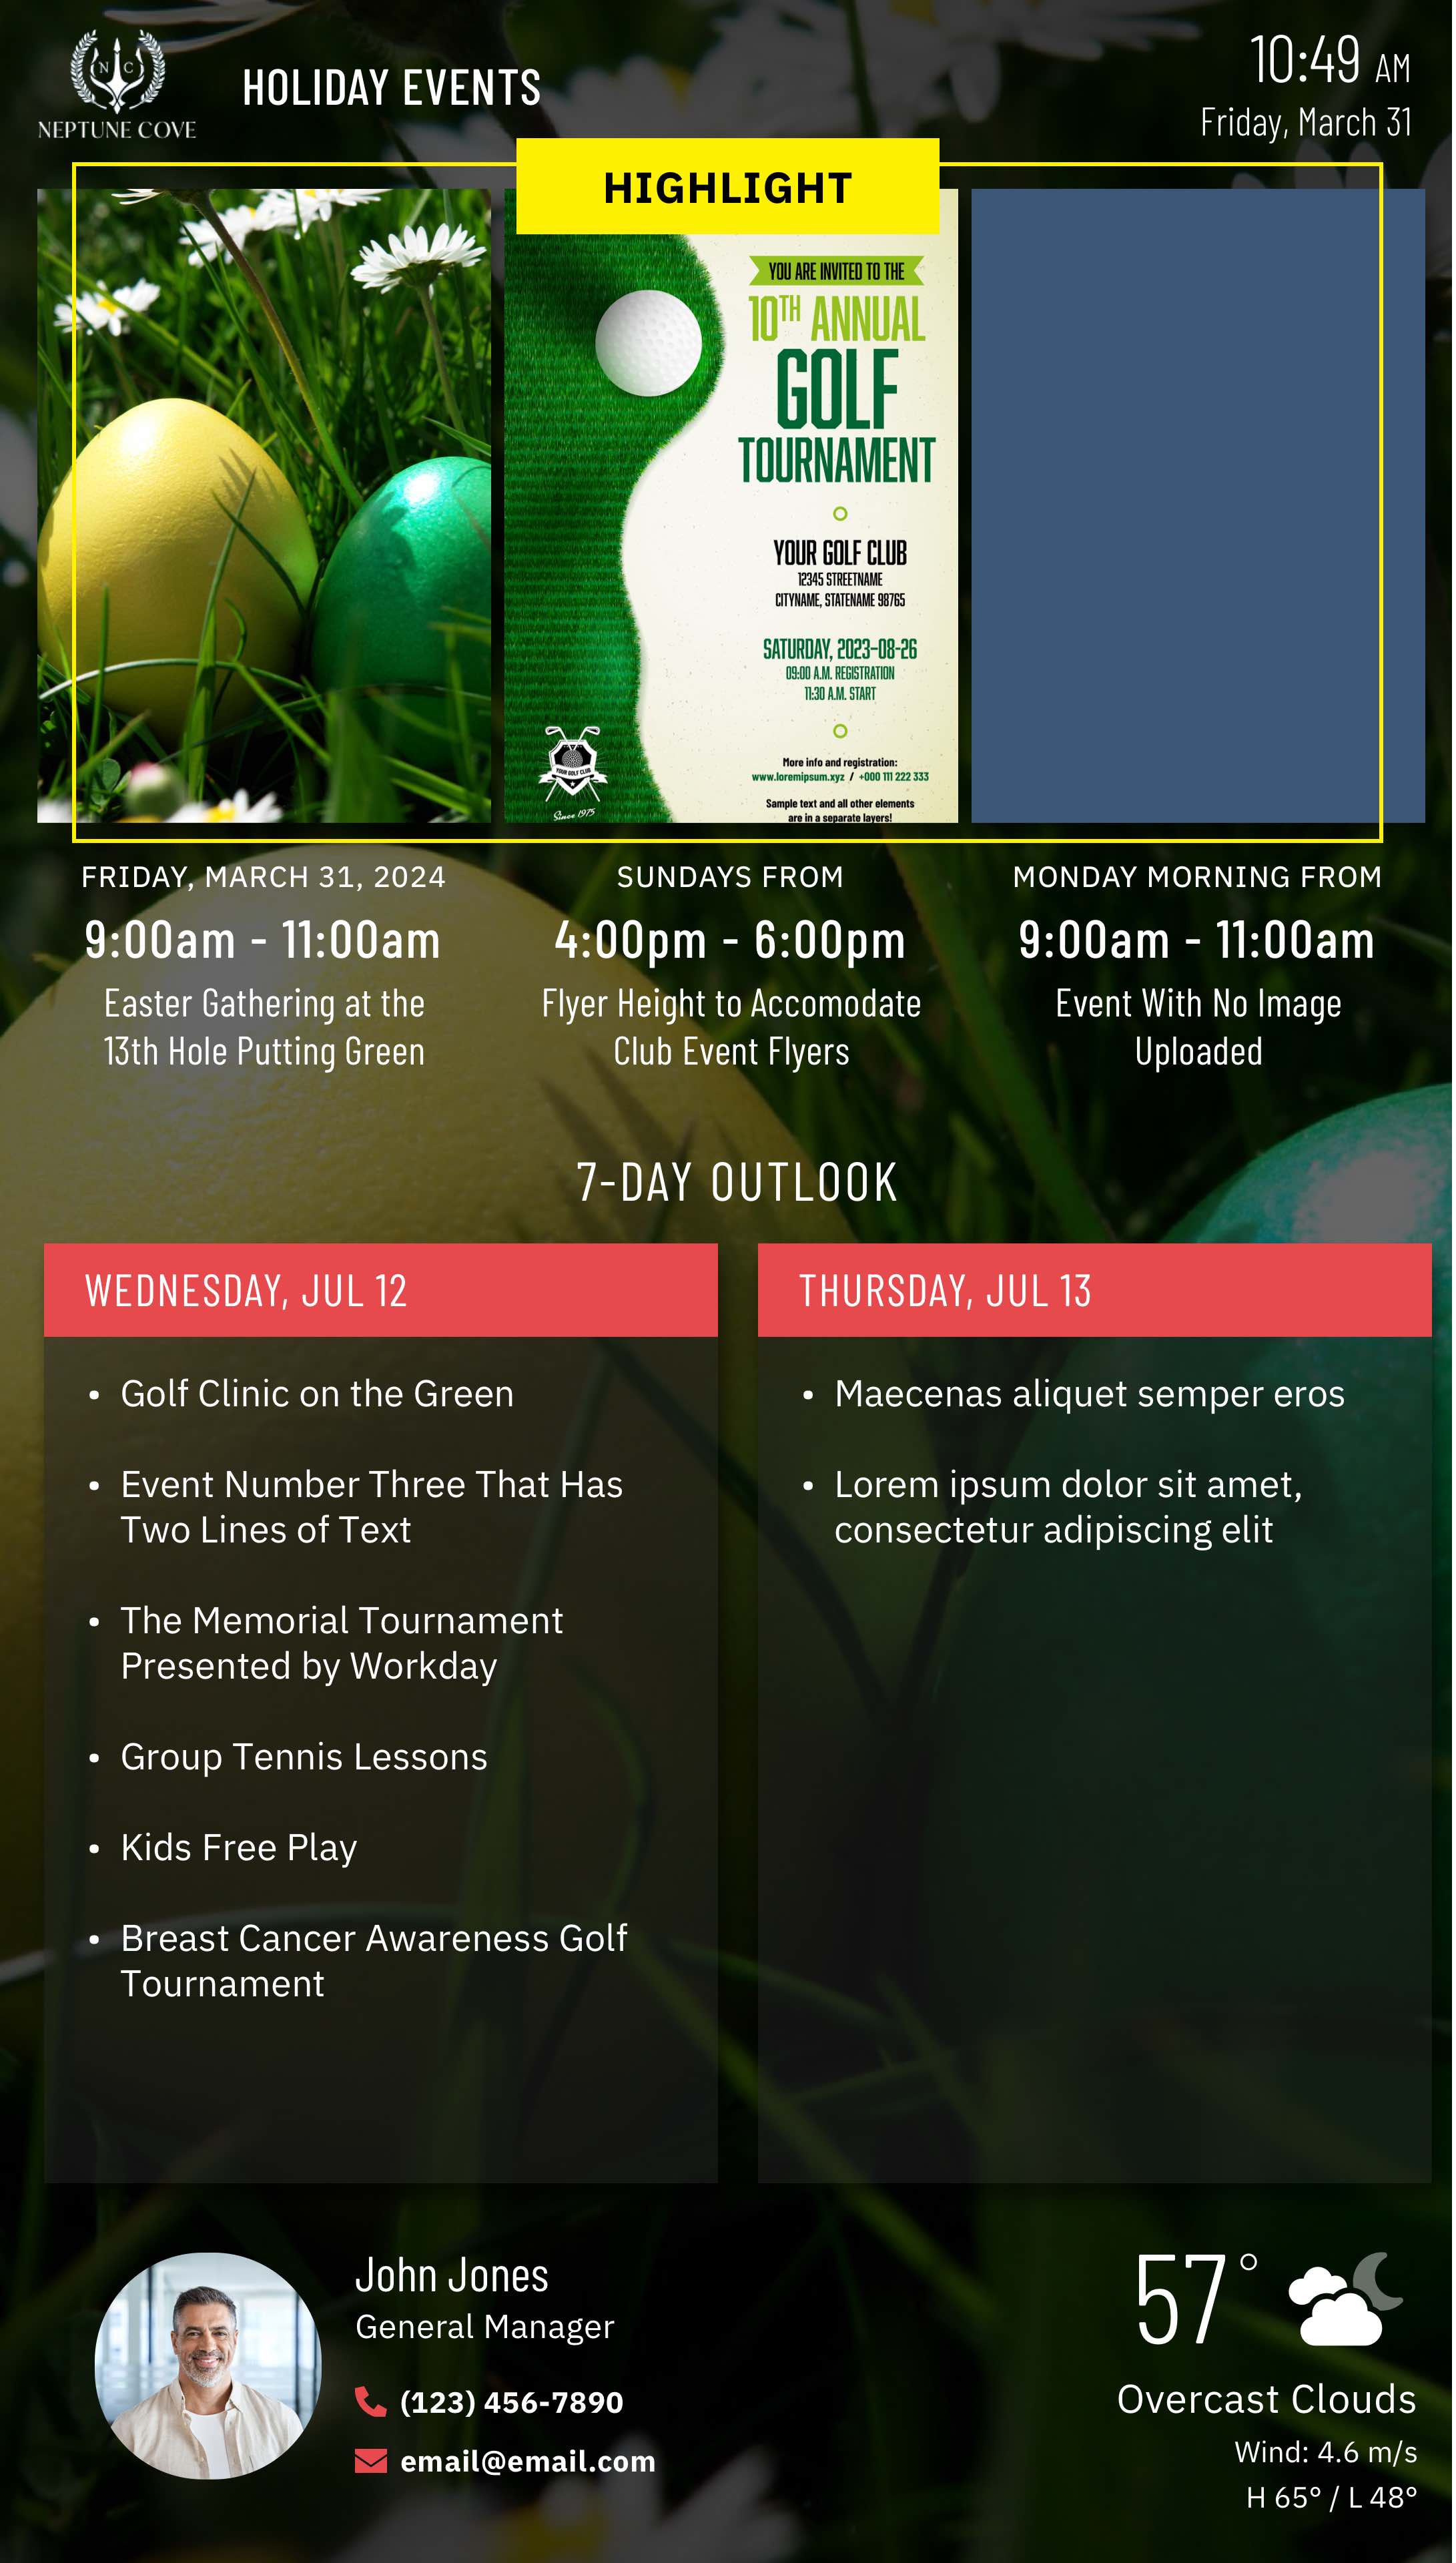
Digital Sign - 2024 - Events, Weather, Flyer (Vertical)
View Mockup in Sketch Cloud
Logo, Title, Date/Time, Three panels with grouped inserts
- NEW! Named Insert: DSSPLASH sets a screensaver image which appears every 2 minutes.
- Named Insert: DSLOGO to update sign logo
- Named Insert: DSTITLE to update sign title
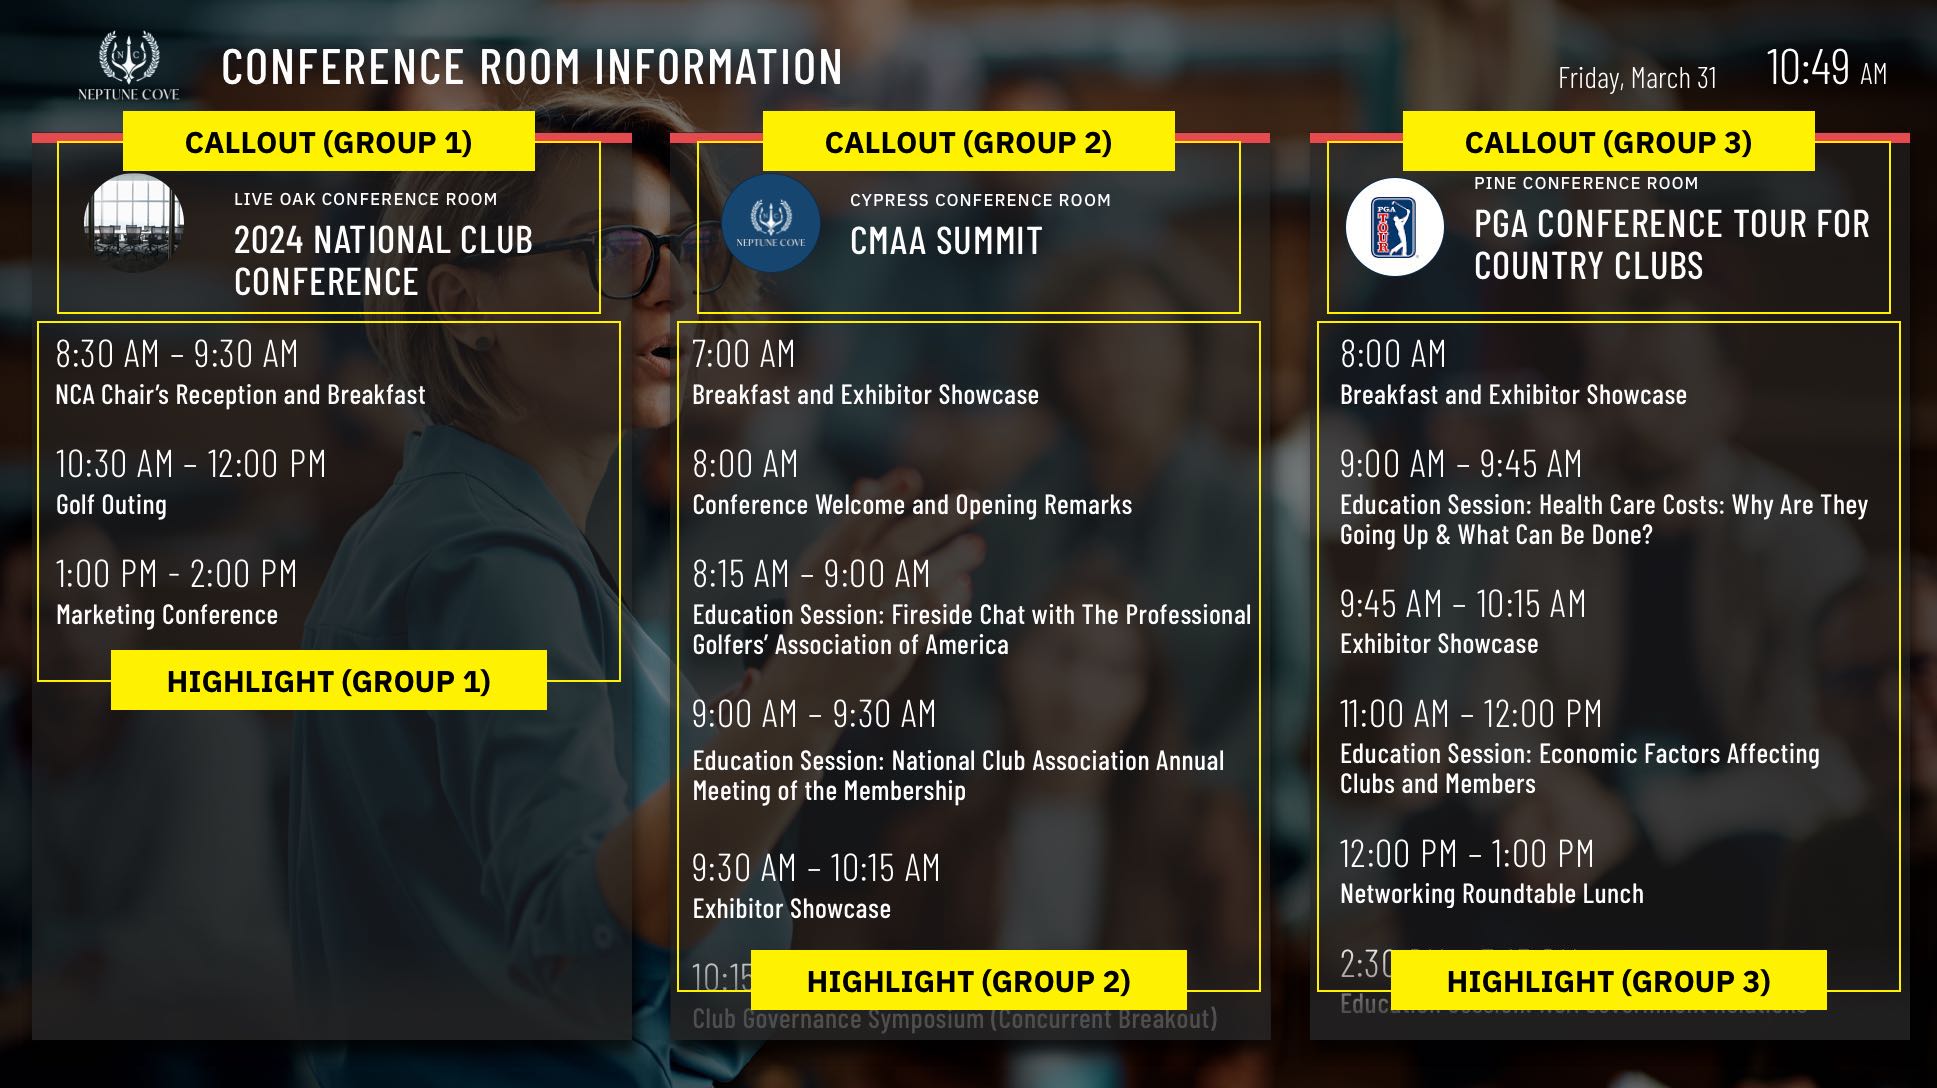
Digital Sign - 2024 - Conference Rooms (Horizontal)
View Mockup in Sketch Cloud
Logo, Title, Date/Time, Three panels with grouped inserts
- NEW! Named Insert: DSSPLASH sets a screensaver image which appears every 2 minutes.
- Named Insert: DSBACKGROUND to update sign background image
- Named Insert: DSLOGO to update sign logo
- Named Insert: DSTITLE to update sign title
Digital Sign - 2024 - Conference Room (Vertical)
View Mockup in Sketch Cloud
Logo, Title, Date/Time, Four panels with grouped inserts
- NEW! Named Insert: DSSPLASH sets a screensaver image which appears every 2 minutes.
- Named Insert: DSBACKGROUND to update sign background image
- Named Insert: DSLOGO to update sign logo
- Named Insert: DSTITLE to update sign title

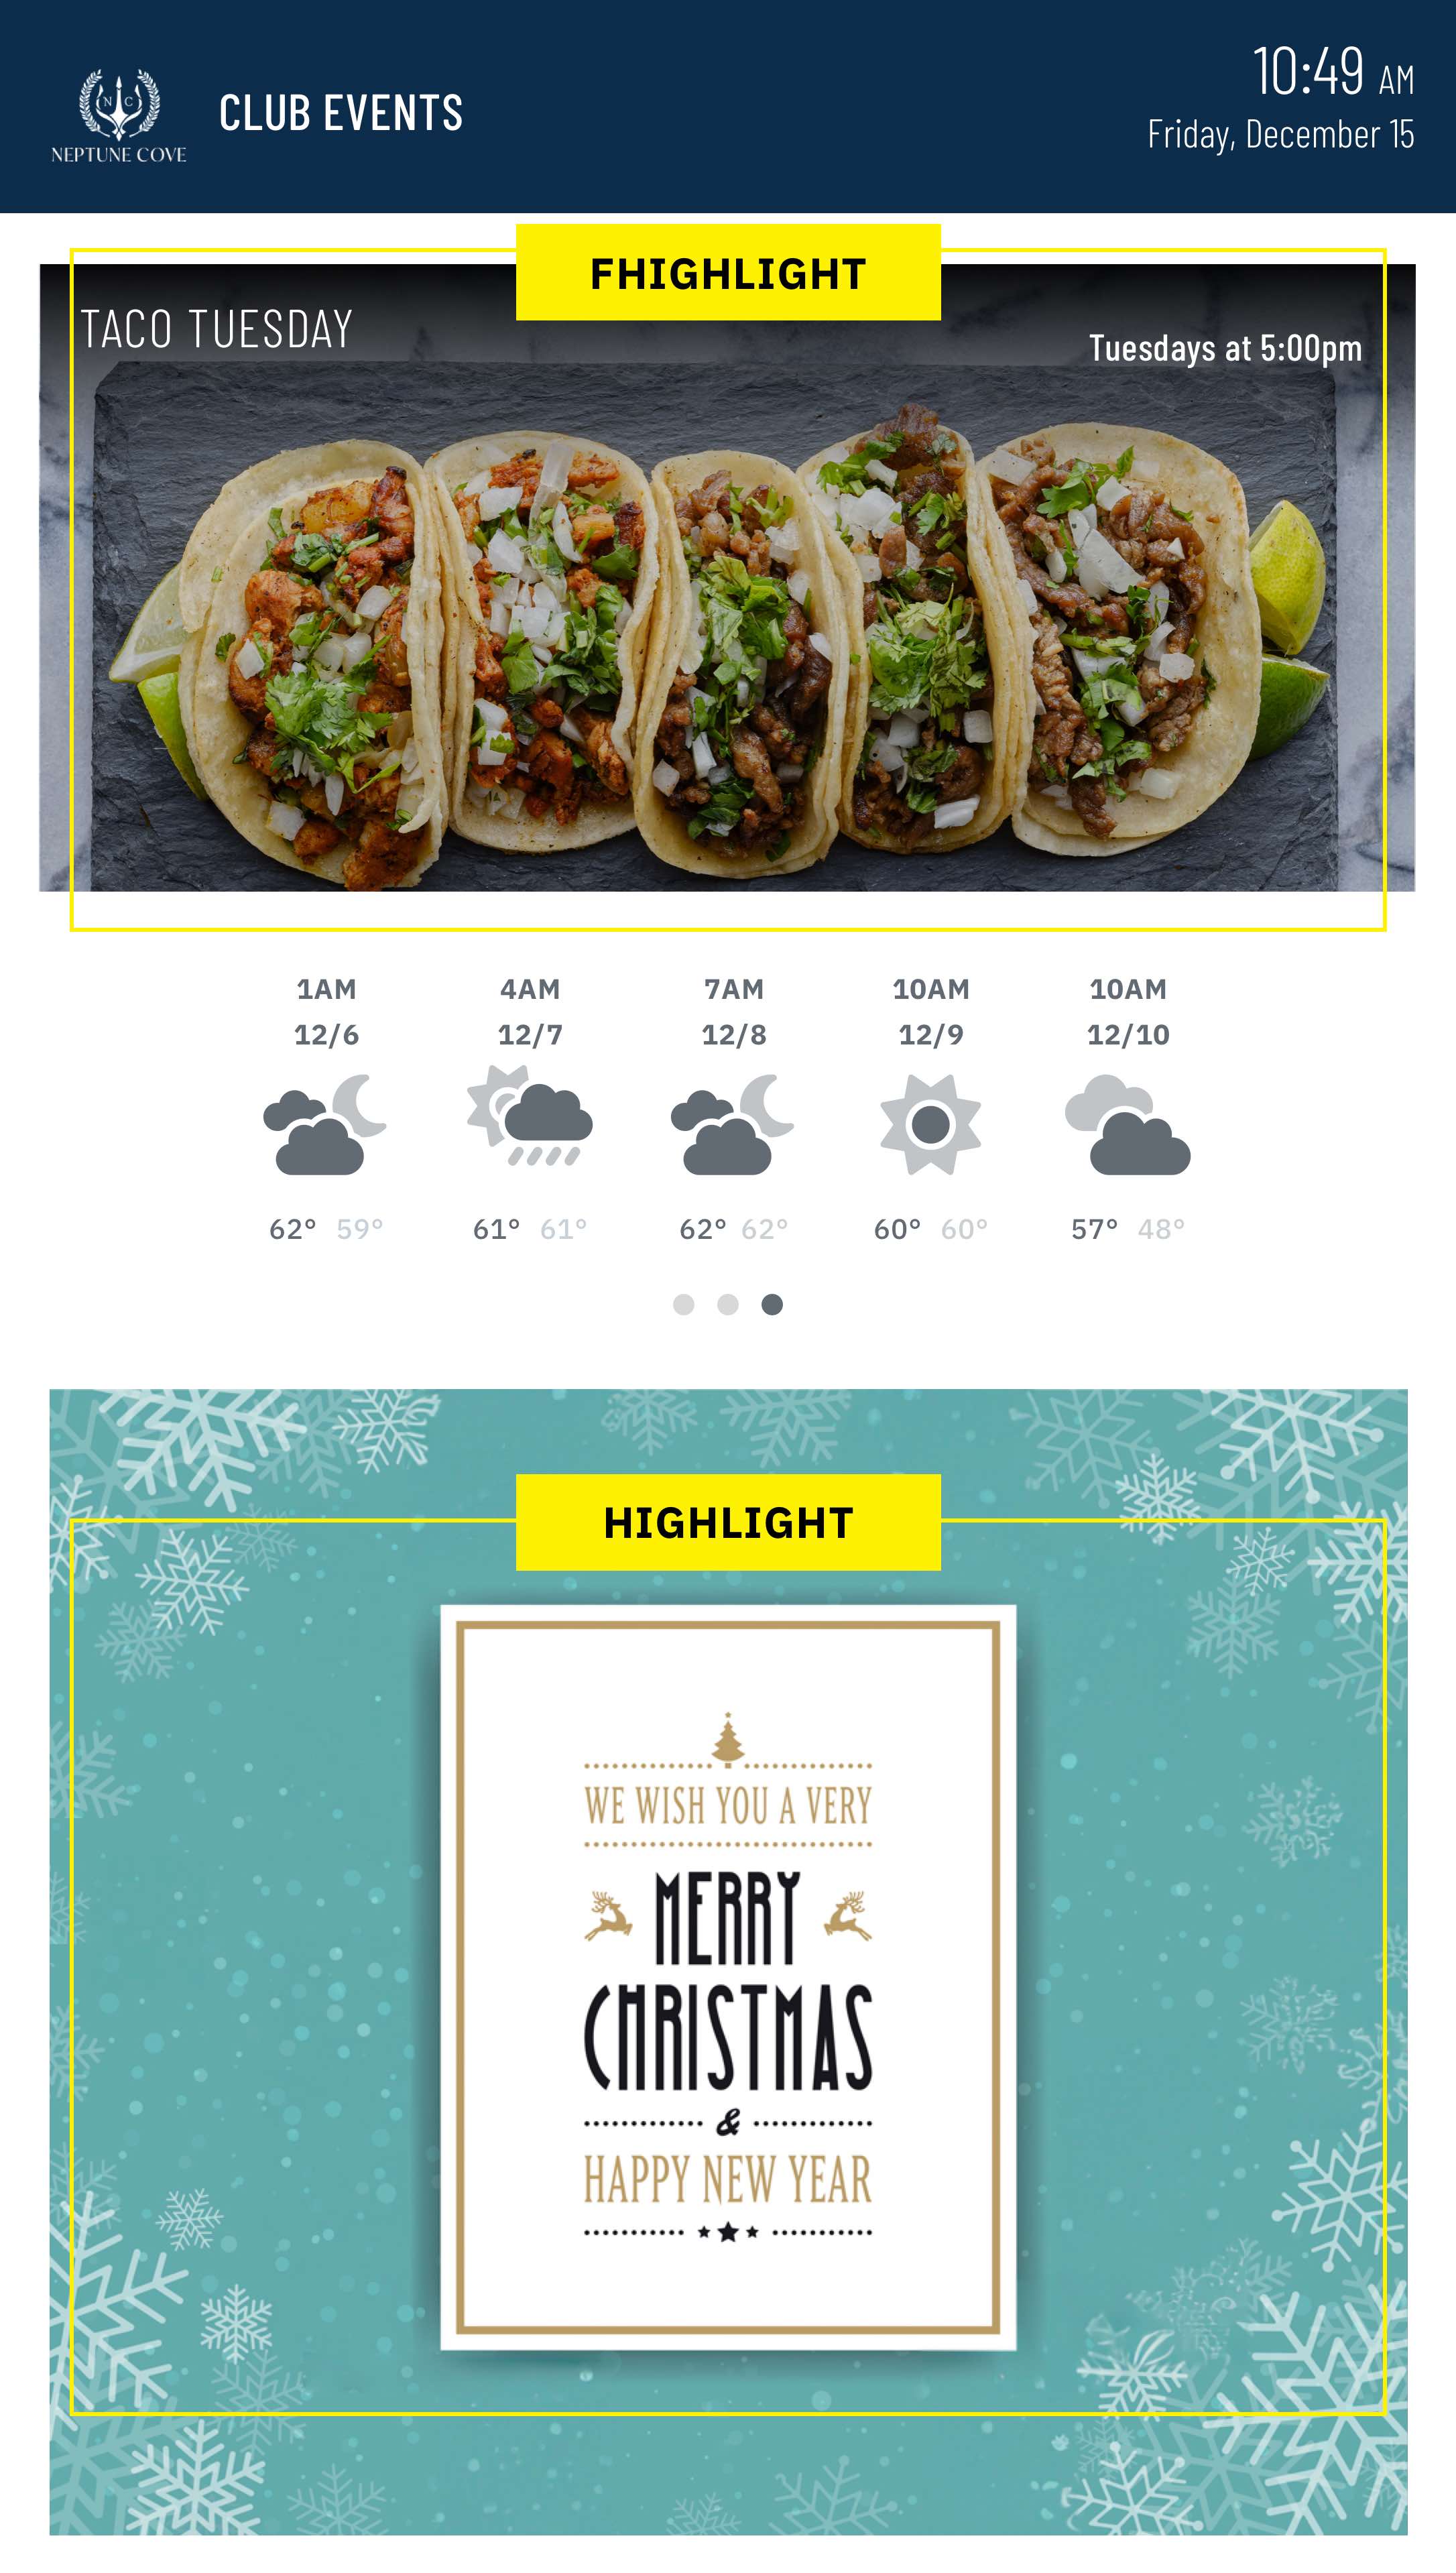
Digital Sign - 2024 - Flyer Events & 7-Day Outlook (Horizontal)
View Mockup in Sketch Cloud
Logo, Title, Date/Time, Inserts for specific events, MRM Club Calendar for 7-Day Outlook
- NEW! Named Insert: DSSPLASH sets a screensaver image which appears every 2 minutes.
- Named Insert: DSBACKGROUND to update sign background image
- Named Insert: DSLOGO to update sign logo
- Named Insert: DSTITLE to update sign title

Digital Sign - 2024 - Flyer Events & 7-Day Outlook (Vertical)
View Mockup in Sketch Cloud
Logo, Title, Date/Time, Inserts for specific events, MRM Club Calendar for 7-Day Outlook
- NEW! Named Insert: DSSPLASH sets a screensaver image which appears every 2 minutes.
- Named Insert: DSBACKGROUND to update sign background image
- Named Insert: DSLOGO to update sign logo
- Named Insert: DSTITLE to update sign title
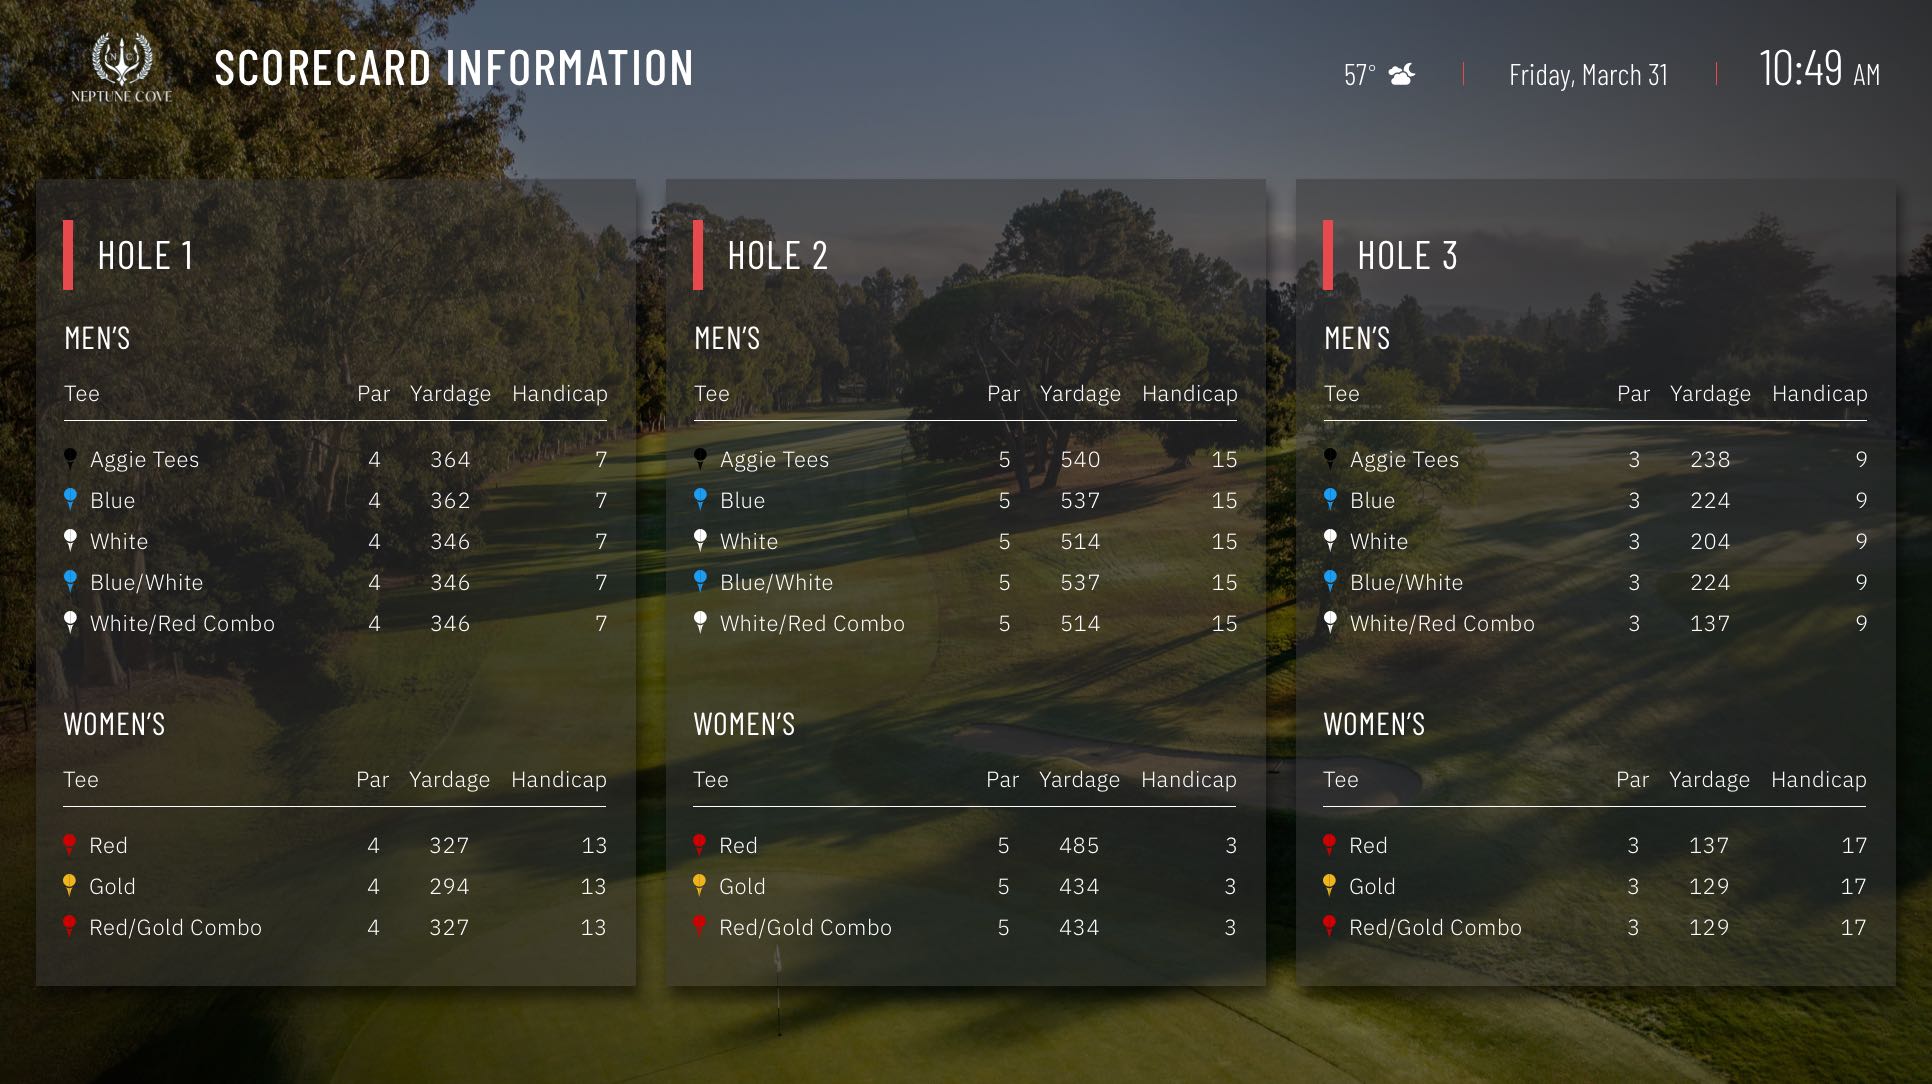
Digital Sign - 2024 - Scorecard (Horizontal)
View Mockup in Sketch Cloud
Logo, Title, Date/Time, Automatically pulls MRM Course Tour data
- NEW! Named Insert: DSSPLASH sets a screensaver image which appears every 2 minutes.
- Named Insert: DSBACKGROUND to update sign background image
- Named Insert: DSLOGO to update sign logo
- Named Insert: DSTITLE to update sign title
Digital Sign - 2024 - Scorecard (Vertical)
View Mockup in Sketch Cloud
Logo, Title, Date/Time, Automatically pulls MRM Course Tour data
- NEW! Named Insert: DSSPLASH sets a screensaver image which appears every 2 minutes.
- Named Insert: DSBACKGROUND to update sign background image
- Named Insert: DSLOGO to update sign logo
- Named Insert: DSTITLE to update sign title

Digital Sign Display/Configuration Options
General Site Configuration
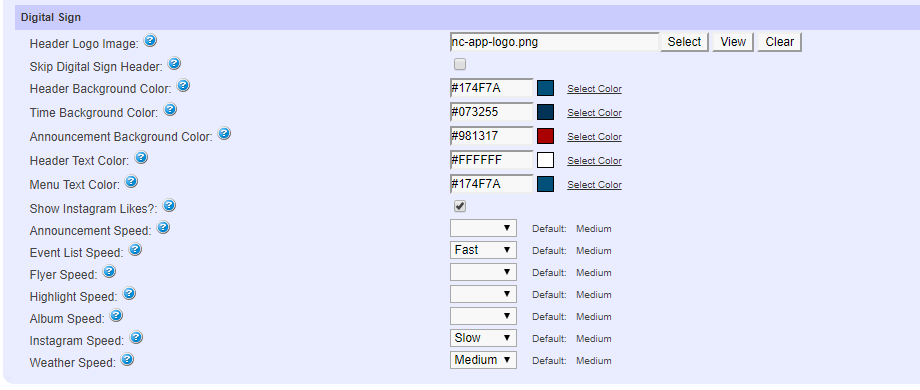
Color and scroll speeds are able to be customized by editing the options available in the General Site Configuration area of your website.
The settings you can control include:
- Header Logo Image (Not Used)
- Skip Digital Sign Header Checkbox (Not Used)
- Header Background Color (Color behind the logo and Title of the sign)
- Time Background Color (Color behind the time displayed on the sign)
- Announcement Background Color (Color behind the scrolling announcements area of the sign; Font color cannot be changed)
- Header Text Color (Font color for the sign title,date and time)
- Menu Text Color (Font color for menus; Applicable only for Digital Sign Option 9)
- Announcement Speed (Fast = 30 seconds; Medium = 60 seconds; Slow = 90 seconds)
- Event List Speed (Fast = 30 seconds; Medium = 60 seconds; Slow = 90 seconds)
- Flyer Speed (Fast = 2 seconds; Medium = 5 seconds; Slow = 10 seconds)
- Highlight Speed (Fast = 2 seconds; Medium = 5 seconds; Slow = 10 seconds)
- Album Speed (Fast = 2 seconds; Medium = 5 seconds; Slow = 10 seconds)
- Weather Speed (Fast = 2 seconds; Medium = 5 seconds; Slow = 10 seconds)
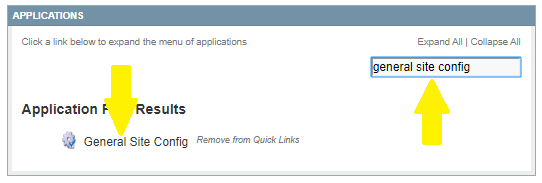
Navigate to "General Site Config"
By typing 'general site config' in the "Find Application" search bar under the "Applications" area of the Admin Home Screen and then clicking the "General Site Config" link that appears in the left:
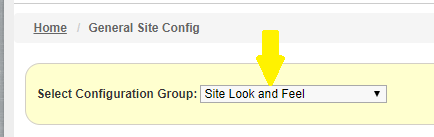
Select "Site Look and Feel" in the dropdown menu:
Scroll down to the "Digital Sign" area of the page, edit the field(s) you wish to customize and click save.
Digital Sign Logo
The "Logo" of the Digital Sign may be customized.
Upload the New Logo File to the Website
Upload the logo image file to the Image Library of your website (Instructions)
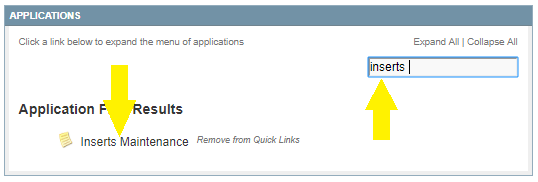
Navigate to "Inserts Maintenance"
by typing 'inserts' in the "Find Application" search bar under the "Applications" area of the Admin Home Screen and then clicking the "Inserts Maintenance" link that appears in the left:
Editing the Logo
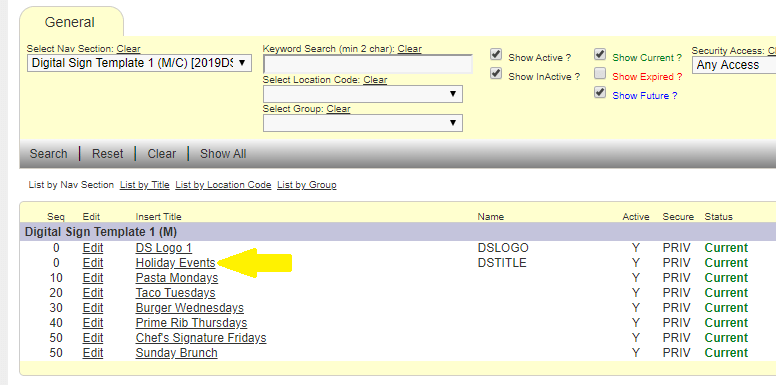
Click on the insert that has "DSLOGO" in the "Name" column:
NOTE: Do NOT change the Insert Name Field which has "DSLOGO" in it. This is required in order to allow the Digital
Sign Logo to display correctly.
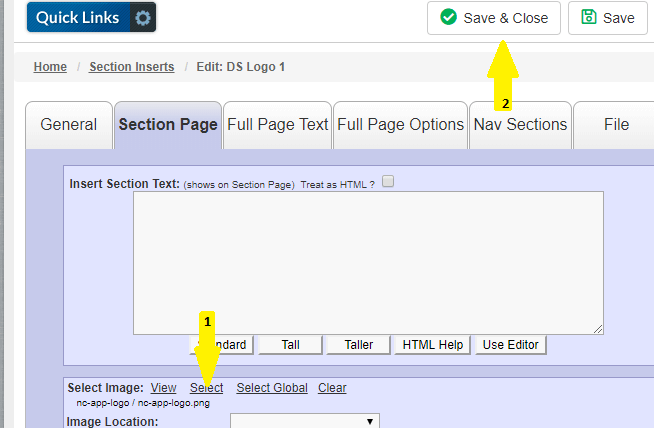
On the Section Page Tab, select the new logo file from the website Image Library by clicking the "Select" link.
Digital Sign Title
The "Title" of the Digital Sign may be customized.
Navigate to "Inserts Maintenance"
by typing 'inserts' in the "Find Application" search bar under the "Applications" area of the Admin Home Screen and then clicking the "Inserts Maintenance" link that appears in the left:
Editing the Title
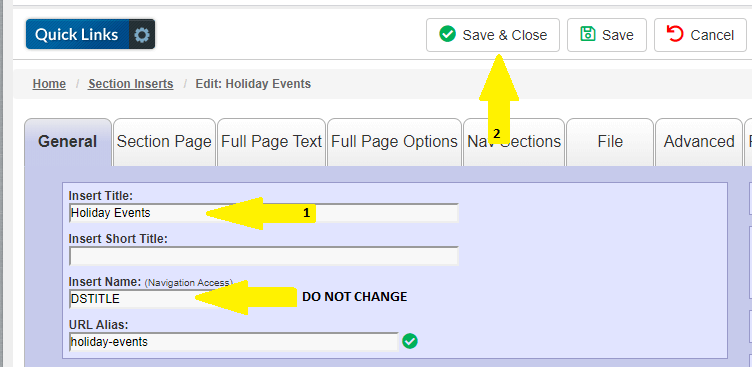
Click on the insert that has "DSTITLE" in the "Name" column:
NOTE: Do NOT change the Insert Name Field which
has "DSTITLE" in it. This is required in order to allow the Digital Sign Title to display correctly.
On the General Tab, edit the "Insert Title" field to include the new Title you wish to display on the Digital Sign and click Save.
Content Usage
The client is responsible for loading the content applicable to their chosen Digital Sign layout. These may include:
- Announcements
- Calendar Events
- Inserts (Featured Highlights (Flyers)/Highlights/Logo/Digital Sign Title)
- Image Album
- Club Facilities
Announcements
Applicable for all Digital Sign Design Layouts. The scrolling speed can be customized. See the Digital Sign Display/Configuration Options section for instructions.
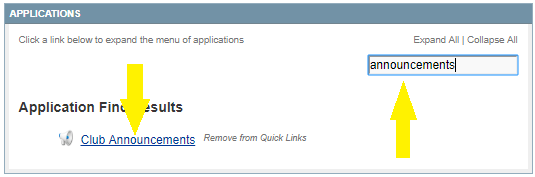
Navigate to "Club Announcements"
Type 'announcements' in the "Find Application" search bar under the "Applications" area of the Admin Home Screen and then click the "Club Announcements" link that appears in the left:
Create a New Announcement

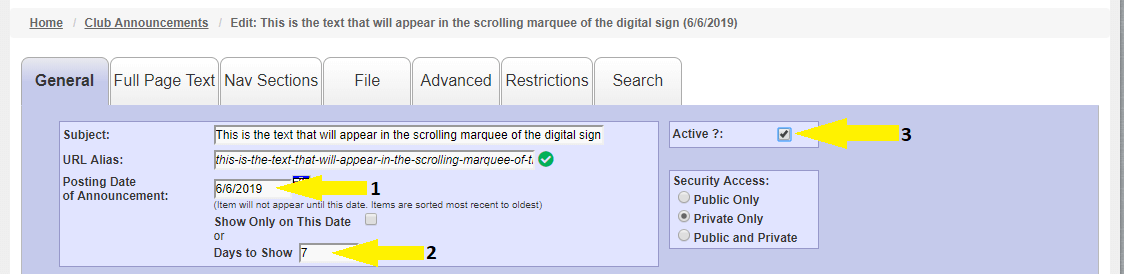
Provide the text you want shown in the "Announcement Subject" field and click "Create Now"
Displayed at the top of the Digital Sign. When more than one announcement is in use, all Announcements will
marquee across the top of the screen.

On the "General" Tab, choose the start date (Posting Date of Announcement), how many days it should show on the sign (Days to Show) and make sure the "Active" checkbox is selected:
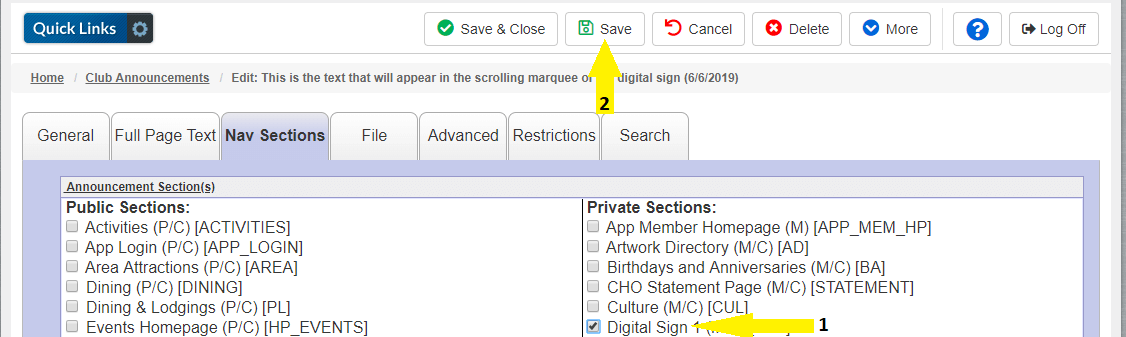
On the "Nav Sections" Tab, check the box for the "Digital Sign" and click save.
Your Announcement will now scroll through the top of the digital sign. There is no additional text available for Announcements beyond the title that scrolls across the top of the page.
Calendar Events
Applicable for Design Option 1, Option 2, Option 3, Option 4, Option 5 and Option 12
The rotating speed can be customized. See the Digital Sign Display/Configuration Options section for instructions.
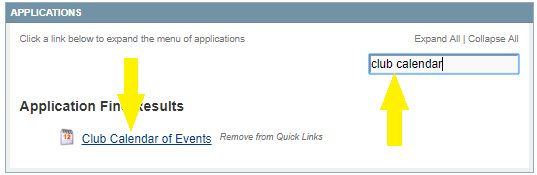
Navigate to "Club Calendar of Events"
Type 'club calendar' in the "Find Application" search bar under the "Applications" area of the Admin Home Screen and then click the "Club Calendar of Events" link that appears in the left:
Adding an Existing Event to the Digital Sign Event List
If you need to create a new calendar event, follow these steps (Step-By-Step & Video)
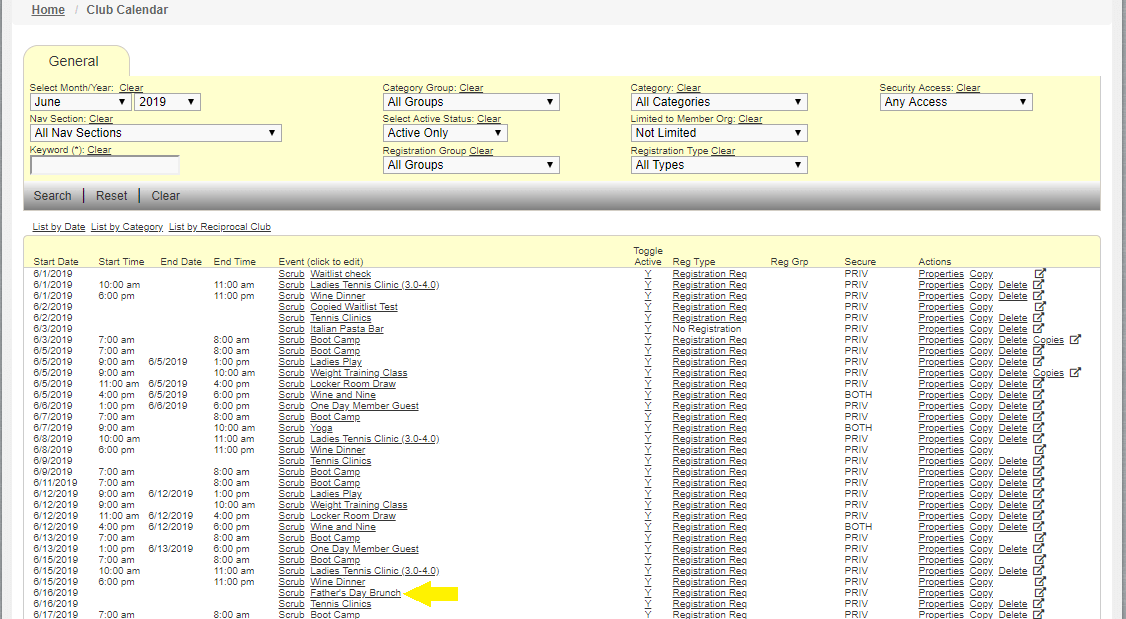
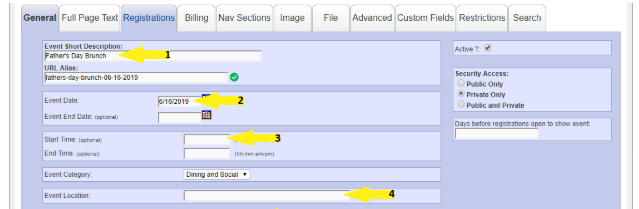
Click on the Event you wish to add to the Events List on the Digital Sign:
The Sign will show the following fields located on the "General" Tab of the event
-
Event Title ("Event Short Description")
- Long titles will wrap to a new line after 60-70 characters.
- The digital sign is designed to show events within the number of days in the future the Digital Sign Navigation Section is configured to display. To edit this value, navigate to "Nav Section Maintenance" by typing 'nav section' in the "Find Application search bar under the "Applications area of the Admin Home Screen and then clicking the "Nav Section Maintenance link that appears on the left. Please contact your Client Services Manager for assistance if needed.
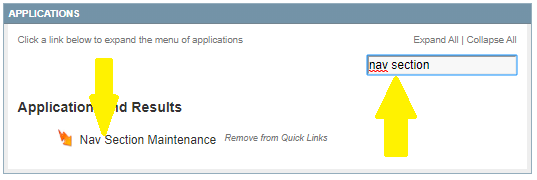
Click on the row for the "Digital Sign" navigation section:

On the Settings Tab, edit the number in the "Days on Calendar to Show in the Future" field.
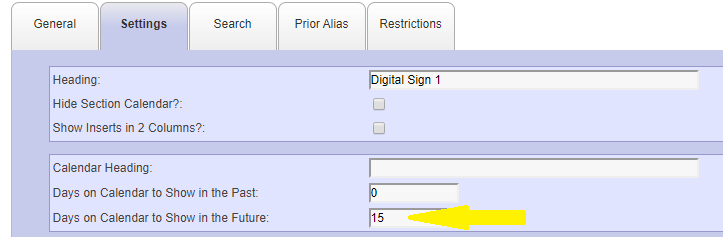
Click Save. The sign will now show events within the number of days defined.
- "Event Date"
- Event "Start Time"
- "Event Location"
On the "Nav Sections" Tab, check the box for the "Digital Sign" and click save.
Your Event will now appear in the Events List on your Digital Sign. There is no additional text available for Calendar Events beyond the fields mentioned above.
Featured Highlight (Full Page Text Flyers)
Applicable for Option 4, Option 5, Option 6, Option 7, Option 8 and Option 11. There is no maximum, however, MembersFirst recommends no more than five. The rotating speed can be customized. See the Digital Sign Display/Configuration Options section for instructions.
Navigate to "Inserts Maintenance"
Type 'inserts' in the "Find Application" search bar under the "Applications" area of the Admin Home Screen and then click the "Inserts Maintenance" link that appears in the left:
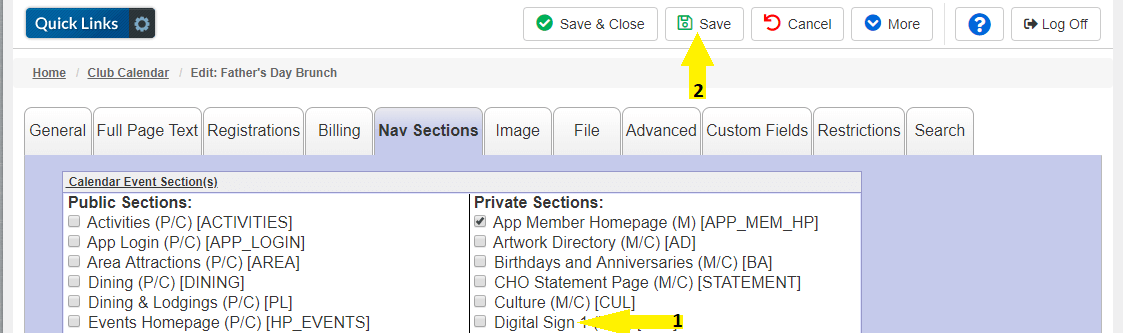
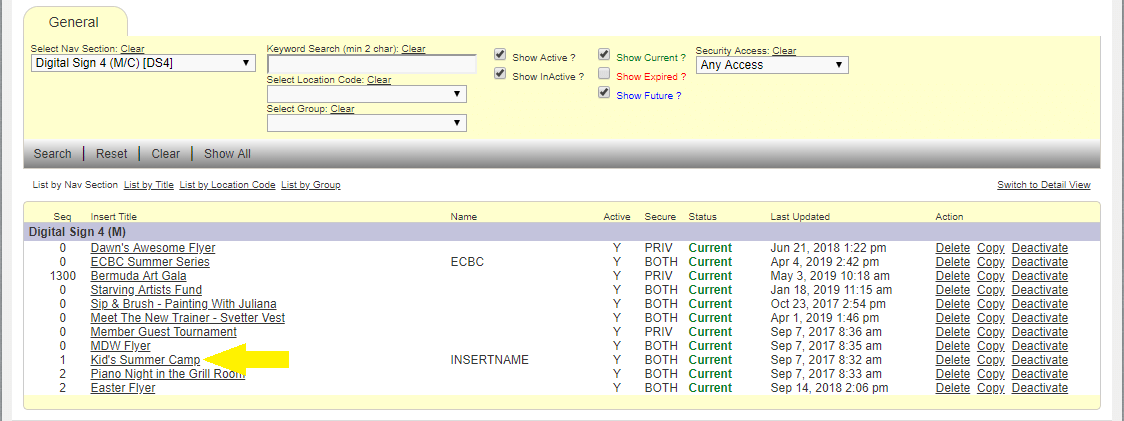
Adding an Existing Highlight to the Digital Sign
If you need to create a new insert highlight, follow these steps (Step-By-Step & Video) or learn more about Insert Location Codes in this video.
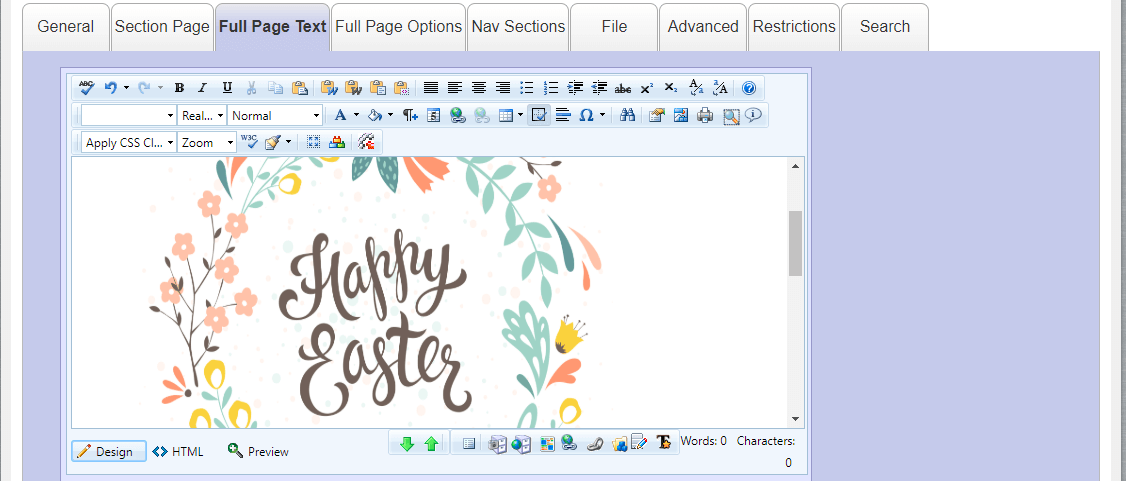
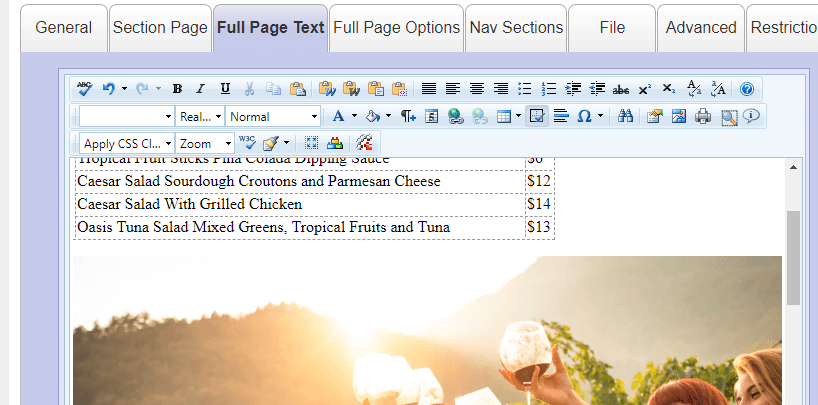
Click on the Insert that has the flyer you wish to add to the Digital Sign:

Make sure the flyer is shown in the "Full Page Text" tab of the insert:
Image Dimensions
- Digital Sign Design Option 4 Flyer = 1290px x 1340px
- Digital Sign Design Option 5 = 1290px x 1900px
- Digital Sign Design Options 6, 7, 8 or 11 = 2424px x 1900px
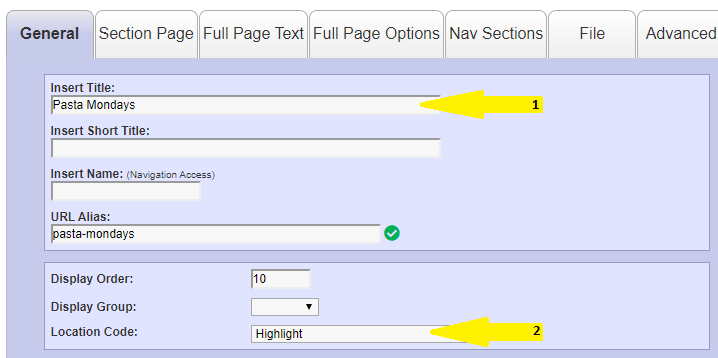
On the "General" Tab, make sure "Featured Highlight" is selected from the "Location Code" dropdown:

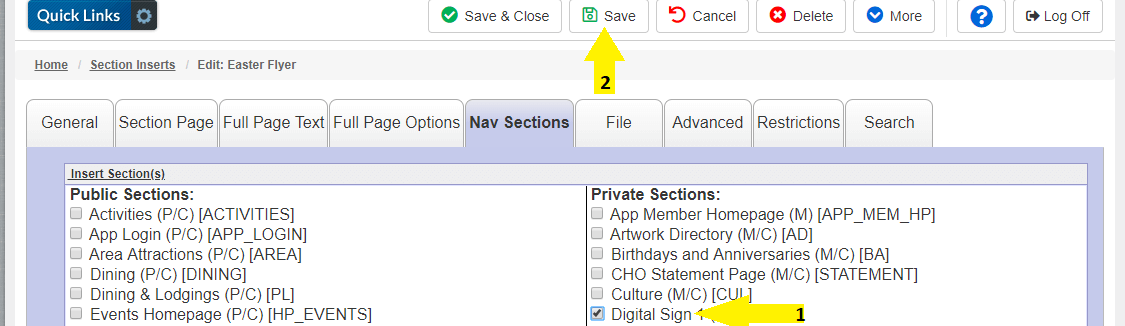
On the "Nav Sections" Tab, check the box for the "Digital Sign" and click save.
Your Flyer will now appear in the Flyers area on your Digital Sign. There is no additional text available beyond the fields mentioned above.
Highlights
Applicable for Option 2, Option 3, Option 6 and Option 7. There is no maximum, however, MembersFirst recommends no more than five. The rotating speed can be customized. See the Digital Sign Display/Configuration Options section for instructions.
Navigate to "Inserts Maintenance"
by typing 'inserts' in the "Find Application" search bar under the "Applications" area of the Admin Home Screen and then clicking the "Inserts Maintenance" link that appears in the left:
Adding an Existing Highlight to the Digital Sign
If you need to create a new insert highlight, follow these steps (Step-By-Step & Video) or learn more about Insert Location Codes in this video.
Click on the Insert that has the highlight you wish to add to the Digital Sign:
On the "General" Tab:
- Title (Insert Title): The title of the featured highlight
- Select "Highlight" from the "Location Code" dropdown
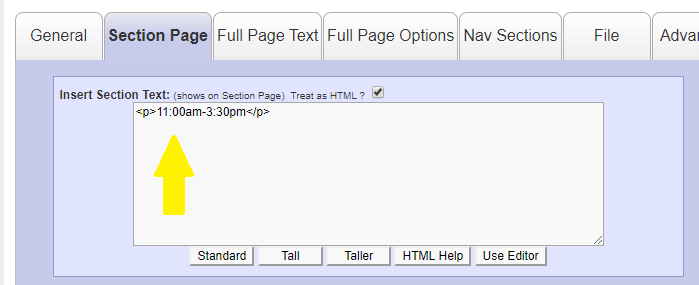
On the "Section Page" Tab:
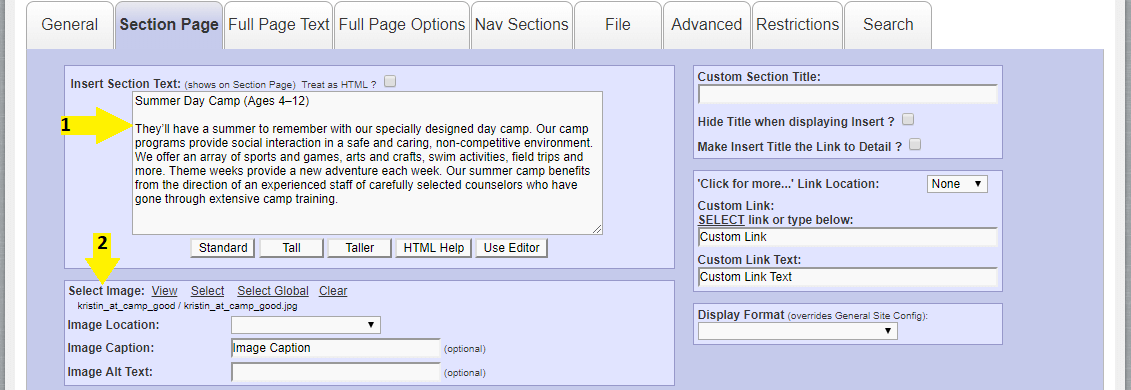
- Teaser Text (Insert Section Text): The text that shows under the image area of the featured highlight. 1-2 Sentences recommended. The sign will display the first 3 lines of text followed by "..." for any overflow text that does not fit within the display.
-
Image (Select Image): Click Select to pick an image from the club's website. Click Select Global to pick an
image from the MembersFirst global image library.
- Image Dimensions =1344px x 788px
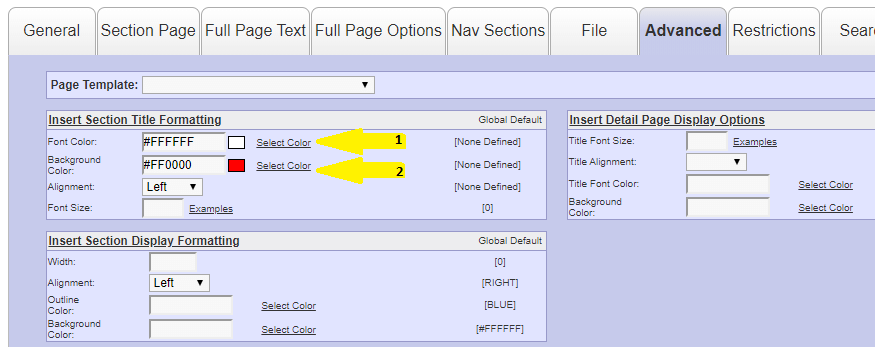
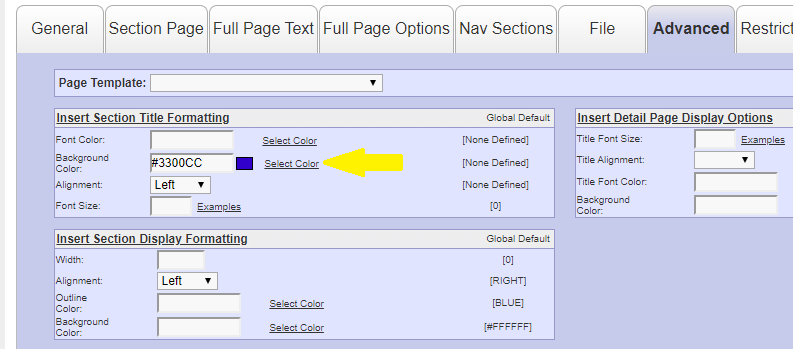
(Optional) If you would like to customize either the background color or the font color of the text displayed under the highlight image, on the "Advanced" Tab enter the desired colors for the "Font Color" and/or "Background Color" fields.
On the "Nav Sections" Tab, check the box for the "Digital Sign" and click save.
Your Highlight will now appear in the Highlight area on your Digital Sign. There is no additional text available beyond the fields mentioned above.
Highlights (Menus)
Applicable for Digital Sign Design Option 9
Navigate to "Inserts Maintenance"
by typing 'inserts' in the "Find Application" search bar under the "Applications" area of the Admin Home Screen and then clicking the "Inserts Maintenance" link that appears in the left:
Adding an Existing Highlight to the Digital Sign
If you need to create a new insert highlight, follow these steps (Step-By-Step & Video) or learn more about Insert Location Codes in this video.
Click on the Insert that has the highlight you wish to add to the Digital Sign:
On the "General" Tab:
- Title (Insert Title): The title of the Menu Block
- Select "Highlight" from the "Location Code" dropdown
On the "Section Page" Tab:
- Teaser Text (Insert Section Text): The text that shows centered under the title bar of the menu.
On the Full Page Text Tab include the menu details and/or image you want to display for that menu block:
- Image Dimensions:
Max Width = 1180px;
Max Height = 1900px (If no other text is used for that menu block)
(Optional) If you would like to customize the background color of the menu title bar, on the "Advanced" Tab enter the desired colors for the "Background Color" field.
On the "Nav Sections" Tab, check the box for the "Digital Sign" and click save.
Your Highlight will now appear in the Menu area on your Digital Sign. There is no additional text available beyond the fields mentioned above.
Instagram Feed
Applicable for Digital Sign Design Option 11 and Option 12
MembersFirst will configure a SnapWidget plugin
and provide you with a link to authorize the plugin's use to pull your Instagram photos into the Digital Sign.
First, login to your business Instagram Account. Second, click on the link provided by your Project Manager and
follow the steps to authorize the widget. Finally, email your Project Manager notifying them you have authorized
the widget and they will connect the SnapWidget with your Digital Sign to pull in your photos.
Photo Gallery
Applicable for Digital Sign Design Option 1, Option 2, Option 7 and Option 8
There is no maximum, however MembersFirst recommends 10-15. The rotating speed can be customized. See the Digital Sign Display/Configuration Options section for instructions.
Image Dimensions with Announcements Active = 676px x 536px
Image Dimensions without Announcements Active = 676px x 626px
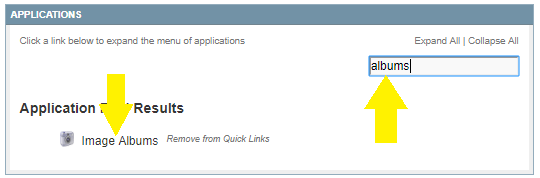
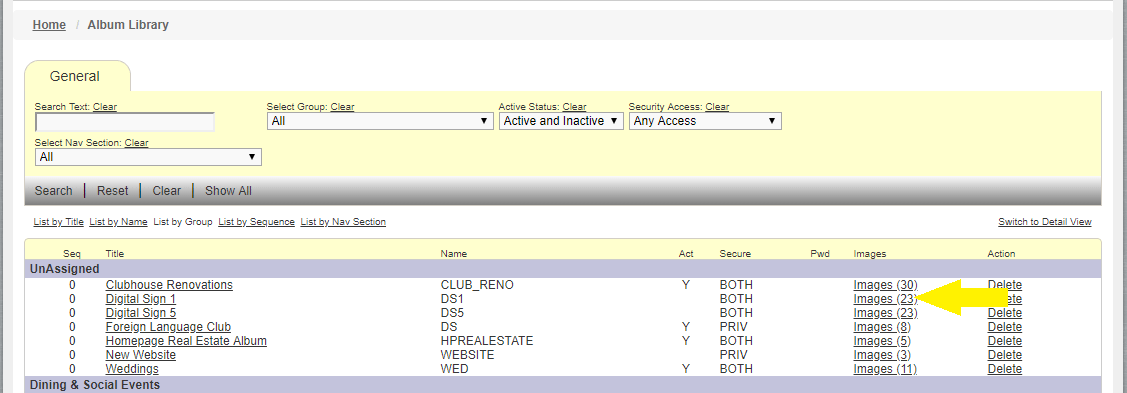
Navigate to "Image Albums"
by typing 'albums' in the "Find Application" search bar under the "Applications" area of the Admin Home Screen and then clicking the "Image Albums" link that appears in the left:
Managing Images in the Digital Sign Photo Gallery
Click the "Images (##)" link next to the Image Album on your Digital Sign. NOTE: The number displayed in parentheses is the number of images that exist in that album.
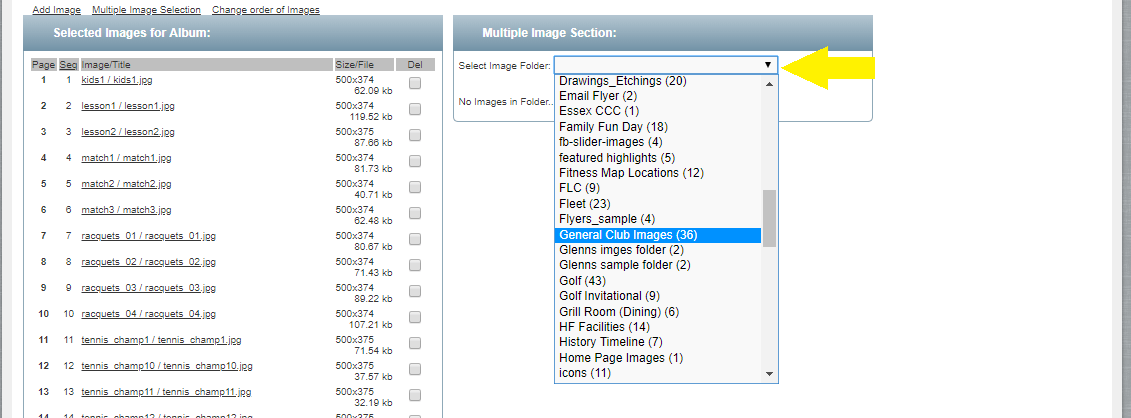
Adding New Images
- Upload the image(s) to the Image Library of your website (Instructions)
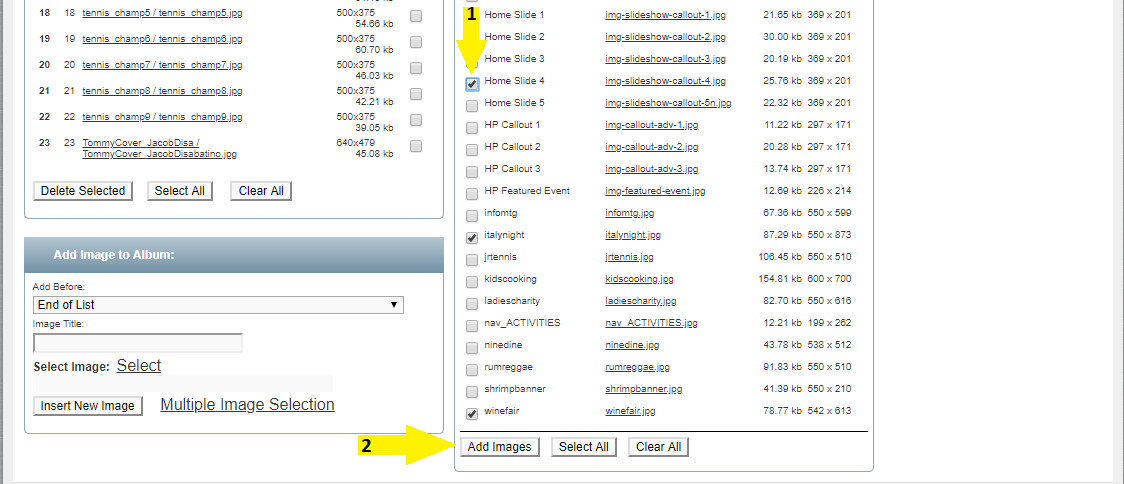
- Select the folder that holds the images you wish to add to the digital sign album:
- Check the boxes next to each image you wish to add to the album and click "Add Images":
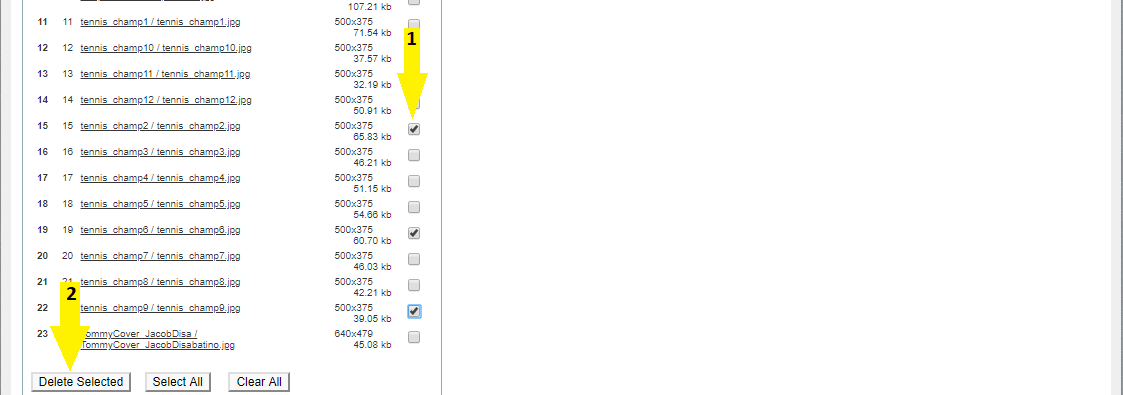
Deleting Images:
- Check the box under the "Del" column next to each image you want to remove from the image album on the Digital
Sign, then click "Delete Selected" Button:
Reordering the Existing Images:
- Click the "Change order of Images" text link above the list of images:
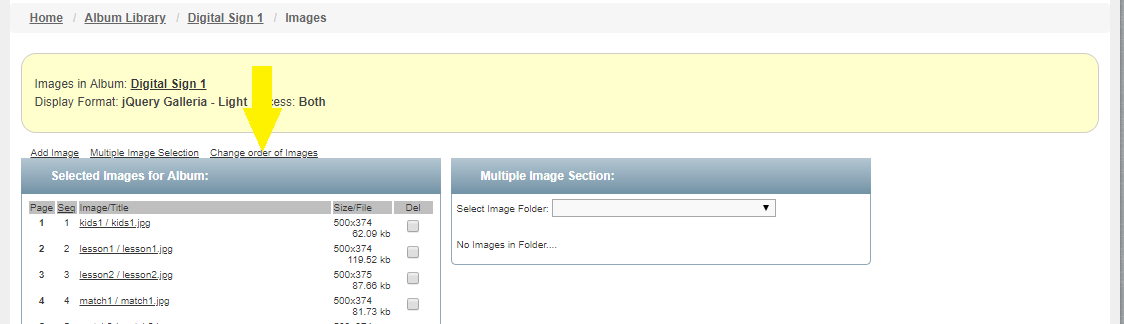
- Select the image you wish to move, then click the "Up or "Down" arrow to change its location in the list.
Repeat for any image you need to move until the desired order is reached. Click Save:
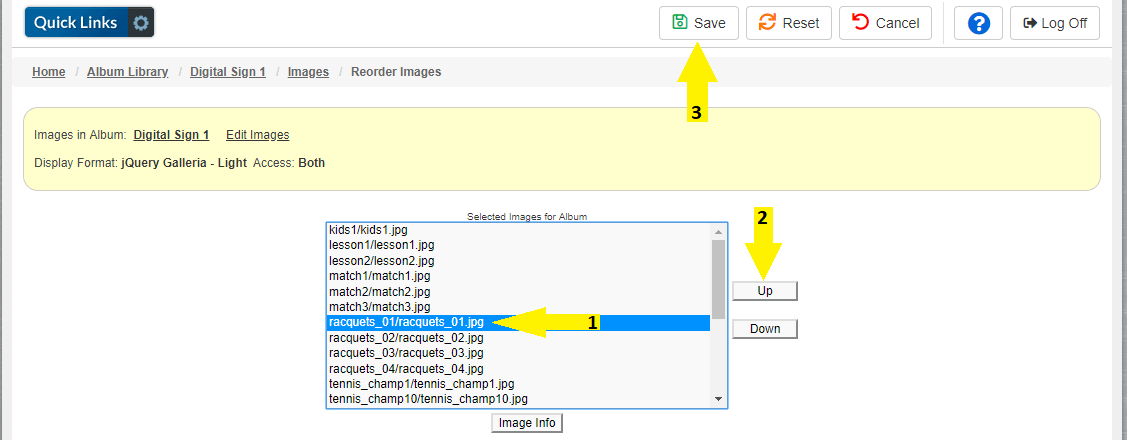
Your Image Album will now be updated. There is no caption text available within the display.